Not sure why toad-in-the-hole is called toad-in-the-hole. Perhaps it used to be made with real toads – I know the Tudors used to eat all sorts. Although, I guess if you were to consider eating a toad, serving one up in a giant Yorkshire pudding wouldn’t be a bad serving suggestion – especially if you dipped it in mustard.
However, my instincts (and Wikipedia) have informed me that it is much more likely to refer to ‘toads waiting for their prey in their burrows, making their heads visible in the earth, just like the sausages peep through the batter’… How disappointing – although, I did discover that toad-in-the-hole used to have the catchy name of ‘meat boiled in a crust’.
Anyway, rest assured that my recipe for toad-in-the-hole is surprisingly easy, delicious and free from amphibians. What more could you want?
Veggie toad-in-the-hole Serves 2 / Hands on time 20 mins / Total time 40 mins /V You’ll need: 20cm oven proof dish and an electric whisk
2 tsp rapeseed oil
6 chilled vegetarian sausages, I use Cauldron
3 fresh thyme or rosemary sprigs
75g plain flour
1 egg
100ml semi skimmed milk
Pinch of ground nutmeg To serve
Wholegrain mustard, gravy and tender-stem broccoli
Method
1. Preheat an oven to 220°C/200°C fan/ 428°F/gas mark 7. Grease a small oven-proof dish (roughly 20cm) with oil and add the 6 chilled vegetarian sausages, along with 2 tsp of rapeseed oil. Shake the sausages until they’ll evenly coated in the oil before adding 3 sprigs of thyme or rosemary. Cook the sausages in the oven, on the middle shelf for 15 mins.
2. Meanwhile, make the batter by measuring out the flour in a medium sized bowl. Add a good crack of salt and pepper, along with a pinch of nutmeg and give it a stir. Make a well in the flour and crack the egg into it. Using a hand whisk, combine the egg with the flour and slowly incorporate the milk until you have a thick but smooth batter. Switch to an electric whisk and mix for a couple of minutes. Leave the batter to rest while the sausages cook.
3. Carefully remove the sausages from the oven and discard the herbs, leaving any detached leaves. Pour the batter slowly into a corner of the dish and allow it to spread out evenly between the sausages.
4. Return the dish to the oven and bake on the top shelf for 15-18 mins, or until the batter has puffed up and is a lovely golden colour. Spoon out onto plates and serve with mashed potato, gravy and your choice cooked vegetables.
If you’ve had a go at making any of my recipes, I’d love to hear from you. Follow me now @corrieheale and tag your recipe pictures using #corriesrabbitfood.
I don’t know why I do it to myself. I just spent another Sunday attempting to make Thai green curry only to fail miserably. Again! I never learn. Firstly, the paste I made was so hot that even Jamie – who sprinkles chilli on his cornflakes – had to spit it out. Secondly, coconut cream is not the same as coconut milk – the box I bought was a separated grainy mess. Thirdly, swapping tofu for jackfruit made for a weird and sloppy texture, not to mention the fact that jackfruit tastes like, well, a fruit. Jamie didn’t seem to mind, though, and happily gobbled it up while I sulkily tucked into a packet of crisps.
On that note, here’s something I made earlier that actually worked. Roasted harissa carrot and lentil salad on a bed of homemade labneh (strained Greek yoghurt). If you can’t be bothered to make your own labneh (I don’t blame you), simply substitute for full-fat Greek yoghurt.
Harissa carrot & lentil salad Serves 2 / Hands on time 35 mins / Total time 45 mins /V Gf For the carrots 250g whole carrots, trimmed and peeled (I use organic bunched carrots)
1 tbs rapeseed oil
1 tbs harissa
2 tsp maple syrup
2 garlic cloves, crushed
½ tsp ground cumin For the lentils 1 tsp rapeseed oil Small red onion, peeled and sliced
1 tsp harissa
250g ready to eat puy lentils
Juice and zest of a lemon 1 garlic clove, crushed To serve 4 tbs full fat Greek yogurt or Labneh Handful fresh dill, chopped
50g soft vegetarian goats cheese (optional)
Method
1. Preheat an oven to 200°C/180°C fan/ 400F/gas mark 6. Trim and peel the carrots and place in a large roasting tin.
2. To make the dressing combine the rapeseed oil, harissa, maple syrup, garlic, ground cumin together in a small bowl with a crack of salt and pepper. Pour over the carrots and mix well until they are well coated. Roast in the oven for 30 minutes before giving them a good shake and continue to cook for a further 10 minutes.
3. Meanwhile sweat the onions in the oil in a large pot or frying pan over a medium heat. Once hot, add a dash of water to help the onions steam before adding the harissa. Stir and cook for a few minutes before adding the lentils along with the zest and juice of a lemon. Season well with salt and pepper and warm through. Once hot, take off the heat and stir in the crushed garlic. Cover with a lid and put to one side.
4. To serve, make a bed of yogurt or labneh in the middle of each plate and spoon over the warm lentils. Top with the carrots, a sprinkling of chopped dill and scatter with soft goats cheese.
Harissa carrot & lentil salad
If you’ve had a go at making any of my recipes, I’d love to hear from you. Follow me now @corrieheale and tag your recipe pictures using #corriesrabbitfood.
Essentially, a quesadilla is a Mexican cheese toastie – and seriously, what’s not to like about that?! There’s also no toastie machine/fancy single- contact grill involved, you can simply squidge these babies into your frying pan and fill them with all sorts of magical fillings. In fact, it reminded me of the Branston pickle and cheese toasties my mum used to make me. I remember it like it was yesterday, that first glorious bite that would send a molten cheesy Branston pickle lava to run down my chin, burning my face and the inside of my mouth. Good times.
Anyhoo, until I come up with a safe alternative to the Branston pickle toastie, let’s squash some black beans together with some cheese and have a fiesta. Quesadillas are easy to make and a great way to get rid of leftovers, because you can fill them with pretty much anything, just as long as you have some kind of cheese to bind it all together. I’ve said it once and I’ll say it again (a bit more sincerely this time) ‘good times’.
Black bean quesadillas
Makes 2 quesadillas (serves 2) / Hands on time 30 mins / Total time 35 mins /V ❄
1 tsp rapeseed oil
1 small white onion, peeled and thinly sliced
½ tsp ground cumin
1 tsp smoked paprika
Pinch of chilli flakes
1 corn on the cob, kernels removed
1 can black beans, drained and rinsed
1 lime
Handful of fresh coriander chopped
150g grated vegetarian cheddar (75g per quesadilla)
4 large wholemeal tortillas
To serve
2 spring onions, chopped
Avocado, stoned and scooped out
Method 1. In a large frying pan or casserole dish, sweat the sliced onions in the rapeseed oil with a good pinch of salt until softened (add a dash of water if the onions are catching to help them steam).
2. Once the onions are soft, add the smoked paprika, cumin and chilli flakes and continue to cook for a few minutes, stirring continually (if the spices start to stick to the bottom, add a dash of water to loosen them up). Meanwhile, carefully run a sharp knife down the sides of the corn on the cob to remove the kernels and add them to the pan along with the black beans and the juice of half a lime. Give it all a good stir and season with salt and pepper to taste. Cut the remaining lime into wedges and put to one side. Preheat an oven to 140°C/120°C fan/ 275°F/gas mark 1 and place 1 large oven-proof plate inside. 3. Cook the bean mixture for a further 5 mins on a medium to high heat before adding a handful of chopped coriander. Take off the heat, cover with a lid and put to one side.
TIP:Once cooled the filling can be frozen. I usually only make one quesadilla and freeze the other half of the bean mixture for another day. To freeze, fully cool before spooning into an airtight container and freezing for up to 3 months.
4. Grate the cheese (75g per quesadilla) and put to one side. Put a large non-stick frying pan on a medium to high heat and place a tortilla in the centre. Top with half the bean mixture and spread it out evenly. Sprinkle with half the cheddar and top with another tortilla. Press down on the quesadilla with a spatular as it’s cooking to make sure it is as flat as possible for 3-5 mins. To flip the quesadilla over, carefully place a large plate over the top of the pan face down and turn up-side-down. Put the frying pan back on the heat and slide the quesadilla back into the frying pan from the plate. Cook on the other side for around 5 more mins before transferring onto the warm plate in the oven. Repeat this process with the other quesadilla. 5. Once the second quesadilla is cooked, carefully remove the first quesadilla for the oven. Cut each quesadilla into eighths and serve immediately topped with sprinkled spring onions, scooped out avocado and the remaining lime wedges.
If you’ve had a go at making any of my recipes, I’d love to hear from you. Follow me now @corrieheale and tag your recipe pictures using #corriesrabbitfood.
V– Vegetarian ❄ – The bean mixture can be frozen for up to 3 months once cooled.
The last time I made a rosti was in a home economics lesson at school when I was nine. I wasn’t such a fan of cooking back then, partly due to this particular rosti-making experience. I added far too much oil and heat to my pan, resulting in my rosti spitting hot oil at me like an angry llama. The results were abysmal, my arms were flecked with burns and my rosti scorched on the outside and raw in the middle.
Well, not this time, you rosti bastard – this time I will win and you will lose and I will spit on your arms. How do you like that? Anyway, turns out that rostis are pretty easy to make, and I was clearly a young fool with a rubbish home economics teacher.
Smoked paprika rosti with asparagus Serves 1 / Hands on time 20 mins / Total time 25 mins / VGfDf❄ You’ll need: A small, non-stick, frying pan
1 tsp rapeseed oil
1 large baking potato (300g) peeled and grated
½ small red onion, peeled and grated
½ tsp smoked paprika
Pinch of chilli flakes
2 eggs – one yolk for the rosti and one egg for poaching
Handful of asparagus
Method 1. Combine the grated potato, red onion in a bowl and give it a good stir. Tip out onto a clean tea-towel before gathering up the corners and squeezing out the excess moisture. Once squeezed, discard the water and pop back in the bowl. Add the chilli flakes, smoked paprika, egg yolk and season well with salt and pepper before giving it a good stir. Put to one side.
2. Fill a small saucepan three-quarters of the way up with boiling water and put on a medium heat to simmer (bear in mind this saucepan needs to be big enough for the asparagus and a poached egg). Trim your asparagus to the appropriate size for your pan and crack the egg into a small teacup or ramekin. Put to one side.
3. In a small non-stick frying pan over a medium to high heat, add a teaspoon of rapeseed oil. Once hot, tip your rosti mixture into the centre and then using the back of a spoon, spread it out to the edges by pushing gently down on it. Leave to sizzle for around 5 minutes. To help flip the rosti without breaking it, I use a plate. Simply place a large plate over the frying pan and carefully turn the frying pan upside down, transferring the rosti to the plate. Return the frying pan to the heat before easily sliding the uncooked side of the rosti into the frying pan from the plate.
4. Cook the other side of the rosti for around 5 more minutes whilst you boil the asparagus and cook the egg. In the simmering water, slowly tip your egg out from a teacup or ramekin. Give it few seconds to settle before carefully adding the asparagus to cook next to it for around 2-3 minutes, before removing carefully with a slotted spoon.
5. Slide your rosti onto a plate and top with the boiled asparagus and soft poached egg. Season with salt and pepper and devour.
Smoked paprika rosti with asparagus
If you’ve had a go at making any of my recipes, I’d love to hear from you. Follow me now @corrieheale and tag your recipe pictures using #corriesrabbitfood.
V– VegetarianGf– Gluten freeDf– Dairy free ❄– Once cooked and cooled, the rosti is suitable for home freezing for up to 3 months.
I woke up this morning and ordered a McDonald’s from my hungover bed to be delivered to my door. What a glorious time to be alive. Two hash browns and an egg McMuffin later, I was still hungry, so dragged myself out of bed and into my kitchen to make a big vat of vegetable korma – bit random, but that’s what I fancied, and I couldn’t afford another Uber Eats.
Light, fragrant and made with yogurt, this healthier korma makes the perfect Saturday night fake-away or a Sunday morning hangover cure. Serve with rice and, if you’re feeling frisky, a garlic and coriander naan.
Healthy sweet potato & chickpea korma Serves 2 generously / Hands on time 40 mins / Total time 1 hr 10 mins /V❄ You’ll need: A stick blender or a food processor. Pestle and mortar
1 tsp rapeseed oil
2 regular or 1 large white onion, roughly chopped
4 large garlic cloves, sliced
Knob of ginger, grated
½ tsp sea salt flakes
8 cardamon pods, shelled and crushed
1 tsp ground cumin
1 tsp ground coriander
1 tsp ground turmeric
Pinch of chilli flakes 2 tsp mango chutney
1 tbs plain flour
300ml vegetable stock (I use 1 Knorr stock pot)
250g Greek yogurt
1 sweet potato (around 350g), peeled and cubed
1 can chickpeas, rinsed and drained
Handful frozen peas
Handful fresh coriander, chopped
Boiled brown basmati rice to serve (optional)
Method
1. In a large casserole dish with a lid, sweat the chopped onions, garlic and ginger together in the oil. Cover with a lid and cook on a medium to low heat for 10 minutes, stirring occasionally. Meanwhile, bash the cardamon pods in a pestle and mortar, spilling out the seeds. Discard the shells and grind to a powder.
2. Once the onions are soft, add the cardamon, cumin, coriander, chilli flakes, salt, turmeric and mango chutney. Add a dash of water, give it a good stir and cook for a further 5 mins.
3. Add the flour and cook for 2 minutes before incorporating the stock bit by bit. Bring to the boil and reduce to a simmer for 10 mins. Take off the heat and add the yogurt before bleeding with a hand blender or food processor until you have a smooth curry sauce.
4. Return the pot to the heat and add the sweet potato chunks. Bring to the boil and then reduce to a simmer. Cover and cook for 20 mins, stirring occasionally.
5. Add the drained chickpeas, stir and cook uncovered for 5 more minutes before finally adding the frozen peas. Cook for 2 more minutes before spooning into bowls and topping with chopped coriander. Serve with brown basmati rice.
Sweet potato & chickpea korma final
If you’ve had a go at making any of my recipes, I’d love to hear from you. Follow me now @corrieheale and tag your recipe pictures using #corriesrabbitfood.
V– Vegetarian. ❄– Suitable for home freezing once cooled. Consume within 3 months.
As promised, I have returned from my gorgeous holiday in Puglia with more than just a few extra pounds and a sunburnt belly button – believe me, I’m as surprised as you are.
I come bearing gifts and the first one is this utterly delicious braised vegetable orecchiette. I discovered this dish on our last evening in Bari, in a pleasant little restaurant, next to a rather unpleasant fat Australian who moaned about her pasta being ‘too hard’. Philistine.
Anyway, it turned out that most of the vegetarian pasta dishes I had my eye on were unavailable, due to the ingredients being out of season. Eating seasonally is obviously a big part of Italian culture which is nice, but unfortunately for me, this meant that I was left with the rather dubiously named ‘vegetable pasta’. I didn’t want to show my disappointment, so I simply smiled and willed it to be more than just a bowl of vegetables and pasta.
It arrived and it was just a bowl of vegetables and pasta – but it was one of the nicest bowls of vegetables and pasta I had ever eaten. Local orecchiette floating in a salty vegetable broth peppered with seasonal vegetables. Bellissimo!
Braised vegetable orecchiette
Serves 2 / Hands on time 30mins/ Total time 30mins
25g unsalted butter
300g baby mixed vegetables (I used 1 small courgette, 2 chestnut mushrooms, 3 baby leeks, 4 baby carrots, 2 baby parsnips. Although you can use whatever vegetables you like)
100g dried orecchiette* or pasta of your choice
500ml vegetable stock (I used 1 Knorr stock pot)
2 bay leaves
1. Chop your vegetables to your desired size – personally I think the bigger the better, especially when braising. In a large heavy bottomed pot with a lid, add the butter and spread the vegetables out as evenly as you can. Cover with roughly 500ml of vegetable stock (you want to make sure the vegetables are only just covered). Season with salt and pepper and add the bay leaves.
2. Bring to the boil on a high heat before turning back down low and covering with a lid. Let the vegetables simmer for 10-12 minutes.
3. Meanwhile, in a separate pan, boil your pasta in slightly salted water and grate the parmesan.
4. Remove the lid off the vegetables, stir in a tsp of dried parsley and turn the heat back up and vigorous boil for another 3 minutes. Meanwhile drain your pasta and put to one side.
5. By now your vegetables will be lovely and soft. Take them off the heat and discard the bay leaves. Pour the pasta straight into the pot and stir through carefully – you don’t want to break the vegetables up too much.
6. Divide into bowls and serve with a drizzle of good quality extra virgin olive oil and a sprinkling of parmesan.
Braised vegetable orecchiette
If you’ve had a go at making any of my recipes, I’d love to hear from you. Follow me now @corrieheale and tag your recipe pictures using #corriesrabbitfood.
*Orecchiette is a pasta that’s popular in Southern Italy and literally translates to ‘little ears’. *Parmesan (Parmigiano Reggiani) is always made using animal rennet, therefore it is not vegetarian. Substitute for Italian hard cheese if applicable.
There is a fine line between those of us who can wear denim hot pants and those of us who can’t. I’m sure you can guess which category I fall into.
So, there I was, bending over to tie up my shoelaces, when I catch sight of what looked like the back of a large rhino. No, there must be some mistake, that cannot be MY arse?! I bolt upright only to see the cellulite on my thighs dimple even harder. ARGH! I quickly bend back over and stare at myself upside down, then from all angles. Three mirrors?! Three f***ing mirrors!!!! No one needs see their arse from that many angles. But the blood has started rushing to my head, so I decide to stand up and face the music.
I’m wearing what can only be described as a giant adult nappy made of denim. It’s high-waisted, and so short you can see my bum cheeks. When did denim shorts become so short? With only two weeks to go until my holiday, I decided to whip off the hot pants and do what any self respecting thirty-something would do in this situation.
Angrily drink three gin and tonics in quick succession at the nearest Weatherspoon’s. So what if my hot pants days are numbered? I hear culottes are back in fashion – a rather snazzy combination of the skirt and a short… Yes, they are as awful as they sound.
Failing that, I could try and just eat a little healthier. So, instead of fully loading my nachos with mountains of refried beans, guacamole and sour cream, I created this rather tasty, lighter version. Swapping shop-bought salty tortillas chips with my homemade version was surprisingly easy and delicious. I’ve favoured fresh avocado slices over guacamole and low-fat yoghurt instead of sour cream. To be honest, it felt just as indulgent, and has given me a good chance of squeezing into my snazzy new culottes. Well, it’s got to be better than wearing a denim nappy, right?
Healthy-ish loaded nachos
Serves 2 or 4 as a starter / Hands on time 40 mins / Total time 40 mins / V🌶
1. Preheat the oven to 200°C/180°C fan/ 400°F/gas mark 6. Stack 4 tortillas on top of each other and cut them in half across the middle, then into quarters and then into eighths. Spread them out, onto 2 deep baking trays, trying to overlap them as little as possible.
2. Sprinkle with smoked paprika, season with salt and pepper and spray with oil (I bought an empty spray bottle and filled it with oil myself but don’t worry if you don’t have one, just drizzle with oil). Bake in the oven for 5 mins, before flipping them over and cooking for a further 5 mins. Remove and put to one side. Turn the oven off but turn the grill on a medium to high heat.
3. Sweat the red onion and the garlic in a little oil in a large pot. Add a bit of water to help the onions steam and to cook them faster. Once softened, add the cumin, smoked paprika, salt and pepper and cook for a further 2 mins. Add the drained black beans, the sweetcorn kernels*, a drop of water and give it a good stir. Season with salt and pepper and continue to cook for a further 5 minutes. *To remove the sweet corn kernels, simply stand the sweetcorn on it’s head and run a sharp knife carefully down the sides to remove them slowly (they tend to go everywhere so proceed with care).
4. Meanwhile, chop the spring onions, the tomatoes and grate the cheese ready for sprinkling.
5. Tip the tortilla chips into one baking tray and top with the cooked beans. Scatter with the tomatoes and spring onions and sprinkle with cheese.
6. Place under the grill for 3-5 minutes or until the cheese has melted. Meanwhile, roughly chop the coriander, slice the avocado and quarter the lime. Remove from the grill and top with the avocado, coriander, a good squeeze of lime. Serve scattered with jalapeños and with a side of yogurt.
If you’ve had a go at making any of my recipes, I’d love to hear from you. Follow me now @corrieheale and tag your recipe pictures using #corriesrabbitfood.
Talk about online food shopping gone wrong. How on earth did I manage to order 4 red peppers the size of my head (no exaggeration). I know I’m relatively knew to the world of online shopping, but who even knew these freaky fruits existed? I stood staring in disbelief at the 4 ‘giant’ peppers lying higgledy-piggledy on my kitchen counter, dwarfing everything in their wake. At first, I laughed, until I checked my order and realised they were £3.95 EACH! Fifiteen effing pounds! I could have ordered a Domino’s pizza for that price.
“I do understand you’re upset, Ms Heale. However, the product name does state that these are giant peppers,” said Ocado.
“Yes, but ‘giant’ to me is just ‘a bit bigger than average’,” I protested. “What you gave me was a monstrosity, a freak of nature! I mean, who even knew peppers came in that size? I want my money back.”
“I will be unable to refund you on this occasion.” “But on your website the picture doesn’t give any idea of scale. If you had photographed one of the peppers next to a small dog or held it up to someone’s face, then I would have realised!”
“I am sorry, we will not be able to offer a refund for these items, as there were no quality or damage issues.”
“Is it too late to say that they’re damaged?”
“Yes.”
“Damn it!” So, I was stuck with them and, to make matters worse, I couldn’t even fit them in my fridge. Time was of the essence, these oafish fruits were not going to stay ripe for much longer, so I roasted the bastards and made this rather delicious puttanesca. Take that, Ocado!
Red pepper puttanesca Serves 4 / Hands on time 40 mins / Total time 40 mins / V ❄ You’ll need: A food processor or hand blender
320g spaghetti
80g vegetarian Italian hard cheese or *Parmesan, grated
Handful of fresh parsley, chopped
150g pitted black olives
6 tsp of capers Red pepper sauce
1 tsp olive oil
1 jar of roasted red peppers (drained weight 350g) or 6 red peppers (see roasting tip below)
¼ tsp smoked paprika
1 medium white onion, roughly chopped
¼ tsp salt
2 garlic cloves, roughly chopped
1 tbs vegetarian red wine (optional)
125ml vegetable stock, I use ½ a Knorr stock pot
2 tbs Greek yogurt
TIP: To roast your own peppers, simply cut each in half, remove the seeds and stork and place facedown on a lined roasting tray. Brush each pepper with rapeseed oil and season lightly with salt. Roast at 200°C/180°C fan/400F/gas mark 6 for 45 mins. Remove from the oven and allow to cool slightly before removing any overly charred bits of skin with a knife.
TIP: This recipe is easily halved for 2 people.
Method
1. Sweat the chopped onion and salt in a tsp of oil over a medium heat for about 10 mins with the lid on (add a dash of water if required to help the onions steam if needed). Once softened, add the garlic and the paprika and continue to cook for a further few minutes. 2. If using jarred peppers, drain and roughly chop them before adding to the onions. If using your own roasted peppers, simply add them as they are.
Add the wine and cook for a few minutes until the alcohol has cooked off, then add the stock. Simmer for 10 minutes.
3. Meanwhile, put the spaghetti in a large saucepan of salted boiling water and cook according to the packet instructions. Use this time to roughly chop the olives, capers, parsley and grate the cheese.
4. Once the sauce has thickened, take off the heat and add 2 tbs of boiling water along with 2 tbs of yogurt. Blend with a hand-blender until you have your desired consistency. Stir in the chopped olives and capers. Put to one side.
5. Once cooked, drain the pasta and give it a shake before pouring straight into the red pepper sauce. Mix well and divide into bowls. Top with a sprinkling of cheese, fresh parsley and a good drizzle of extra virgin olive oil.
Red pepper puttanesca
If you’ve had a go at making any of my recipes, I’d love to hear from you. Follow me now @corrieheale and tag your recipe pictures using #corriesrabbitfood.
❄– The red pepper sauce is suitable for home freezing once cooled. Freeze for up to 3 months.
* Parmesan (Parmigiano Reggiani) is always made using animal rennet, therefore it is not vegetarian. Substitute for Italian hard cheese if applicable.
So, unless you’ve been living under a rock this past week (in which case, you would probably be dead), you may have noticed it’s been snowing a bit. Okay, so it’s been snowing a lot, but I still don’t think it warranted the levels of hysteria that perhaps the apocalypse would have caused. Yes, I’m aware the ‘Beast from the East’ has been wafting Baltic conditions over our little island, but can we all just put on a jumper and shut up about it? Also, if I see one more Instagram of someone’s snowy back garden, I’m going to throw my phone on the floor and stamp on it.
Anyway, now that the snow has melted, we can all get on with our lives. For me, that was walking to work this morning and passing a handmade sign that read ‘please stop shitting outside our home’… Normality has officially been resumed.
Anyhoo, I love this pasta dish, it’s actually one of the first recipes I ever blogged about, but over the years it has evolved and simplified, so I thought I’d share the updated recipe with you. It’s super-easy, cheap, and takes no time at all. Bon appetit.
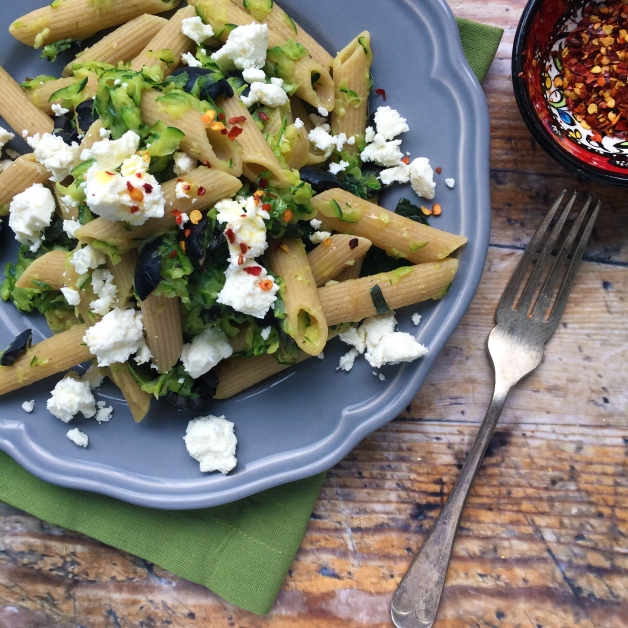
Courgette penne with feta & mint Serves 2 / Hands on time 25 mins / Total time 25 mins /V
1 tsp olive oil
2 garlic cloves, finely chopped
2 courgettes, soft middles removed and grated
Pinch of chilli flakes (optional)
Handful of fresh mint
2 handfuls of black olives
100g vegetarian feta
150g wholemeal penne
Drizzle Pomora extra virgin olive oil to serve
Method
1. Start by boiling a kettle of water and weighing out your pasta. Pop the pasta into a saucepan and season well with salt (don’t cook your pasta just yet).
2. Chop the courgettes into three large chunks and grate the sides until you reach the soft core – the middle of the courgettes is too wet to use so only use the outer layer and discard the middle. Peel and finely chop the garlic and add to a large cooking pot over a medium heat. Cook the garlic for a couple of minutes before adding the courgette. Stir well, up the heat, add a pinch of chilli flakes and season well with salt and pepper. Continue to cook stirring occasionally.
3. Add the boiled water from the kettle to the pasta and cook according to packet instructions. Now is a good time to roughly chop the mint leaves, black olives and crumble the feta, put to one side.
4. Once the pasta is cooked, drain well and add straight into the courgette mixture. Give it a good stir until combined. Incorporate the black olives and fresh mint. Divide into bowls and top with the crumbled feta and a drizzle of extra virgin olive oil. Lovely jubbly.
Courgette penne with feta & mint
If you’ve had a go at making any of my recipes, I’d love to hear from you. Follow me now @corrieheale and tag your recipe pictures using #corriesrabbitfood.
It’s the 8th of January and surprisingly my 2018 health goals haven’t gone out the window just yet. Me and my new Fitbit are getting on famously, although I decided not to tell it about the giant pizza and two bottles of wine I guzzled last Friday. What? Every couple have their secrets and besides, I’m of the belief that if you don’t remember doing something, then it probably didn’t happen — even if you found the evidence in the morning and decided to polish off what you didn’t eat the night before.
So let’s kick off another week with this rather marvellous traybake. Oh I do love this recipe, mainly because it’s cheap and takes minimal effort (my kind of food). So sit back, relax and let the oven do all the work.
Sweet potato & butterbean traybake Serves 2 / Hands on time 5 mins / Total time 55 mins / V GfDf
1 large sweet potato, chopped into chunks
1 can butterbeans, rinsed and drained
1 red pepper, deseeded and cut into chunks
175ml vegetable stock, I use ½ a Knorr stock pot
½ tsp smoked paprika
2 eggs
Handful of fresh coriander, roughly chopped
2 tsp Pomora extra virgin olive oil
Greek yogurt to serve (optional)
Pickled chillies or jarred jalapeños to serve (optional)
TIP: You can use any canned beans you like in this recipe and almost any veg, just bare in mind that cooking times may vary.
Method
1. Preheat your oven to 200°C/180°C fan/400°F/gas mark 6. Cut your sweet potato into chunks along with the red pepper. Rinse and drain the butterbeans before pouring them into a large deep baking tray or casserole dish. Add the sweet potato and the peppers before pouring over 175ml of vegetable stock. Season well with salt and pepper and sprinkle over the smoked paprika. Give it a good stir.
2. Bake for 45 mins or until the sweet potato is soft. Remove from the oven and using a spoon, create space for 2 eggs. Crack the eggs into each space before baking for a further 6-8 mins – depending on how set you like your eggs.
3. Remove from the oven, sprinkle with fresh coriander and scoop into bowls. Serve with yogurt, a drizzle of extra virgin olive oil and your choice of chillies (optional).
Sweet Potato & Butterbean Traybake
If you’ve had a go at making any of my recipes, I’d love to hear from you. Follow me now @corrieheale and tag your recipe pictures using #corriesrabbitfood.


 2. If using jarred peppers, drain and roughly chop them before adding to the onions. If using your own roasted peppers, simply add them as they are.