Leek mac and cheese

Leek mac & cheese
Leek mac & cheese

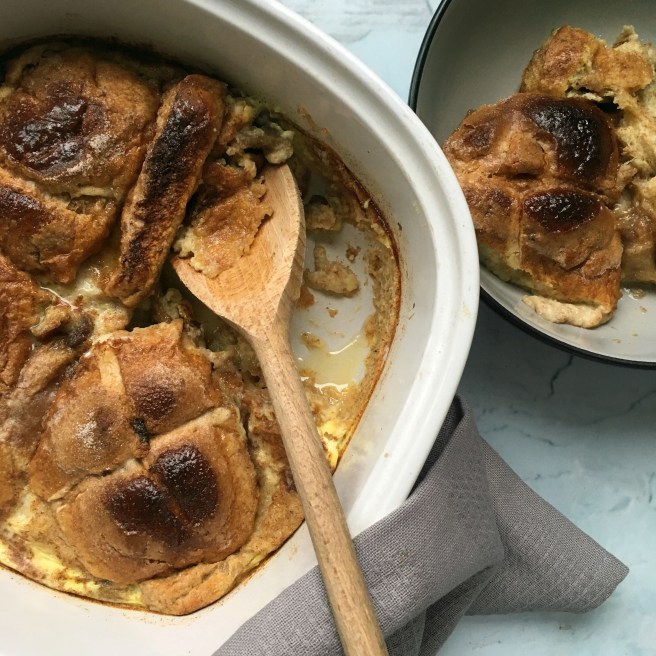
This was actually suppose to be a jalapeño mac and cheese, but the ones I had in my fridge had gone all manky, and there appeared to be a jalapeño shortage in north London. I was a bit peeved about this, until I spoke to my friend, Abbie, who informed me that the best mac and cheese she had ever eaten was Delia’s leek and bacon. I pondered for a moment – maybe I didn’t need jalapeños. I certainly didn’t need bacon. Maybe I just needed leeks. Leeks and cheese make excellent bed fellows, so why not throw them together to make hot, passionate cheesy love?
Gosh, where did that come from? Anyway, enjoy – I certainly did.


Leek mac and cheese
Serves 4-6 / Hands on time 30 mins / Total time 50 mins / V
You’ll need: Deep casserole dish and a food processor (if making breadcrumbs)
250g macaroni
2 tbs unsalted butter
2 garlic cloves, crushed
1 tsp Dijon mustard
1 large leek, roughly chopped
3 tbs plain flour
250ml semi-skimmed milk
250g vegetarian cheeses (you can use a mixture of any cheeses you like as long as it melts easily. I used a mix of Emmental and cheddar)
Breadcrumbs 
50g of stale bread
1 garlic clove
1 knob of butter
30g vegetarian Italian hard cheese or *Parmesan, grated
To serve
leaves and pickles

Method
1. Preheat your oven to 200°C/180°fan/400°F/gas mark 6. Cook your macaroni according the the packet instructions, drain and put to one side. Meanwhile, make your breadcrumbs by blitzing up 50g of stale bread in a food processor, put to one side. Add a knob of butter to a large frying pan along with a crushed garlic clove on a medium heat. Once melted add the breadcrumbs and fry until golden brown. Put to one side.
2. In a large saucepan add the butter, crushed garlic cloves and dijon mustard on a medium heat. Add the roughly chopped leek stir until well coated in the mix. Put the lid on and allow to sweat for 10 mins, keeping an eye on the mixture to make sure it doesn’t burn. Meanwhile, use this time to grate the cheese.
3. Once the leeks have softened, add the the flour, stir and continue to cook for a minute stirring continually. Add the milk bit by bit and incorporate into the leeks stirring well until smooth (as smooth as it can be with the leeks in it). Season well with salt and pepper and take off the heat.
4. Add the cheese a handful at a time and stir after each addition, until you have a thick, silky cheese sauce. Stir in the macaroni and pour into an oven proof dish. Sprinkle over the breadcrumbs, grate over the Italian hard cheese. Bake in the oven for 20 minutes. Once cooked, leave to stand for 5 minutes before serving with a simple salad and few pickles.
Leek mac & cheese
Leek mac & cheese

If you’ve had a go at making any of my recipes, I’d love to hear from you. Follow me now @corrieheale and tag your recipe pictures using #corriesrabbitfood.


V – Vegetarian
*Parmesan (Parmigiano Reggiani) is always made using animal rennet, therefore it is not vegetarian. Substitute for Italian hard cheese if applicable.


Hot cross bun pudding

Hot cross bun pudding

Got a few sad, stale hot cross buns left over from Easter? Well, don’t even think about throwing them away! Have a cheeky, post-Easter treat and whip up a hot-cross-bun bread and butter pudding – y’know, just in case you haven’t eaten enough over the past few days… Actually, come to think of it, if you have some leftover chocolate, throw some of that in, too. The more the merrier (damn, I wish I had thought of that). Happy belated Easter, everyone!


Hot cross bun pudding
Serves 4 / Hands on time 10 mins / Total time 50 mins / V
4 hot cross buns
Spreadable butter
1 tsp cinnamon
80g caster sugar
2 eggs
350ml semi skimmed milk


Method
1. Preheat your oven to 200°C/180°C fan/400°F/gas mark 6. Slice the hot cross buns in half and spread each slice with butter. Weigh out the sugar and add a teaspoon of cinnamon, stir well and put to one side. Layer the hot cross bun slices in an oven proof dish and sprinkle over the sugar making sure you get plenty in-between the layers (leave a tablespoon of cinnamon sugar to one side).
2. Whisk the eggs and milk together in a separate bowl until combined, then pour over the buns. Sprinkle with the left over sugar and leave to soak for 10 minutes. Bake in the oven for 25-30 minutes or until golden brown. Divide into bowls and serve immediately for a comforting treat.

Hot cross bun pudding

If you’ve had a go at making my hot cross bun pudding or any of my other recipes, I’d love to hear about it @corrieheale corrie.heale@gmail.com


V– Vegetarian


Roasted vegetable hummus bowl

Roasted vegetable hummus bowls

Just in case you didn’t know, drinking numerous Smirnoff Ices through a straw containing shots of sambuca is not a good idea past the age of 30. This goes without saying, but if you’re as a dumb as me and choose to ignore this advice, then a two-day hangover is winging it’s way to you. Brace yourself, it’s gonna hurt.

Why do I do this to myself? I can hardly manage a large glass of wine these days, let alone alco-pops followed by shots. I mean, who do I think I am, Keith Richards? No, just give me a nice cup of tea, a sit down, and a lovely bowl of hummus topped with roasted vegetables, please. It won’t cure your hangover (only Lucozade and salt-and-vinegar crisps can do that), but it’s darn good, and will have you feeling all nourished and smug – you can pretend you’re a Hemsley sister.

Roasted vegetable hummus bowl
Serves 2 / Hands on time 30 mins / Total time 30 mins / V Vn Df
You’ll need: A hand blender or food processor
1 tsp rapeseed oil
3 sprigs of rosemary
1 aubergine, chopped into chunks
1 small red pepper, de-seeded and roughy chopped
1 red onion, peeled and roughly chopped
100g baby carrots
½ tsp smoked paprika
Pomora extra virgin olive oil
For the hummus
1 can of chickpeas, drained
1 garlic clove, crushed
1-3 tbs of water
1 ½ tbs tahini
½ lemon, juice
1 tbs extra virgin olive oil
To serve
2 wholemeal pita breads (optional)


TIP: This is a good way of using up the unwanted vegetables in the fridge so feel free to adapt the recipe to whatever you have.


Method
1. Start by pre-heating your oven to 200°C/fan 180°C/400°F/gas mark 6. In a large roasting tin, add the whole baby carrots, chopped aubergine, red pepper,  red onion and rosemary sprigs. Sprinkle the vegetables with smoked paprika, olive oil and a generous grind of salt and pepper and give it all a good stir. Once the veg is evenly coated in the oil and spices, roast in the oven for 20-25 minutes.
2. Meanwhile make your hummus by combining the chickpeas, crushed garlic, tahini, lemon and a good crack of salt and pepper in a bowl. Start by adding 1 tbs of water and then blitz until smooth with a hand blender – if the mixture is too firm add a dash more water until you get your desired thickness. Stir in a tablespoon of extra virgin olive oil and season to taste.
3. Spoon the hummus evenly into bowls and using the back of a tablespoon, create a rough bed for your roasted vegetables. Once the vegetables are nicely roasted, remove from the oven, discard the rosemary sprigs and spoon into the centre of your hummus. Drizzle with a generous glug of regular or Pomora rosemary infused extra virgin olive oil and serve with warm pita breads.

Roasted vegetable hummus bowls

If you’ve had a go at making any of my recipes, I’d love to hear from you. Follow me now @corrieheale and tag your recipe pictures using #corriesrabbitfood.


V– Vegetarian    Vn– Vegan    Df– Dairy free  


Frozen berry porridge with maple syrup

Maple berry porridge

I recently decided to try and become one of those people who gets up half an hour earlier for work, to do a spot of Pilates and eat a healthy and balanced breakfast. So far, I’ve struggled with the Pilates part and the getting-up-earlier part, but I have been making progress on the breakfast part – go me! Scoffing Pret croissants (plural) at my desk is now a thing of the past – I now opt for a bowl of granola with yoghurt, or scrambled eggs (not together, that would be horrible).
So, does this new, exciting weekday breakfast make me late for work? Yes, it does. Does eating it in under 60 seconds and then running for the bus give me indigestion? Of course! But I’m enjoying the variety. So, this week I thought I’d dip my toe into the world of porridge (not literally. Again, that would be horrible).
I’m not a massive porridge eater. I find it a bit sloppy, but I need something filling and hearty after all of this depressing snow. So, armed with frozen berries and maple syrup, I found this to be a cheap and cheerful way to start my day. Just need to remember to soak the pan next time – porridge can stick like cement. Enjoy!


Frozen berry porridge with maple syrup
Serves 1 / Hands on time 10 mins / Total time 10 mins
V Vn Df
2 small handfuls frozen berries
1 tbs maple syrup
1/3 of a mug of porridge oats
2/3 of a mug of oat milk
Greek or coconut yogurt to serve (optional)


Tip: Don’t wait to soak your pan, do it immediately or your porridge will turn to cement. 


Method
1. Put your frozen berries in a small saucepan with a tablespoon of maple syrup. Cook on a low heat with the lid on while you prepare your porridge.
2. Combine the porridge oats with the oat milk and a small pinch of salt. Cook on a medium heat in a saucepan stirring continually until the porridge is thick and creamy.
3. Serve immediately in a bowl topped with warm maple syrup berries and yogurt. Delicious.

Maple berry porridge

If you’ve had a go at making any of my recipes, I’d love to hear from you. Follow me now @corrieheale and tag your recipe pictures using #corriesrabbitfood.


V– Vegetarian    Vn– Vegan    Df– Dairy free.


Asparagus, goats cheese & lemon tart

Asparagus, goats cheese & lemon tart

Let’s say goodbye to this bitterly cold Game of Thrones weather and hello to spring.
“Hello spring!”‘
To celebrate, I’ve created this rather zingy lemon and goats cheese tart for you to roll up, stuff in your mouth and swallow whole like a goose… Or not, each to their own.


Asparagus, goats cheese & lemon tart
Serves 4 / Hands on time 10 mins / Total time 30 mins / V
320g ready rolled puff pastry, trimmed to fit a 32cm baking tray
100g vegetarian soft goats cheese
Juice and zest of half a lemon
15g vegetarian Italian hard cheese or Parmesan*, grated
2 tbs plain or Greek yogurt
230g bunch of asparagus
Pomora extra virgin lemon oil


Method
1. Preheat your oven to 200°C/fan 180°C/400°F/gas mark 6. Line a baking tray with baking paper and roll out the puff pastry. Trim the pastry to fit your baking tray and lie it on top of the baking paper directly on the tray. Using a sharp knife, lightly score a rectangle roughly 1 finger-width from the edge, then put to one side.
2. Using a fork, combine the soft goats cheese, yogurt, Italian hard cheese, lemon zest and lemon juice in a bowl until you have a thick but spreadable paste. Spoon out into the middle of your pastry. Using a butter knife evenely spread the mixture out to the scored edge being careful not to go over the line.
3. Arrange the asparagus on top of the goats cheese before seasoning with salt and pepper. Bake in the oven for 20 minutes until the edges of the tart turn golden brown.
4. Remove from the oven and leave to rest for five minutes before brushing the asparagus with lemon extra virgin olive oil. Serve warm with a mixed leaf salad.

Asparagus, goats cheese & lemon tart

If you’ve had a go at making any of my recipes, I’d love to hear from you. Follow me now @corrieheale and tag your recipe pictures using #corriesrabbitfood.


V – Vegetarian
* Parmesan (Parmigiano Reggiani) is always made using animal rennet, therefore it is not vegetarian. Substitute for Italian hard cheese if applicable.


Courgette penne with fresh mint & feta

Courgette penne with feta & mint

So, unless you’ve been living under a rock this past week (in which case, you would probably be dead), you may have noticed it’s been snowing a bit. Okay, so it’s been snowing a lot, but I still don’t think it warranted the levels of hysteria that perhaps the apocalypse would have caused. Yes, I’m aware the ‘Beast from the East’ has been wafting Baltic conditions over our little island, but can we all just put on a jumper and shut up about it? Also, if I see one more Instagram of someone’s snowy back garden, I’m going to throw my phone on the floor and stamp on it.
Anyway, now that the snow has melted, we can all get on with our lives. For me, that was walking to work this morning and passing a handmade sign that read ‘please stop shitting outside our home’… Normality has officially been resumed.
Anyhoo, I love this pasta dish, it’s actually one of the first recipes I ever blogged about, but over the years it has evolved and simplified, so I thought I’d share the updated recipe with you. It’s super-easy, cheap, and takes no time at all. Bon appetit.


Courgette penne with feta & mint
Serves 2 / Hands on time 25 mins / Total time 25 mins / V
1 tsp olive oil
2 garlic cloves, finely chopped
2 courgettes, soft middles removed and grated
Pinch of chilli flakes (optional)
Handful of fresh mint
2 handfuls of black olives
100g vegetarian feta
150g wholemeal penne
Drizzle Pomora extra virgin olive oil to serve


Method
1. Start by boiling a kettle of water and weighing out your pasta. Pop the pasta into a saucepan and season well with salt (don’t cook your pasta just yet).
2. Chop the courgettes into three large chunks and grate the sides until you reach the soft core – the middle of the courgettes is too wet to use so only use the outer layer and discard the middle. Peel and finely chop the garlic and add to a large cooking pot over a medium heat. Cook the garlic for a couple of minutes before adding the courgette. Stir well, up the heat, add a pinch of chilli flakes and season well with salt and pepper. Continue to cook stirring occasionally.
3. Add the boiled water from the kettle to the pasta and cook according to packet instructions. Now is a good time to roughly chop the mint leaves, black olives and crumble the feta, put to one side.
4. Once the pasta is cooked, drain well and add straight into the courgette mixture. Give it a good stir until combined. Incorporate the black olives and fresh mint. Divide into bowls and top with the crumbled feta and a drizzle of extra virgin olive oil. Lovely jubbly.

Courgette penne with feta & mint

If you’ve had a go at making any of my recipes, I’d love to hear from you. Follow me now @corrieheale and tag your recipe pictures using #corriesrabbitfood.


V– Vegetarian


Fried feta on toast with honey & thyme

Fried feta on toast with honey & thyme

Out of all the cheeses, I buy feta most regularly. Not just because I love it but because it’s so versatile. I crumble it on top of stews, stir it through pasta and toss it around in my salads but frying it? Not so much, until now.
However, this crumbly tangy cheese may be versatile but its shelf-life is its downfall. Much like the The Little Mermaid, this cheese has just three days (after opening) before it turns bad and loses Prince Eric’s love forever. Well, what I mean is, it starts to smell and taste like a tramps foot and no Prince wants that… (Disney fans click here to reminisce).
Anyway, by day three it’s decision time, I have 100g of the stuff left and have run out of things to do with it. I had pasta for dinner yesterday, I have no salad and I’ve run out of stew – things are getting tense. Maybe I could just stuff it in my mouth? I mean, that’s gotta be better than just binning it, right?
‘No, no, no’ I whisper under my breath, stroking its cold and slimy back with my finger ‘you deserve better than that my friend.’
“Err, what are you doing?” Jamie is standing in the doorway looking confused and slightly horrified at me.
“OH! Um… Just thought it had a hair on it but it doesn’t, phew!” I say slightly too shrilly. “Toast?”
“Yeah go on then” he says as he turns his attention back to The Sopranos.
So I coat the feta in flour, dip it in egg and fry it before serving it on toast drizzled in honey and topped with fresh thyme. ‘It’s what he would have wanted’ I say softly to myself.
“WHAT?” shouted Jamie from the living room.
“NOTHING!” I say hurriedly wiping honey off my chin.


Fried feta on toast with thyme & honey
Serves 1 / Hands on time 10 mins / Total time 10 mins / V
1 piece of sourdough, toasted
100g vegetarian feta, cut into 2 slices
1 heaped tbs plain flour
1 egg
Thyme leaves
1 tbs rapeseed oil
tbs runny honey

TIP: If your honey is a little hard and crystallised, pop the jar in a saucepan and fill with boiling water. This will melt it in no time.  

Method
1. On a small side plate, add a heaped tablespoon of flour. Slice the feta into two even slices and dust well in the flour.
2. Beat the egg in a small bowl, season well with salt and pepper and pour onto a plate. Dip the cheese into the egg and cover evenly.

3. In a small frying pan on a medium heat add a tablespoon of rapeseed oil. Once hot, carefully place the cheese in and fry gently on each side for a couple of minutes or until golden.
4. Serve on a piece of toasted sourdough, drizzled generously with honey and sprinkled with thyme leaves. Yum!


Fried feta on toast with honey & thyme

If you’ve had a go at making any of my recipes, I’d love to hear from you. Follow me now @corrieheale and tag your recipe pictures using #corriesrabbitfood.


V– Vegetarian


Buckwheat pancakes

Buckwheat pancakes
Buckwheat Pancakes

I wouldn’t normally buy buckwheat flour as I’m not celiac or a clean eating idiot but I had to buy some for work so thought I’d make the most of it. I was actually pleasantly surprised by this recipe, it was even worth the £4 I paid for the flour (£4, what is the world coming to). Anyway, if you’re made of money and like your pancakes with a delightful springy texture, then loosen your belts and grab the maple syrup, it’s pancake time. Happy pancake day everybody.


Buckwheat pancakes
Makes 6-8 pancakes / Hands on time 20 mins / Total time 20 mins /  Gf
125g buckwheat flour
1 tsp baking powder
30g caster sugar
½ tsp ground cinnamon
125ml semi skimmed milk
1 egg
2 tbs yogurt
Knob of butter
Greek yogurt and maple syrup to serve (optional)


Tip 1: You can make these as healthy or as unhealthy as you like. I served mine topped with strawberries, yogurt and maple syrup because that’s what I had in my fridge but you can top them with whatever you like.

Tip 2: Can’t eat them all? Cook them, wait until they’re cool and then wrap up individually in cling film and refrigerate. Microwave for 30-60 seconds when required. Consume within 5 days. 


Method
1. In a large bowl, whisk together all the dry ingredients and put to one side. In a smaller bowl, whisk together one egg, 125ml of milk and 2 tablespoons of yogurt until combined.
2. Add the wet ingredients to the dry ingredients and whisk until you have a smooth batter. (Buckwheat flour is quite different to regular flour, it has a gummy, sticky texture, this is normal). Put to one side for 10 minutes or until the mixture starts to bubble slightly.
3. Heat a knob of butter in a large frying pan on a medium to high heat. When the butter starts to bubble, ladle in your desired amount of batter (I like to make 3 at a time).
4. Cook for a couple of minutes or until they start to bubble and the edges look set. Flip over and cook for a further couple of minutes. Serve immediately topped with your favourite toppings.

Buckwheat pancakes
Buckwheat Pancakes

If you’ve had a go at making any of my recipes, I’d love to hear from you. Follow me now @corrieheale and tag your recipe pictures using #corriesrabbitfood.


V– Vegetarian    Gf– Gluten free


New potato Spanish omelette

Spanish omelette
Spanish Omelette

I’ve just been paid, yet I have no money, story of my life. So I had to bypass my beloved Waitrose (which I can’t really afford to shop in anyway) and go to Tesco (insert sad face emoji here). Why does Tesco have that horrible strip lighting that makes everyone one look like shit? Reminds me of a giant kebab shop – people walking around aimlessly looking pasty, drunk and miserable. Although that being said, my shop only came to £5.06 so perhaps it was worth the misery. Muchas gracias Tesco. 


New potato Spanish omelette
Serves 4 / Hands on time 1 hr  / Total time 1 hr / V Gf Df
You’ll need: A large non-stick frying pan with a lid
350g new potatoes, sliced
Small red onion, finely sliced
1 garlic clove, chopped
1 tbs olive oil
5 large eggs, beaten
Handful of freshly chopped parsley
Salad leaves to serve


Method
1. Slice the new potatoes thinly and finely slice the red onion and the garlic. Heat a tablespoon of olive oil in a medium sized, non-stick saucepan, on a medium to low heat. Add the potato, onion and garlic to the pan along with a good pinch of salt and pepper. Coat evenly in the oil by turning them a few times.
2. Once sizzling, add a dash of water and cover with a lid and cook for 30 mins adding a dash of water when needed and turning the potatoes over regularly.
3. Once the potatoes are soft, remove from the heat but keep the heat on. In a large bowl, beat 5 eggs together with a handful of chopped parsley and good pinch of salt and pepper. Tumble the potatoes into the egg mixture and give it careful stir, making sure the potatoes are suitably covered.
4. Put the saucepan back over a medium heat and add a little more oil and heat before pouring the mixture back into the pan. Spread out evenly with a spoon and cover again with a lid for 10 mins, or until the egg is visibly cooked on top.
5. Loosen the edges of the omelette with a knife before carefully inverting it onto a large plate. Slide the omelette carefully back into the hot frying pan and cook for a further few minutes on the other side.
6. Turn out onto a plate and leave to cool. Serve warm with a bowl of simply dressed leaves.

Spanish omelette
Spanish Omelette

If you’ve had a go at making any of my recipes, I’d love to hear from you. Follow me now @corrieheale and tag your recipe pictures using #corriesrabbitfood.


V– Vegetarian    Gf– Gluten free    Df – Dairy free


Peanut tofu with roasted greens

Peanut tofu with roasted greens
Peanut tofu bowl with roasted greens

I refuse to call this a ‘buddha bowl’ even if it is one. By definition, a buddha bowl is a hearty filling dish made up of raw or roasted vegetables, greens, beans, grains, rice and so on. So nothing to do with Buddha then. Stupid.
Anyway, as I now hilariously go to the gym once a week, I thought I better try and up my protein intake. At first, I thought this meant I could eat more cheese (score) it didn’t (boo). So I stocked up on chickpeas, peanut butter and tofu, in the hope that in 8 weeks, I would have the arms, legs and face of Jennifer Aniston. In the words of Mariah Carey and Whitney Houston, “there can be miracles, when you believe”.


Peanut tofu with roasted greens
Serves 2 / Hands on time 20 mins / Total time 50 mins / V Vn
You’ll need: A baking tray and a wok or large frying pan
1 tsp rapeseed oil or rapeseed oil spray (see tip below)
396g pack of firm tofu
1 can chickpeas, drained
100g tender-stem broccoli
4 spring onions, trimmed
2 tsp light soy sauce
2 tsp toasted sesame oil
½ lime, quartered
Satay sauce
1 tsp toasted sesame oil
1 tbs boiling water
3 tbs crunchy peanut butter
1 tbs light soy sauce
1 tbs rice vinegar
2 tbs sweet chilli sauce
To serve
Brown rice or bulgur wheat to serve (optional)
Freshly chopped coriander (optional)

TIP: Use microwavable brown rice to save time and washing up.


Method
1. Preheat your oven to 200°C/180°fan/400°F/gas mark 6. Drain the block of tofu and cut into large chunks. Line a baking tray with baking paper and place your tofu chunks on it, evenly spaced apart.
2. Bake in the oven for 10 mins before turning the tofu and continuing to bake for 5 more mins. Meanwhile, make the satay sauce by combining all of the ingredients together in a medium sized bowl, large enough to include the tofu later. Put to one side.
3. Drain the chickpeas and prepare the veg by trimming the stalks of the tender stem and halving the spring onions.
4. Once the tofu is cooked, remove from the oven but keep the oven on. Transfer the tofu a bit at a time to the satay sauce coating the cubes carefully with a spoon. Once all the tofu is well coated, put to one side to marinate. If you’re making rice or bulgur wheat, now is good time to put it on (I recommend cooking just 50-60g for 2 people or you may end up with too much food).
5. On the same baking tray you cooked the tofu on, add the broccoli, spring onions and chickpeas. Drizzle with a tsp of sesame oil and 2 tsp of soy sauce and bake in the oven for 15 mins, giving it a shake halfway through. 10 mins before the vegetables and chickpeas are due to come out the oven, heat a tsp of sesame oil in a wok or large frying pan over a medium to high heat. Once hot, add all the tofu along with all the sauce and fry until sticky and a bit singed. The sauce will stick to the pan a bit as it’s quite sweet but simply scrape it off with a wooden spoon – these bits will add a delicious burnt caramel flavour.
6. Divide the cooked rice or bulgur wheat (if using) between two bowls and top with the chickpeas and greens. Spoon over the tofu and finish with a squeeze of lime and a sprinkle of chopped coriander (optional).


Peanut tofu with roasted greens
Peanut tofu bowl with roasted greens

If you’ve had a go at making any of my recipes, I’d love to hear from you. Follow me now @corrieheale and tag your recipe pictures using #corriesrabbitfood.


V– Vegetarian    Vn– Vegan