Hot cross bun pudding

Hot cross bun pudding

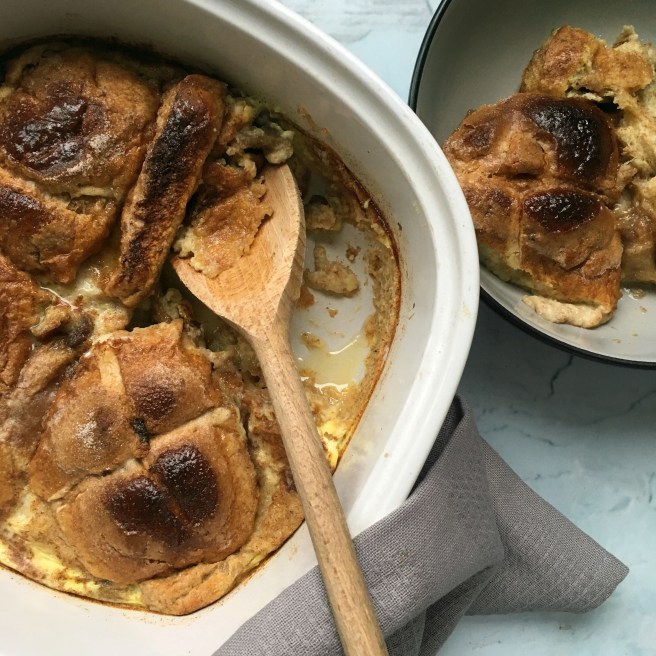
Got a few sad, stale hot cross buns left over from Easter? Well, don’t even think about throwing them away! Have a cheeky, post-Easter treat and whip up a hot-cross-bun bread and butter pudding – y’know, just in case you haven’t eaten enough over the past few days… Actually, come to think of it, if you have some leftover chocolate, throw some of that in, too. The more the merrier (damn, I wish I had thought of that). Happy belated Easter, everyone!


Hot cross bun pudding
Serves 4 / Hands on time 10 mins / Total time 50 mins / V
4 hot cross buns
Spreadable butter
1 tsp cinnamon
80g caster sugar
2 eggs
350ml semi skimmed milk


Method
1. Preheat your oven to 200°C/180°C fan/400°F/gas mark 6. Slice the hot cross buns in half and spread each slice with butter. Weigh out the sugar and add a teaspoon of cinnamon, stir well and put to one side. Layer the hot cross bun slices in an oven proof dish and sprinkle over the sugar making sure you get plenty in-between the layers (leave a tablespoon of cinnamon sugar to one side).
2. Whisk the eggs and milk together in a separate bowl until combined, then pour over the buns. Sprinkle with the left over sugar and leave to soak for 10 minutes. Bake in the oven for 25-30 minutes or until golden brown. Divide into bowls and serve immediately for a comforting treat.

Hot cross bun pudding

If you’ve had a go at making my hot cross bun pudding or any of my other recipes, I’d love to hear about it @corrieheale corrie.heale@gmail.com


V– Vegetarian


Frozen berry porridge with maple syrup

Maple berry porridge

I recently decided to try and become one of those people who gets up half an hour earlier for work, to do a spot of Pilates and eat a healthy and balanced breakfast. So far, I’ve struggled with the Pilates part and the getting-up-earlier part, but I have been making progress on the breakfast part – go me! Scoffing Pret croissants (plural) at my desk is now a thing of the past – I now opt for a bowl of granola with yoghurt, or scrambled eggs (not together, that would be horrible).
So, does this new, exciting weekday breakfast make me late for work? Yes, it does. Does eating it in under 60 seconds and then running for the bus give me indigestion? Of course! But I’m enjoying the variety. So, this week I thought I’d dip my toe into the world of porridge (not literally. Again, that would be horrible).
I’m not a massive porridge eater. I find it a bit sloppy, but I need something filling and hearty after all of this depressing snow. So, armed with frozen berries and maple syrup, I found this to be a cheap and cheerful way to start my day. Just need to remember to soak the pan next time – porridge can stick like cement. Enjoy!


Frozen berry porridge with maple syrup
Serves 1 / Hands on time 10 mins / Total time 10 mins
V Vn Df
2 small handfuls frozen berries
1 tbs maple syrup
1/3 of a mug of porridge oats
2/3 of a mug of oat milk
Greek or coconut yogurt to serve (optional)


Tip: Don’t wait to soak your pan, do it immediately or your porridge will turn to cement. 


Method
1. Put your frozen berries in a small saucepan with a tablespoon of maple syrup. Cook on a low heat with the lid on while you prepare your porridge.
2. Combine the porridge oats with the oat milk and a small pinch of salt. Cook on a medium heat in a saucepan stirring continually until the porridge is thick and creamy.
3. Serve immediately in a bowl topped with warm maple syrup berries and yogurt. Delicious.

Maple berry porridge

If you’ve had a go at making any of my recipes, I’d love to hear from you. Follow me now @corrieheale and tag your recipe pictures using #corriesrabbitfood.


V– Vegetarian    Vn– Vegan    Df– Dairy free.


Asparagus, goats cheese & lemon tart

Asparagus, goats cheese & lemon tart

Let’s say goodbye to this bitterly cold Game of Thrones weather and hello to spring.
“Hello spring!”‘
To celebrate, I’ve created this rather zingy lemon and goats cheese tart for you to roll up, stuff in your mouth and swallow whole like a goose… Or not, each to their own.


Asparagus, goats cheese & lemon tart
Serves 4 / Hands on time 10 mins / Total time 30 mins / V
320g ready rolled puff pastry, trimmed to fit a 32cm baking tray
100g vegetarian soft goats cheese
Juice and zest of half a lemon
15g vegetarian Italian hard cheese or Parmesan*, grated
2 tbs plain or Greek yogurt
230g bunch of asparagus
Pomora extra virgin lemon oil


Method
1. Preheat your oven to 200°C/fan 180°C/400°F/gas mark 6. Line a baking tray with baking paper and roll out the puff pastry. Trim the pastry to fit your baking tray and lie it on top of the baking paper directly on the tray. Using a sharp knife, lightly score a rectangle roughly 1 finger-width from the edge, then put to one side.
2. Using a fork, combine the soft goats cheese, yogurt, Italian hard cheese, lemon zest and lemon juice in a bowl until you have a thick but spreadable paste. Spoon out into the middle of your pastry. Using a butter knife evenely spread the mixture out to the scored edge being careful not to go over the line.
3. Arrange the asparagus on top of the goats cheese before seasoning with salt and pepper. Bake in the oven for 20 minutes until the edges of the tart turn golden brown.
4. Remove from the oven and leave to rest for five minutes before brushing the asparagus with lemon extra virgin olive oil. Serve warm with a mixed leaf salad.

Asparagus, goats cheese & lemon tart

If you’ve had a go at making any of my recipes, I’d love to hear from you. Follow me now @corrieheale and tag your recipe pictures using #corriesrabbitfood.


V – Vegetarian
* Parmesan (Parmigiano Reggiani) is always made using animal rennet, therefore it is not vegetarian. Substitute for Italian hard cheese if applicable.


Buckwheat pancakes

Buckwheat pancakes
Buckwheat Pancakes

I wouldn’t normally buy buckwheat flour as I’m not celiac or a clean eating idiot but I had to buy some for work so thought I’d make the most of it. I was actually pleasantly surprised by this recipe, it was even worth the £4 I paid for the flour (£4, what is the world coming to). Anyway, if you’re made of money and like your pancakes with a delightful springy texture, then loosen your belts and grab the maple syrup, it’s pancake time. Happy pancake day everybody.


Buckwheat pancakes
Makes 6-8 pancakes / Hands on time 20 mins / Total time 20 mins /  Gf
125g buckwheat flour
1 tsp baking powder
30g caster sugar
½ tsp ground cinnamon
125ml semi skimmed milk
1 egg
2 tbs yogurt
Knob of butter
Greek yogurt and maple syrup to serve (optional)


Tip 1: You can make these as healthy or as unhealthy as you like. I served mine topped with strawberries, yogurt and maple syrup because that’s what I had in my fridge but you can top them with whatever you like.

Tip 2: Can’t eat them all? Cook them, wait until they’re cool and then wrap up individually in cling film and refrigerate. Microwave for 30-60 seconds when required. Consume within 5 days. 


Method
1. In a large bowl, whisk together all the dry ingredients and put to one side. In a smaller bowl, whisk together one egg, 125ml of milk and 2 tablespoons of yogurt until combined.
2. Add the wet ingredients to the dry ingredients and whisk until you have a smooth batter. (Buckwheat flour is quite different to regular flour, it has a gummy, sticky texture, this is normal). Put to one side for 10 minutes or until the mixture starts to bubble slightly.
3. Heat a knob of butter in a large frying pan on a medium to high heat. When the butter starts to bubble, ladle in your desired amount of batter (I like to make 3 at a time).
4. Cook for a couple of minutes or until they start to bubble and the edges look set. Flip over and cook for a further couple of minutes. Serve immediately topped with your favourite toppings.

Buckwheat pancakes
Buckwheat Pancakes

If you’ve had a go at making any of my recipes, I’d love to hear from you. Follow me now @corrieheale and tag your recipe pictures using #corriesrabbitfood.


V– Vegetarian    Gf– Gluten free


New potato Spanish omelette

Spanish omelette
Spanish Omelette

I’ve just been paid, yet I have no money, story of my life. So I had to bypass my beloved Waitrose (which I can’t really afford to shop in anyway) and go to Tesco (insert sad face emoji here). Why does Tesco have that horrible strip lighting that makes everyone one look like shit? Reminds me of a giant kebab shop – people walking around aimlessly looking pasty, drunk and miserable. Although that being said, my shop only came to £5.06 so perhaps it was worth the misery. Muchas gracias Tesco. 


New potato Spanish omelette
Serves 4 / Hands on time 1 hr  / Total time 1 hr / V Gf Df
You’ll need: A large non-stick frying pan with a lid
350g new potatoes, sliced
Small red onion, finely sliced
1 garlic clove, chopped
1 tbs olive oil
5 large eggs, beaten
Handful of freshly chopped parsley
Salad leaves to serve


Method
1. Slice the new potatoes thinly and finely slice the red onion and the garlic. Heat a tablespoon of olive oil in a medium sized, non-stick saucepan, on a medium to low heat. Add the potato, onion and garlic to the pan along with a good pinch of salt and pepper. Coat evenly in the oil by turning them a few times.
2. Once sizzling, add a dash of water and cover with a lid and cook for 30 mins adding a dash of water when needed and turning the potatoes over regularly.
3. Once the potatoes are soft, remove from the heat but keep the heat on. In a large bowl, beat 5 eggs together with a handful of chopped parsley and good pinch of salt and pepper. Tumble the potatoes into the egg mixture and give it careful stir, making sure the potatoes are suitably covered.
4. Put the saucepan back over a medium heat and add a little more oil and heat before pouring the mixture back into the pan. Spread out evenly with a spoon and cover again with a lid for 10 mins, or until the egg is visibly cooked on top.
5. Loosen the edges of the omelette with a knife before carefully inverting it onto a large plate. Slide the omelette carefully back into the hot frying pan and cook for a further few minutes on the other side.
6. Turn out onto a plate and leave to cool. Serve warm with a bowl of simply dressed leaves.

Spanish omelette
Spanish Omelette

If you’ve had a go at making any of my recipes, I’d love to hear from you. Follow me now @corrieheale and tag your recipe pictures using #corriesrabbitfood.


V– Vegetarian    Gf– Gluten free    Df – Dairy free


Peanut tofu with roasted greens

Peanut tofu with roasted greens
Peanut tofu bowl with roasted greens

I refuse to call this a ‘buddha bowl’ even if it is one. By definition, a buddha bowl is a hearty filling dish made up of raw or roasted vegetables, greens, beans, grains, rice and so on. So nothing to do with Buddha then. Stupid.
Anyway, as I now hilariously go to the gym once a week, I thought I better try and up my protein intake. At first, I thought this meant I could eat more cheese (score) it didn’t (boo). So I stocked up on chickpeas, peanut butter and tofu, in the hope that in 8 weeks, I would have the arms, legs and face of Jennifer Aniston. In the words of Mariah Carey and Whitney Houston, “there can be miracles, when you believe”.


Peanut tofu with roasted greens
Serves 2 / Hands on time 20 mins / Total time 50 mins / V Vn
You’ll need: A baking tray and a wok or large frying pan
1 tsp rapeseed oil or rapeseed oil spray (see tip below)
396g pack of firm tofu
1 can chickpeas, drained
100g tender-stem broccoli
4 spring onions, trimmed
2 tsp light soy sauce
2 tsp toasted sesame oil
½ lime, quartered
Satay sauce
1 tsp toasted sesame oil
1 tbs boiling water
3 tbs crunchy peanut butter
1 tbs light soy sauce
1 tbs rice vinegar
2 tbs sweet chilli sauce
To serve
Brown rice or bulgur wheat to serve (optional)
Freshly chopped coriander (optional)

TIP: Use microwavable brown rice to save time and washing up.


Method
1. Preheat your oven to 200°C/180°fan/400°F/gas mark 6. Drain the block of tofu and cut into large chunks. Line a baking tray with baking paper and place your tofu chunks on it, evenly spaced apart.
2. Bake in the oven for 10 mins before turning the tofu and continuing to bake for 5 more mins. Meanwhile, make the satay sauce by combining all of the ingredients together in a medium sized bowl, large enough to include the tofu later. Put to one side.
3. Drain the chickpeas and prepare the veg by trimming the stalks of the tender stem and halving the spring onions.
4. Once the tofu is cooked, remove from the oven but keep the oven on. Transfer the tofu a bit at a time to the satay sauce coating the cubes carefully with a spoon. Once all the tofu is well coated, put to one side to marinate. If you’re making rice or bulgur wheat, now is good time to put it on (I recommend cooking just 50-60g for 2 people or you may end up with too much food).
5. On the same baking tray you cooked the tofu on, add the broccoli, spring onions and chickpeas. Drizzle with a tsp of sesame oil and 2 tsp of soy sauce and bake in the oven for 15 mins, giving it a shake halfway through. 10 mins before the vegetables and chickpeas are due to come out the oven, heat a tsp of sesame oil in a wok or large frying pan over a medium to high heat. Once hot, add all the tofu along with all the sauce and fry until sticky and a bit singed. The sauce will stick to the pan a bit as it’s quite sweet but simply scrape it off with a wooden spoon – these bits will add a delicious burnt caramel flavour.
6. Divide the cooked rice or bulgur wheat (if using) between two bowls and top with the chickpeas and greens. Spoon over the tofu and finish with a squeeze of lime and a sprinkle of chopped coriander (optional).


Peanut tofu with roasted greens
Peanut tofu bowl with roasted greens

If you’ve had a go at making any of my recipes, I’d love to hear from you. Follow me now @corrieheale and tag your recipe pictures using #corriesrabbitfood.


V– Vegetarian    Vn– Vegan


Cacio e pepe with cherry tomatoes

Cacio e pepe with cherry tomatoes

For those of you who haven’t heard of cacio e pepe, it’s a Roman pasta dish consisting of three basic ingredients; cheese, black pepper and pasta — in fact ‘cacio’ means ‘cheese’ and ‘pepe’ means ‘pepper’. It’s a gloriously simple dish that uses the water the pasta is cooked in to create a cheesy, glossy sauce. The advantage of this, is that you make it all in one pot, thus saving on washing up. Praise be to Rome.
Most cacio e pepe recipes I researched seemed to include butter as well as combination of parmesan and pecorino but I found both additions to be unnecessary, I didn’t need more calories thank you very much. I did however, approve of adding a bit of chopped garlic and a few cheeky cherry toms. Is it a traditional cacio e pepe? Certainly not, but who cares, I won’t tell if you won’t.


Cacio e pepe with cherry tomatoes
Serves 2 / Hands on time 20 mins / Total time 20 mins 
200g spaghetti
200g cherry tomatoes
2 garlic cloves, chopped
1 tbs olive oil
500ml boiling water
½ tsp salt flakes
¼ tsp ground black pepper
80g vegetarian Italian hard cheese or Parmesan, grated
Drizzle of Pomora extra virgin olive oil
Fresh basil leaves to serve


Method
1. Boil a kettle with at least half a litre of water. Peel and finely chop the garlic and halve the cherry tomatoes.
2. In a large pan with a lid, add a tablespoon of oil and put on a medium heat. Add two finely chopped garlic cloves, cherry tomatoes, ½ tsp salt flakes and ¼ tsp black pepper. Cook for 2 mins stirring continually. Pour over 500ml of boiling water, add the spaghetti and put the lid on (make sure your pasta is fully submerged in the water before putting the lid on). Up the heat and bring to the boil.
3. Once boiling, remove the lid and continue to boil over a medium to high heat for 8 mins stirring regularly (this is a good time to grate your cheese if you haven’t already done so).
4. Once the pasta is cooked, take off the heat and allow to cool for a minute before adding most of the grated cheese (keep a little back to sprinkle on top of each portion). Mix vigorously (this prevents the cheese coagulating) until the cheese has melted.
5. Serve immediately with a sprinkling of cheese, a drizzle of extra virgin olive oil and a crack of black pepper. Top with torn fresh basil leaves.

Cacio e pepe with cherry tomatoes
Cacio e pepe

If you’ve had a go at making any of my recipes, I’d love to hear from you. Follow me now @corrieheale and tag your recipe pictures using #corriesrabbitfood.


*Parmesan (Parmigiano Reggiani) is always made using animal rennet, therefore it is not vegetarian. Substitute for Italian hard cheese if applicable.


Sweet potato & butterbean traybake

Sweet potato & butterbean traybake
Sweet Potato & Butterbean Traybake

It’s the 8th of January and surprisingly my 2018 health goals haven’t gone out the window just yet. Me and my new Fitbit are getting on famously, although I decided not to tell it about the giant pizza and two bottles of wine I guzzled last Friday. What? Every couple have their secrets and besides, I’m of the belief that if you don’t remember doing something, then it probably didn’t happen — even if you found the evidence in the morning and decided to polish off what you didn’t eat the night before.
So let’s kick off another week with this rather marvellous traybake. Oh I do love this recipe, mainly because it’s cheap and takes minimal effort (my kind of food). So sit back, relax and let the oven do all the work.


Sweet potato & butterbean traybake
Serves 2 / Hands on time 5 mins / Total time 55 mins / V Gf Df 
1 large sweet potato, chopped into chunks
1 can butterbeans, rinsed and drained
1 red pepper, deseeded and cut into chunks
175ml vegetable stock, I use ½ a Knorr stock pot
½ tsp smoked paprika
2 eggs
Handful of fresh coriander, roughly chopped
2 tsp Pomora extra virgin olive oil
Greek yogurt to serve (optional)
Pickled chillies or jarred jalapeños to serve (optional)

TIP: You can use any canned beans you like in this recipe and almost any veg, just bare in mind that cooking times may vary. 


Method
1. Preheat your oven to 200°C/180°C fan/400°F/gas mark 6. Cut your sweet potato into chunks along with the red pepper. Rinse and drain the butterbeans before pouring them into a large deep baking tray or casserole dish. Add the sweet potato and the peppers before pouring over 175ml of vegetable stock. Season well with salt and pepper and sprinkle over the smoked paprika. Give it a good stir.
2. Bake for 45 mins or until the sweet potato is soft. Remove from the oven and using a spoon, create space for 2 eggs. Crack the eggs into each space before baking for a further 6-8 mins – depending on how set you like your eggs.
3. Remove from the oven, sprinkle with fresh coriander and scoop into bowls. Serve with yogurt, a drizzle of extra virgin olive oil and your choice of chillies (optional).

Sweet potato & butterbean traybake
Sweet Potato & Butterbean Traybake

If you’ve had a go at making any of my recipes, I’d love to hear from you. Follow me now @corrieheale and tag your recipe pictures using #corriesrabbitfood.


V– Vegetarian    Gf– Gluten free    Df– Dairy free


Cocoa & coconut energy balls

Cocoa & Coconut Energy Balls

I don’t know about you, but I’ve literally spent the last two weeks eating nothing but Cadbury’s Roses (good times) but what in gods name have Cadbury’s done to their wrappers? The once delicately wrapped choccies I used to twist straight into my mouth have been replaced with what looked like assorted condom wrappers. Thanks a lot Cadbury’s, thanks for ruining Christmas… Okay so I still ate two tubs but this isn’t over Cadbury’s, a strongly worded letter will be winging it’s way to you when I can be bothered to write and post one.
Until then, I shall be making my own chocolates — mainly because I am now addicted to Cadbury’s Roses and need a healthier substitute for January. Happy new year every body


Cocoa & coconut energy balls
​Makes 12 balls / Hands on time 10 mins / Total time 10 mins + chilling time / V 
180g ready to eat dates, stones removed
50g porridge oats
50g Green & Blacks Organic 70% dark chocolate
50g nuts of your choice (I used a mix of cashews, almonds and pecans)
½ tsp cinnamon
2 tsp flaxseed mill (I use Lindwoods milled flax, sunflower, pumpkin and sesame seeds with goji berries)
4 tsp cold water
2 tbs desiccated coconut (optional)


Method
1. De-stone the dates and add them to the blender along with the oats, chocolate and your choice of nuts. Blitz until you have a paste.
2. Add half a tsp of cinnamon, 2 tsp of flaxseed mill and 4 tsp of cold water. Blend again until combined and a bit sticky.
3. Turn out and roughly divide the mixture into 12. Using your hands, roll the mixture into a walnut sized balls before placing inside a sealable container (it’s okay if the balls touch but don’t put them on top of each other). Once rolled, I like to roll half of my balls in desiccated coconut for a bit of variation but this is optional (tastes really good though so I recommend it).
4. Pop them in the fridge to chill and eat as and when desired. Store in an airtight container for up to 1 month.

Cocoa & Coconut Energy Balls

If you’ve had a go at making any of my recipes, I’d love to hear from you. Follow me now @corrieheale and tag your recipe pictures using #corriesrabbitfood.


V– Vegetarian.   – Suitable for home freezing. Wrap individually in cling film and consume within 1 month.


Lebkuchen

Lebkuchen
Lebkuchen

Hey guess what time it is? It’s Christmas edible gift time, yay. So save your pennies and treat the mediocre friend in your life to some delicious homemade baked goods. This years offering is lebkuchen – a traditional German Christmas treat resembling gingerbread. Soft, cakey and full of Christmas spices, these little biscuits make the perfect thrifty gift, especially if you’ve been spending too much money on drinking and Uber’s. Fröhliche Weihnachten!
For more edible gift ideas why not try my vanilla shortbread or salted sultana rum fudge.


EXCLUSIVE READER OFFER 
Psst… Christmas just came early. Want a variety of delicious extra virgin olive oils delivered direct to your door all year round? Well now’s your chance. For a limited time only, I’m offering you an exclusive 25% off your first quarter when you adopt an olive tree with Pomora. Just enter the discount code CRFXMAS25 at the check out and you’ll receive a quarterly shipment of 3x250ml tins of oil from your tree, alternating between plain and flavoured oils from one of our award winning growers, so what are you waiting for? Treat yourself or someone you love this Christmas with Pomora.


Lebkuchen
Makes 16-18 biscuits / Hands on time 20 mins / Total time 30 mins + cooling and icing / V
250g plain flour
80g ground almonds
2 tsp ground ginger
1 tsp cinnamon
½ tsp all spice
¼ tsp sea salt flakes
2 tsp cocoa powder
½ tsp bicarbonate soda
1 tsp baking powder
Zest of half a lemon
200g honey
50g dark brown muscovado sugar
80g unsalted butter
110g icing sugar


Method
1. In a large mixing bowl, combine the flour with all the spices, cocoa powder, salt, bicarbonate of soda, baking powder and the zest of half a lemon. Mix until the ingredients are well distributed.
2. In a small saucepan over a medium heat, melt the honey, butter and the dark muscovado sugar together. Once melted take off the heat and pour straight into the dry mixture. Mix with a wooden spoon until you have a wet dough. Leave to cool for a few minutes or until the dough is cool enough to handle. Preheat an oven to 180°C/160°C fan/350°F/gas mark 4.
3. The dough will still be warm but easy to work with. Using your hands pick up around 35g of dough (about the size of a walnut) roll into a ball and divide between 2 lined baking trays, spacing out evenly to allow room for the biscuits to expand. Using the back of table spoon, flatten each ball slightly into a disk shape (although they should spread out slightly naturally on their own).
4. Bake in the oven for 10-12 mins. Once expanded and golden in colour, remove from the oven and leave to cool on the trays for 5 mins before twisting each biscuit carefully with your fingers to loosen it and transferring to a wire rack. Leave to cool completely.
5. To ice, mix 110g of icing sugar with 1 and a half tbs of water until you have a thick but loose paste. Place a sheet of cling film under the wire rack to catch any drips. Spoon 1 tsp of icing over each biscuit and using the back of the spoon, push the icing to the edges using a circular motion (don’t worry if these drip, that’s the idea). Grate over the remaining lemon zest (optional) and leave to set before serving. Store in a tin lined with a baking sheet for up to a week.

Lebkuchen

If you’ve had a go at making any of my recipes, I’d love to hear from you. Follow me now @corrieheale and tag your recipe pictures using #corriesrabbitfood.


V– Vegetarian.