Let’s be honest, it’s too damn hot to cook this week, so I’ve been living off a nutritious diet of fresh tomatoes and gin and tonics. I was hoping to save this recipe for when my tomato plant started to produce fruit, but insultingly, he (my plant) has only produced two tiny green tomatoes so far, and that does not a bruschetta make. Selfish. Just remember who waters you, mate. So instead, I scampered off to Waitrose and came back with a big bag of overpriced tomatoes, sourdough and enough tonic water and ice to sink HMS Belfast. Within 10 minutes I was chomping on delicious bruschetta and sipping ice cold G&Ts while staring daggers at my tomato plant. I’m not angry, just disappointed – he hangs his head in shame.
Bruschetta Serves 2 as a starter / Hands on time 10 mins / Total time 10 mins /V VnDf 2 pieces of sourdough (I used a rye variety)
4 ripe tomatoes, de-seeded and roughly chopped
1 garlic clove, peeled
Handful of fresh basil, roughly chopped
1 tsp balsamic vinegar Pomora extra virgin olive oil
Method
1. Start by de-seeding and roughly chopping your tomatoes – I do this by halving my tomatoes, removing the core and spooning out the seeds. Roughly chop and place in a bowl before sprinkling with a generous pinch of salt and pepper. Stir in the chopped basil, balsamic vinegar and a good drizzle of extra virgin olive oil. Put to one side.
2. Toast 2 large pieces of sourdough on either a grill pan or in a toaster. Meanwhile, cut the end off the garlic clove and peel. Once toasted, rub the toast with the cut side of the garlic to give it a gorgeous flavour. Finally sprinkle the toast with salt and pepper and drizzle with olive oil before topping with the tomato mixture. Tasty.
Bruschetta
If you’ve had a go at making any of my recipes, I’d love to hear from you. Follow me now @corrieheale and tag your recipe pictures using #corriesrabbitfood.
As promised, I have returned from my gorgeous holiday in Puglia with more than just a few extra pounds and a sunburnt belly button – believe me, I’m as surprised as you are.
I come bearing gifts and the first one is this utterly delicious braised vegetable orecchiette. I discovered this dish on our last evening in Bari, in a pleasant little restaurant, next to a rather unpleasant fat Australian who moaned about her pasta being ‘too hard’. Philistine.
Anyway, it turned out that most of the vegetarian pasta dishes I had my eye on were unavailable, due to the ingredients being out of season. Eating seasonally is obviously a big part of Italian culture which is nice, but unfortunately for me, this meant that I was left with the rather dubiously named ‘vegetable pasta’. I didn’t want to show my disappointment, so I simply smiled and willed it to be more than just a bowl of vegetables and pasta.
It arrived and it was just a bowl of vegetables and pasta – but it was one of the nicest bowls of vegetables and pasta I had ever eaten. Local orecchiette floating in a salty vegetable broth peppered with seasonal vegetables. Bellissimo!
Braised vegetable orecchiette
Serves 2 / Hands on time 30mins/ Total time 30mins
25g unsalted butter
300g baby mixed vegetables (I used 1 small courgette, 2 chestnut mushrooms, 3 baby leeks, 4 baby carrots, 2 baby parsnips. Although you can use whatever vegetables you like)
100g dried orecchiette* or pasta of your choice
500ml vegetable stock (I used 1 Knorr stock pot)
2 bay leaves
1. Chop your vegetables to your desired size – personally I think the bigger the better, especially when braising. In a large heavy bottomed pot with a lid, add the butter and spread the vegetables out as evenly as you can. Cover with roughly 500ml of vegetable stock (you want to make sure the vegetables are only just covered). Season with salt and pepper and add the bay leaves.
2. Bring to the boil on a high heat before turning back down low and covering with a lid. Let the vegetables simmer for 10-12 minutes.
3. Meanwhile, in a separate pan, boil your pasta in slightly salted water and grate the parmesan.
4. Remove the lid off the vegetables, stir in a tsp of dried parsley and turn the heat back up and vigorous boil for another 3 minutes. Meanwhile drain your pasta and put to one side.
5. By now your vegetables will be lovely and soft. Take them off the heat and discard the bay leaves. Pour the pasta straight into the pot and stir through carefully – you don’t want to break the vegetables up too much.
6. Divide into bowls and serve with a drizzle of good quality extra virgin olive oil and a sprinkling of parmesan.
Braised vegetable orecchiette
If you’ve had a go at making any of my recipes, I’d love to hear from you. Follow me now @corrieheale and tag your recipe pictures using #corriesrabbitfood.
*Orecchiette is a pasta that’s popular in Southern Italy and literally translates to ‘little ears’. *Parmesan (Parmigiano Reggiani) is always made using animal rennet, therefore it is not vegetarian. Substitute for Italian hard cheese if applicable.
What could be better than boiling hot soup on a boiling hot day? Well, I apologise, but my cupboards were bare and I couldn’t be bothered to get the bus to Waitrose. So, instead, I sat in the sun and drank wine for nine straight hours, listening to The Little Mermaid soundtrack and crying – I don’t feel very well today.
Anyway, next week I’m off on hollibobs, so alas, you won’t be receiving a recipe from me, but expect something deliciously Italian on my return. In the meantime, let’s head to Asia and enjoy this rather tasty Thai green soup.
Thai green lentil soup Serves 4 / Hands on time 20 mins / Total time 50 mins / V Vn Gf*Df ❄🌶
1 tsp coconut oil
1 white onion, chopped
2 garlic cloves, crushed
Knob of fresh ginger, grated
50g Thai green curry paste* – I use Blue Dragon which is vegan and gluten free
1 can coconut milk
200g sweet potato (medium sized) peeled and cut into chunks
175g dried green lentils
1 litre vegetable stock*, I use 2 Knorr vegetable stock pots
Large handful of fresh coriander, including the stalks
Stick of lemon grass, bashed
Method
1. In a large cooking pot with a lid, sweat the chopped onions in the oil, over a medium/low heat for 10 mins with the lid on, stirring occasionally – add a dash of water if needed, to prevent burning.
2. Once soft, add the grated ginger, crushed garlic and the Thai green curry paste. Give it a good stir and cook for a further 3 mins. Add the sweet potato, coconut milk, stock, lentils and the bashed lemon grass and bring to the boil.
3. Turn down the heat and simmer for 30 mins, stirring occasionally. Cut the storks off the bunch of coriander and add them to the soup. Cook for 5 more minutes. Finally take off the heat, fish out the lemon grass and blend, either with a hand blender or a food processor. Serve topped with chopped coriander leaves.
Thai green lentil curry
If you’ve had a go at making any of my recipes, I’d love to hear from you. Follow me now @corrieheale and tag your recipe pictures using #corriesrabbitfood.
V– Vegetarian Vn– Vegan Df– Dairy free. 🌶– Spicy Gf – I useKnorrvegetable stock pots because they are gluten free but other stock pots/cubes may not be. Always check the label. ❄ – Suitable for home freezing once cooled. Consume within 3 months.
* Some Thai green curry pastes contain crustaceans and fish and may not be gluten free. Always check the label.
There is a fine line between those of us who can wear denim hot pants and those of us who can’t. I’m sure you can guess which category I fall into.
So, there I was, bending over to tie up my shoelaces, when I catch sight of what looked like the back of a large rhino. No, there must be some mistake, that cannot be MY arse?! I bolt upright only to see the cellulite on my thighs dimple even harder. ARGH! I quickly bend back over and stare at myself upside down, then from all angles. Three mirrors?! Three f***ing mirrors!!!! No one needs see their arse from that many angles. But the blood has started rushing to my head, so I decide to stand up and face the music.
I’m wearing what can only be described as a giant adult nappy made of denim. It’s high-waisted, and so short you can see my bum cheeks. When did denim shorts become so short? With only two weeks to go until my holiday, I decided to whip off the hot pants and do what any self respecting thirty-something would do in this situation.
Angrily drink three gin and tonics in quick succession at the nearest Weatherspoon’s. So what if my hot pants days are numbered? I hear culottes are back in fashion – a rather snazzy combination of the skirt and a short… Yes, they are as awful as they sound.
Failing that, I could try and just eat a little healthier. So, instead of fully loading my nachos with mountains of refried beans, guacamole and sour cream, I created this rather tasty, lighter version. Swapping shop-bought salty tortillas chips with my homemade version was surprisingly easy and delicious. I’ve favoured fresh avocado slices over guacamole and low-fat yoghurt instead of sour cream. To be honest, it felt just as indulgent, and has given me a good chance of squeezing into my snazzy new culottes. Well, it’s got to be better than wearing a denim nappy, right?
Healthy-ish loaded nachos
Serves 2 or 4 as a starter / Hands on time 40 mins / Total time 40 mins / V🌶
1. Preheat the oven to 200°C/180°C fan/ 400°F/gas mark 6. Stack 4 tortillas on top of each other and cut them in half across the middle, then into quarters and then into eighths. Spread them out, onto 2 deep baking trays, trying to overlap them as little as possible.
2. Sprinkle with smoked paprika, season with salt and pepper and spray with oil (I bought an empty spray bottle and filled it with oil myself but don’t worry if you don’t have one, just drizzle with oil). Bake in the oven for 5 mins, before flipping them over and cooking for a further 5 mins. Remove and put to one side. Turn the oven off but turn the grill on a medium to high heat.
3. Sweat the red onion and the garlic in a little oil in a large pot. Add a bit of water to help the onions steam and to cook them faster. Once softened, add the cumin, smoked paprika, salt and pepper and cook for a further 2 mins. Add the drained black beans, the sweetcorn kernels*, a drop of water and give it a good stir. Season with salt and pepper and continue to cook for a further 5 minutes. *To remove the sweet corn kernels, simply stand the sweetcorn on it’s head and run a sharp knife carefully down the sides to remove them slowly (they tend to go everywhere so proceed with care).
4. Meanwhile, chop the spring onions, the tomatoes and grate the cheese ready for sprinkling.
5. Tip the tortilla chips into one baking tray and top with the cooked beans. Scatter with the tomatoes and spring onions and sprinkle with cheese.
6. Place under the grill for 3-5 minutes or until the cheese has melted. Meanwhile, roughly chop the coriander, slice the avocado and quarter the lime. Remove from the grill and top with the avocado, coriander, a good squeeze of lime. Serve scattered with jalapeños and with a side of yogurt.
If you’ve had a go at making any of my recipes, I’d love to hear from you. Follow me now @corrieheale and tag your recipe pictures using #corriesrabbitfood.
It may have escaped your attention, but I have well over 150 recipes on this blog, and not one of those recipes is a risotto. Even just the word fills me with a despair, one which can only be trumped by the even-more-disappointing ‘stuffed pepper’. There’s nothing worse than a pepper stuffed with whatever scraps the restaurant chef can find – which, more often than not, is last night’s vegetarian option: risotto. NOOOOOOOOOOOOOOOOO!
Don’t get me wrong, a risotto can be a wonderful thing – but frankly, it rarely is. It’s the lazy vegetarian option that graces pub menus throughout the land, and has been given all the love and attention of some over-steamed veg at a carvary.
On a few occasions (and I know this sounds silly), I’ve been close to tears when I’ve looked up from my sickie bowl of stodge to see plates piled high with tender-looking roast beef, golden Yorkshire puddings, glazed carrots, crispy roast potatoes and glossy gravy. Don’t get me wrong, it’s not that I want to eat my boyfriend’s roast dinner, I just crave the same love and attention that went into making his meal. And, in my experience (and I’ve eaten a lot of risotto), that is rarely the case… Until recently.
After a day of exploring the Derbyshire countryside and eating our weight in Bakewell pudding, my boyfriend and I booked a table at The Manners in Bakewell. Starving, my eyes quickly devoured the menu only to fall upon the word I had been hoping not to see: ‘risotto’. My heart sank, and so did Jamie’s (he knows how upset risotto makes me).
“Maybe there’s a special on?” he said apologetically, turning in his chair to look for a board.
“There isn’t,” I replied glumly, looking at the starters to see if one could double up as a main. “They have a burrata salad – maybe I could have that with chips or something?” I added weakly, but Jamie could see my disappointment.
“Why don’t you just try the risotto?” he suggested tentatively.
“Why don’t you try it?!” I snapped accidentally, and instantly regretted it.
“Fine!” he hit back. “Let’s just go somewhere else – forget the fact we’ve been waiting an hour at the bar for this table and it’s almost nine o’clock.”
“Are you ready to order?” the kindly waiter interrupted. He had suddenly appeared by my side, pen poised and expectant look on his face.
“Er, yeah, sorry – I’ll have the burrata and the risotto,” I smiled weakly.
It. Was. Delicious. A creamy, dreamy bowl of perfectly cooked rice with bursts of fresh pea, asparagus and dill. With every mouthful, I discovered pockets of tangy goats cheese rind as well as subtle notes of lemon. Before I know it, Jamie had abandoned his meal and we are both digging into mine – and I didn’t mind one bit. For the first time in living memory, a pub risotto was finally worthy of centre stage. So I did something I thought I would never do – a risotto recipe. Pigs have flown. Enjoy!
Asparagus, pea and goats cheese risotto Serves 4 / Hands on Time 1 hr 10 mins / Total time 1 hr 10 mins /Gf❄
200g asparagus, trimmed and chopped
1 onion, finely chopped
½ tsp salt
30g unsalted butter
2 garlic cloves, crushed
200g risotto rice
150ml vegetarian white wine
800ml vegetable stock, I use Knorr stock pots
200g frozen peas
40g vegetarian Italian hard cheese or *Parmesan
100g vegetarain goats cheese with rind, roughly chopped
Handful of fresh dill, chopped
½ lemon, juice and zest
Method 1. Start by discarding the woody ends of the asparagus spears and chop into chunks. Put to one side.
2. Prepare all of the other ingredients – making risotto is pretty hands on so you want everything ready to go. Measure out, chop and grate everything you are going to need. Transfer the hot vegetable stock into a suitably sized saucepan on the hob and keep at a very low simmer, with a ladle to hand.
3. In a large non stick pot, or saucepan with a lid, add the butter and sweat the onions down with the salt, on a low heat for around 10 mins, with the lid on. Add the crushed garlic and continue to cook for a further few more minutes. Add the risotto rice and coat well in the buttery onion mixture before upping the heat to high. Stir continually for 3 mins until the rice goes slightly translucent at the edges. Add all of the wine (it should fizz) and cook until the wine has absorbed.
4. Turn the heat down to medium and add a ladle of your simmering stock, stir until absorbed. Continue to add a ladle of stock one at a time and cook until each addition until you have one ladle of stock left. Add the asparagus along with the rest of the stock and cook until all the stock has been absorbed. Take off the heat.
5. Add the peas, lemon juice, lemon zest, fresh dill, Italian hard cheese and the goats cheese. Mix well and cover with a lid and leave for 5 mins. Finally uncover, season with salt and pepper and serve drizzled with extra virgin olive oil.
Asparagus, pea and goats cheese risotto
If you’ve had a go at making any of my recipes, I’d love to hear from you. Follow me now @corrieheale and tag your recipe pictures using #corriesrabbitfood.
Gf– Gluten free ❄ Suitable for home freezing once cooled. Consume within 3 months. *Parmesan (Parmigiano Reggiani) is always made using animal rennet, therefore it is not vegetarian. Substitute for Italian hard cheese if applicable.
Talk about online food shopping gone wrong. How on earth did I manage to order 4 red peppers the size of my head (no exaggeration). I know I’m relatively knew to the world of online shopping, but who even knew these freaky fruits existed? I stood staring in disbelief at the 4 ‘giant’ peppers lying higgledy-piggledy on my kitchen counter, dwarfing everything in their wake. At first, I laughed, until I checked my order and realised they were £3.95 EACH! Fifiteen effing pounds! I could have ordered a Domino’s pizza for that price.
“I do understand you’re upset, Ms Heale. However, the product name does state that these are giant peppers,” said Ocado.
“Yes, but ‘giant’ to me is just ‘a bit bigger than average’,” I protested. “What you gave me was a monstrosity, a freak of nature! I mean, who even knew peppers came in that size? I want my money back.”
“I will be unable to refund you on this occasion.” “But on your website the picture doesn’t give any idea of scale. If you had photographed one of the peppers next to a small dog or held it up to someone’s face, then I would have realised!”
“I am sorry, we will not be able to offer a refund for these items, as there were no quality or damage issues.”
“Is it too late to say that they’re damaged?”
“Yes.”
“Damn it!” So, I was stuck with them and, to make matters worse, I couldn’t even fit them in my fridge. Time was of the essence, these oafish fruits were not going to stay ripe for much longer, so I roasted the bastards and made this rather delicious puttanesca. Take that, Ocado!
Red pepper puttanesca Serves 4 / Hands on time 40 mins / Total time 40 mins / V ❄ You’ll need: A food processor or hand blender
320g spaghetti
80g vegetarian Italian hard cheese or *Parmesan, grated
Handful of fresh parsley, chopped
150g pitted black olives
6 tsp of capers Red pepper sauce
1 tsp olive oil
1 jar of roasted red peppers (drained weight 350g) or 6 red peppers (see roasting tip below)
¼ tsp smoked paprika
1 medium white onion, roughly chopped
¼ tsp salt
2 garlic cloves, roughly chopped
1 tbs vegetarian red wine (optional)
125ml vegetable stock, I use ½ a Knorr stock pot
2 tbs Greek yogurt
TIP: To roast your own peppers, simply cut each in half, remove the seeds and stork and place facedown on a lined roasting tray. Brush each pepper with rapeseed oil and season lightly with salt. Roast at 200°C/180°C fan/400F/gas mark 6 for 45 mins. Remove from the oven and allow to cool slightly before removing any overly charred bits of skin with a knife.
TIP: This recipe is easily halved for 2 people.
Method
1. Sweat the chopped onion and salt in a tsp of oil over a medium heat for about 10 mins with the lid on (add a dash of water if required to help the onions steam if needed). Once softened, add the garlic and the paprika and continue to cook for a further few minutes. 2. If using jarred peppers, drain and roughly chop them before adding to the onions. If using your own roasted peppers, simply add them as they are.
Add the wine and cook for a few minutes until the alcohol has cooked off, then add the stock. Simmer for 10 minutes.
3. Meanwhile, put the spaghetti in a large saucepan of salted boiling water and cook according to the packet instructions. Use this time to roughly chop the olives, capers, parsley and grate the cheese.
4. Once the sauce has thickened, take off the heat and add 2 tbs of boiling water along with 2 tbs of yogurt. Blend with a hand-blender until you have your desired consistency. Stir in the chopped olives and capers. Put to one side.
5. Once cooked, drain the pasta and give it a shake before pouring straight into the red pepper sauce. Mix well and divide into bowls. Top with a sprinkling of cheese, fresh parsley and a good drizzle of extra virgin olive oil.
Red pepper puttanesca
If you’ve had a go at making any of my recipes, I’d love to hear from you. Follow me now @corrieheale and tag your recipe pictures using #corriesrabbitfood.
❄– The red pepper sauce is suitable for home freezing once cooled. Freeze for up to 3 months.
* Parmesan (Parmigiano Reggiani) is always made using animal rennet, therefore it is not vegetarian. Substitute for Italian hard cheese if applicable.
I have nothing else to say, other than it’s hot, it’s sweaty and I am very sunburnt. It’s time to cool down with some frozen yogurt. Easiest. Recipe. Ever! The frozen berries freeze the yoghurt as you blend, so no need to wait before diving in with a spoon. Who knew science was this cool – literally?
5 minute mixed berry frozen yogurt Serves 2 / Hands on time 5 mins / Total time 5 minsV Gf You’ll need: A food processor
200g mixed frozen berries
4 tbs full fat Greek yogurt
1 tsp maple syrup or honey + extra for drizzle
Method
1 Assemble all ingredients in a food processor and blitz for about 30 seconds
or until the mixture is smooth.
2. Serve immediately in bowls topped with a few extra frozen berries, an extra dollop of Greek yogurt and a drizzle of maple syrup or honey.
Mixed berry frozen yogurt
If you’ve had a go at making any of my recipes, I’d love to hear from you. Follow me now @corrieheale and tag your recipe pictures using #corriesrabbitfood.
Last Saturday, I had so much to do that I decided to do nothing. Instead, I stayed in bed and watched back-to-back episodes of Ally McBeal and ate Marmite on toast. It was the best weekend ever. I laughed, I cried, I even ‘laughied’, which is when you laugh and cry at the same time. Anyway, the next day I managed to peel myself out of bed having achieved nothing – unless you count the new litigation skills I learnt from watching so much Ally McBeal. I do.
Regardless of what an amazing lawyer I’m convinced I would make, it quickly dawned on me that I a) have no money and b) have no food – i.e. not a great start when you’re a food blogger. Luckily, I had just enough money to go to the corner shop and buy a few jars of olives. My friend Anne-Marie had recently asked me if I had a recipe for tapenade on my website, and I said no – so thought I’d do that. Later that day, I found myself back in bed, watching back-to-back episodes of Ally McBeal and eating two different types of tapenade on toast. What? At least I did something!
Black & green olive tapenade Serves 6-8 / Hands on time 10 mins / Total time 10 mins / V VnGfDf❄ You’ll need: A food processor Black olive tapenade
200g (drained weight) pitted black olives in brine. I used a mix of Kalamata olives and black.
1 tsp capers
1 Tbs extra virgin olive oil
1 garlic clove, peeled and roughly chopped
1 tsp red wine vinegar
Juice of half a lemon
Small handful of chopped parsley to serve (optional)
Green olive tapenade
200g (drained weight) pitted green olives in brine
1 tsp capers
1 tbs extra virgin olive oil
2 garlic cloves, peeled and roughly chopped
1 pickled jalapeño pepper, stalk removed
1 tsp white wine vinegar or cider vinegar
½ lemon, juice
2 tsp pine nuts Small handful of chopped parsley to serve (optional)
Method (For both the green and the black tapenade) Drain the olives and put them in a food processor along with the other ingredients, leaving out the parsley. Blitz until you have your desired texture, I like my tapenade quite coarse so keep the blitzing to a minimum. Serve on toast, sprinkled with freshly chopped parsley and drizzled with extra virgin olive oil.
Black & green olive tapenape
If you’ve had a go at making any of my recipes, I’d love to hear from you. Follow me now @corrieheale and tag your recipe pictures using #corriesrabbitfood.
V– Vegetarian Vn– Vegan Gf– Gluten free Df– Dairy free. ❄– Freeze on the day of making, in an air tight container. Defrost fully and consume within 3 days. Freeze for up to 3 months.
I know it’s early, I know I probably shouldn’t have done it – but it’s too late now, it’s happened. Last week, I made the momentous decision to transition. Gone are the black tights, gone are the warm winter coats and knee-high boots. That’s right, my winter wardrobe has been replaced with all things summer!
Last week, temperatures soared into the late-20s, making it the hottest April in the UK on record since 1949. But, of course, in true British fashion, the weather is set to nosedive back down again. Typical. I’m not surprised, but I will not surrender – I’m sick of living in stupid Narnia. So, if you see a rather pasty, 30-something woman, wearing denim shorts and a sun hat, shivering at a bus stop this week in the rain, pay her no heed.
So, in preparation for these plummeting temperatures, I’ve made a warming carrot and ginger soup for Jamie to spoon into my mouth as I curse my idiotic decision. It’s topped with a beautifully creamy cashew nut cream, which may be a new idea to some of you. I love cashew nut cream, my mum used to make it occasionally and pour it all over my apple crumble. It’s a great dairy-free alternative to cream, and goes wonderfully well with sweet or savoury dishes. In fact, I would go so far as to say that the cashew nut cream really makes this soup, so I strongly recommend you take the time to soak those cashews – you won’t regret it. Enjoy!
Carrot & ginger soup with cashew cream Serves 4 / Hands on time 35 mins / Total time 50 mins + soaking /V VnDfGf❄
You’ll need: A food processor
2 tbs extra virgin olive oil
600g carrots, peeled and roughly chopped
1 white onion, peeled and roughly chopped
1 bulb of garlic
1 large knob of ginger (roughly 50g), minced
½ tsp ground nutmeg
1 can chickpeas, drained
1 ½ litre of vegetable stock, I use 1 ½ Knorr stock pots Cashew cream 150g cashews
½ tsp salt
1 small garlic clove, crushed
Juice of half a lemon
150ml water
Method 1. The night before, soak 150g of cashews in a bowl of water overnight or for a minimum of 4 hours.
2. Preheat your oven to 220°C/200°C fan/400°F/gas mark 7. Peel and roughly chop the carrots and put them in a large roasting tray, along with the grated ginger, chopped onion, nutmeg and olive oil. Season well with salt and pepper and give it all a good toss.
3. Cut the top off the garlic bulb, exposing the tops of the garlic cloves. Put on a small square of foil, drizzle with extra virgin olive oil and add a pinch of salt. Scrunch up the foil to seal in the bulb.and nestle into the roasting tin along with the other vegetables. Roast for 30 mins, give them a shake and then contra to roast for a further 10 mins.
4. Meanwhile, make the cashew cream. Rinse and drain the cashews and put them in a food processor along with the water, garlic, lemon juice and salt. Blitz for 3–5 mins until you have a silky smooth creamy consistency, adding more water if needed. Put to one side.
5. Once the vegetables have roasted, remove from the oven and carefully fish out the garlic foil parcel. Unwrap and leave to cool for a few minutes before squeezing the soft roasted garlic out of their shells and adding to a large cooking pot. Add the other vegetables as well as a litre of vegetable stock and the drained can of chickpeas. Season with salt and pepper and bring to the boil. Simmer for 5-10 mins before blending either in a food processor or a hand blender.
6. Decant into bowls, top with lashing of cashew cream and serve with bread.
Carrot & ginger soup with cashew cream
If you’ve had a go at making any of my recipes, I’d love to hear from you. Follow me now @corrieheale and tag your recipe pictures using #corriesrabbitfood.
V– Vegetarian Vn– Vegan Gf– Gluten free Df– Dairy free
❄– Suitable for home freezing once cooled. Consume within 3 months. Freeze cashew cream separately. Keep for up to 3 months.
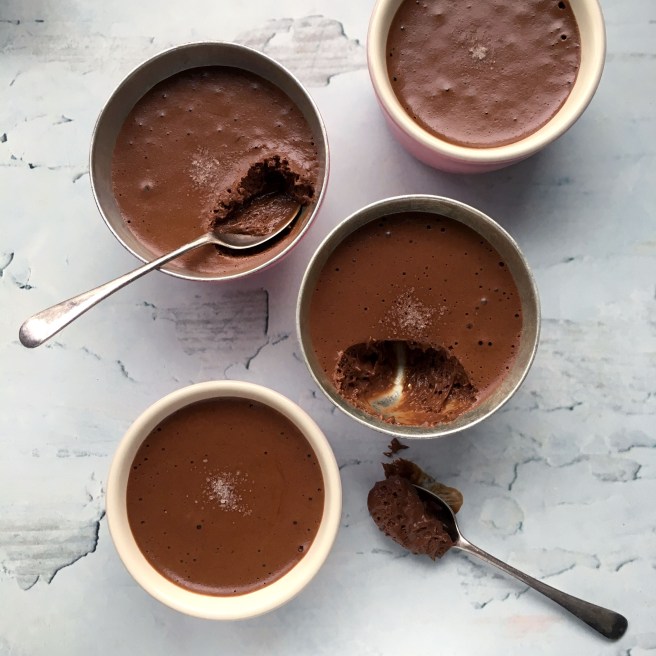
Let’s have one last hurrah before bikini season and pour some salty chocolateyness down our throats. Actually, if you can pour the mousse, then you’ve probably made it incorrectly. The mousse should be nicely aerated and set – perfect for plunging your face and/or spoons into. Personally, I prefer face, but whatever floats your boat.
Salted chocolate mousse with olive oil Serves 4 / Hands on time 20 mins / Total time 20 mins + chilling /V Gf You’ll need: A standing mixer with a balloon whisk attachment and an electric hand whisk
150g *Green & Black’s Organic 70% dark chocolate
4 large eggs, separated
80g caster sugar
80ml Pomora extra virgin olive oil
1 tbs brandy
Good pinch of sea salt flakes
Method
1. Start by separating the egg yolks from the whites into two separate bowls.
2. Break your chocolate into pieces and gently melt over a pan of simmering water in a heatproof bowl. Whilst the chocolate it melting, use this time to measure out the sugar and the extra virgin olive oil.
3. Once melted, take off the heat and leave to cool (but not set). Meanwhile, beat the egg yolks with a hand whisk until combined and slightly paler in colour.
4. Add a good pinch of salt to the melted chocolate and give it a good mix before tasting (to get the balance of salt right you need to keep tasting the chocolate). Once salted, beat the olive oil straight into the melted chocolate using an electric hand whisk on a slow setting. Add the oil in a steady, slow stream until your chocolate is lovely and glossy. Add the egg yolks slowly along with a tablespoon of brandy and whisk again, put to one side.
5. In your standing mixer, whisk the egg whites on a high speed until you have white soft peaks. Turn the speed down slightly and add the sugar a tablespoon at a time until incorporated. On a medium speed, beat a third of the chocolate mixture into the egg whites before folding the rest of the chocolate in by hand using a metal spoon (try not to over beat as you’ll knock the air out of the mousse).
6. Pour into four ramekins and chill for at least 3 hours before serving topped with a little sea salt.
Salted chocolate & olive oil mousse
If you’ve had a go at making any of my recipes, I’d love to hear from you. Follow me now @corrieheale and tag your recipe pictures using #corriesrabbitfood.
V– Vegetarian Gf– Gluten free
*The Green & Black’s Organic 70% dark chocolate I use in this recipe is gluten free but some other brands may not be. Always check the label.


 2. If using jarred peppers, drain and roughly chop them before adding to the onions. If using your own roasted peppers, simply add them as they are.