Using extra virgin olive oil to make granola might seem like I’ve lost my tiny little mind but don’t knock it until you’ve tried it. This is my friend Bianca’s recipe and she is a professional food stylist, so if you don’t trust me, trust her!
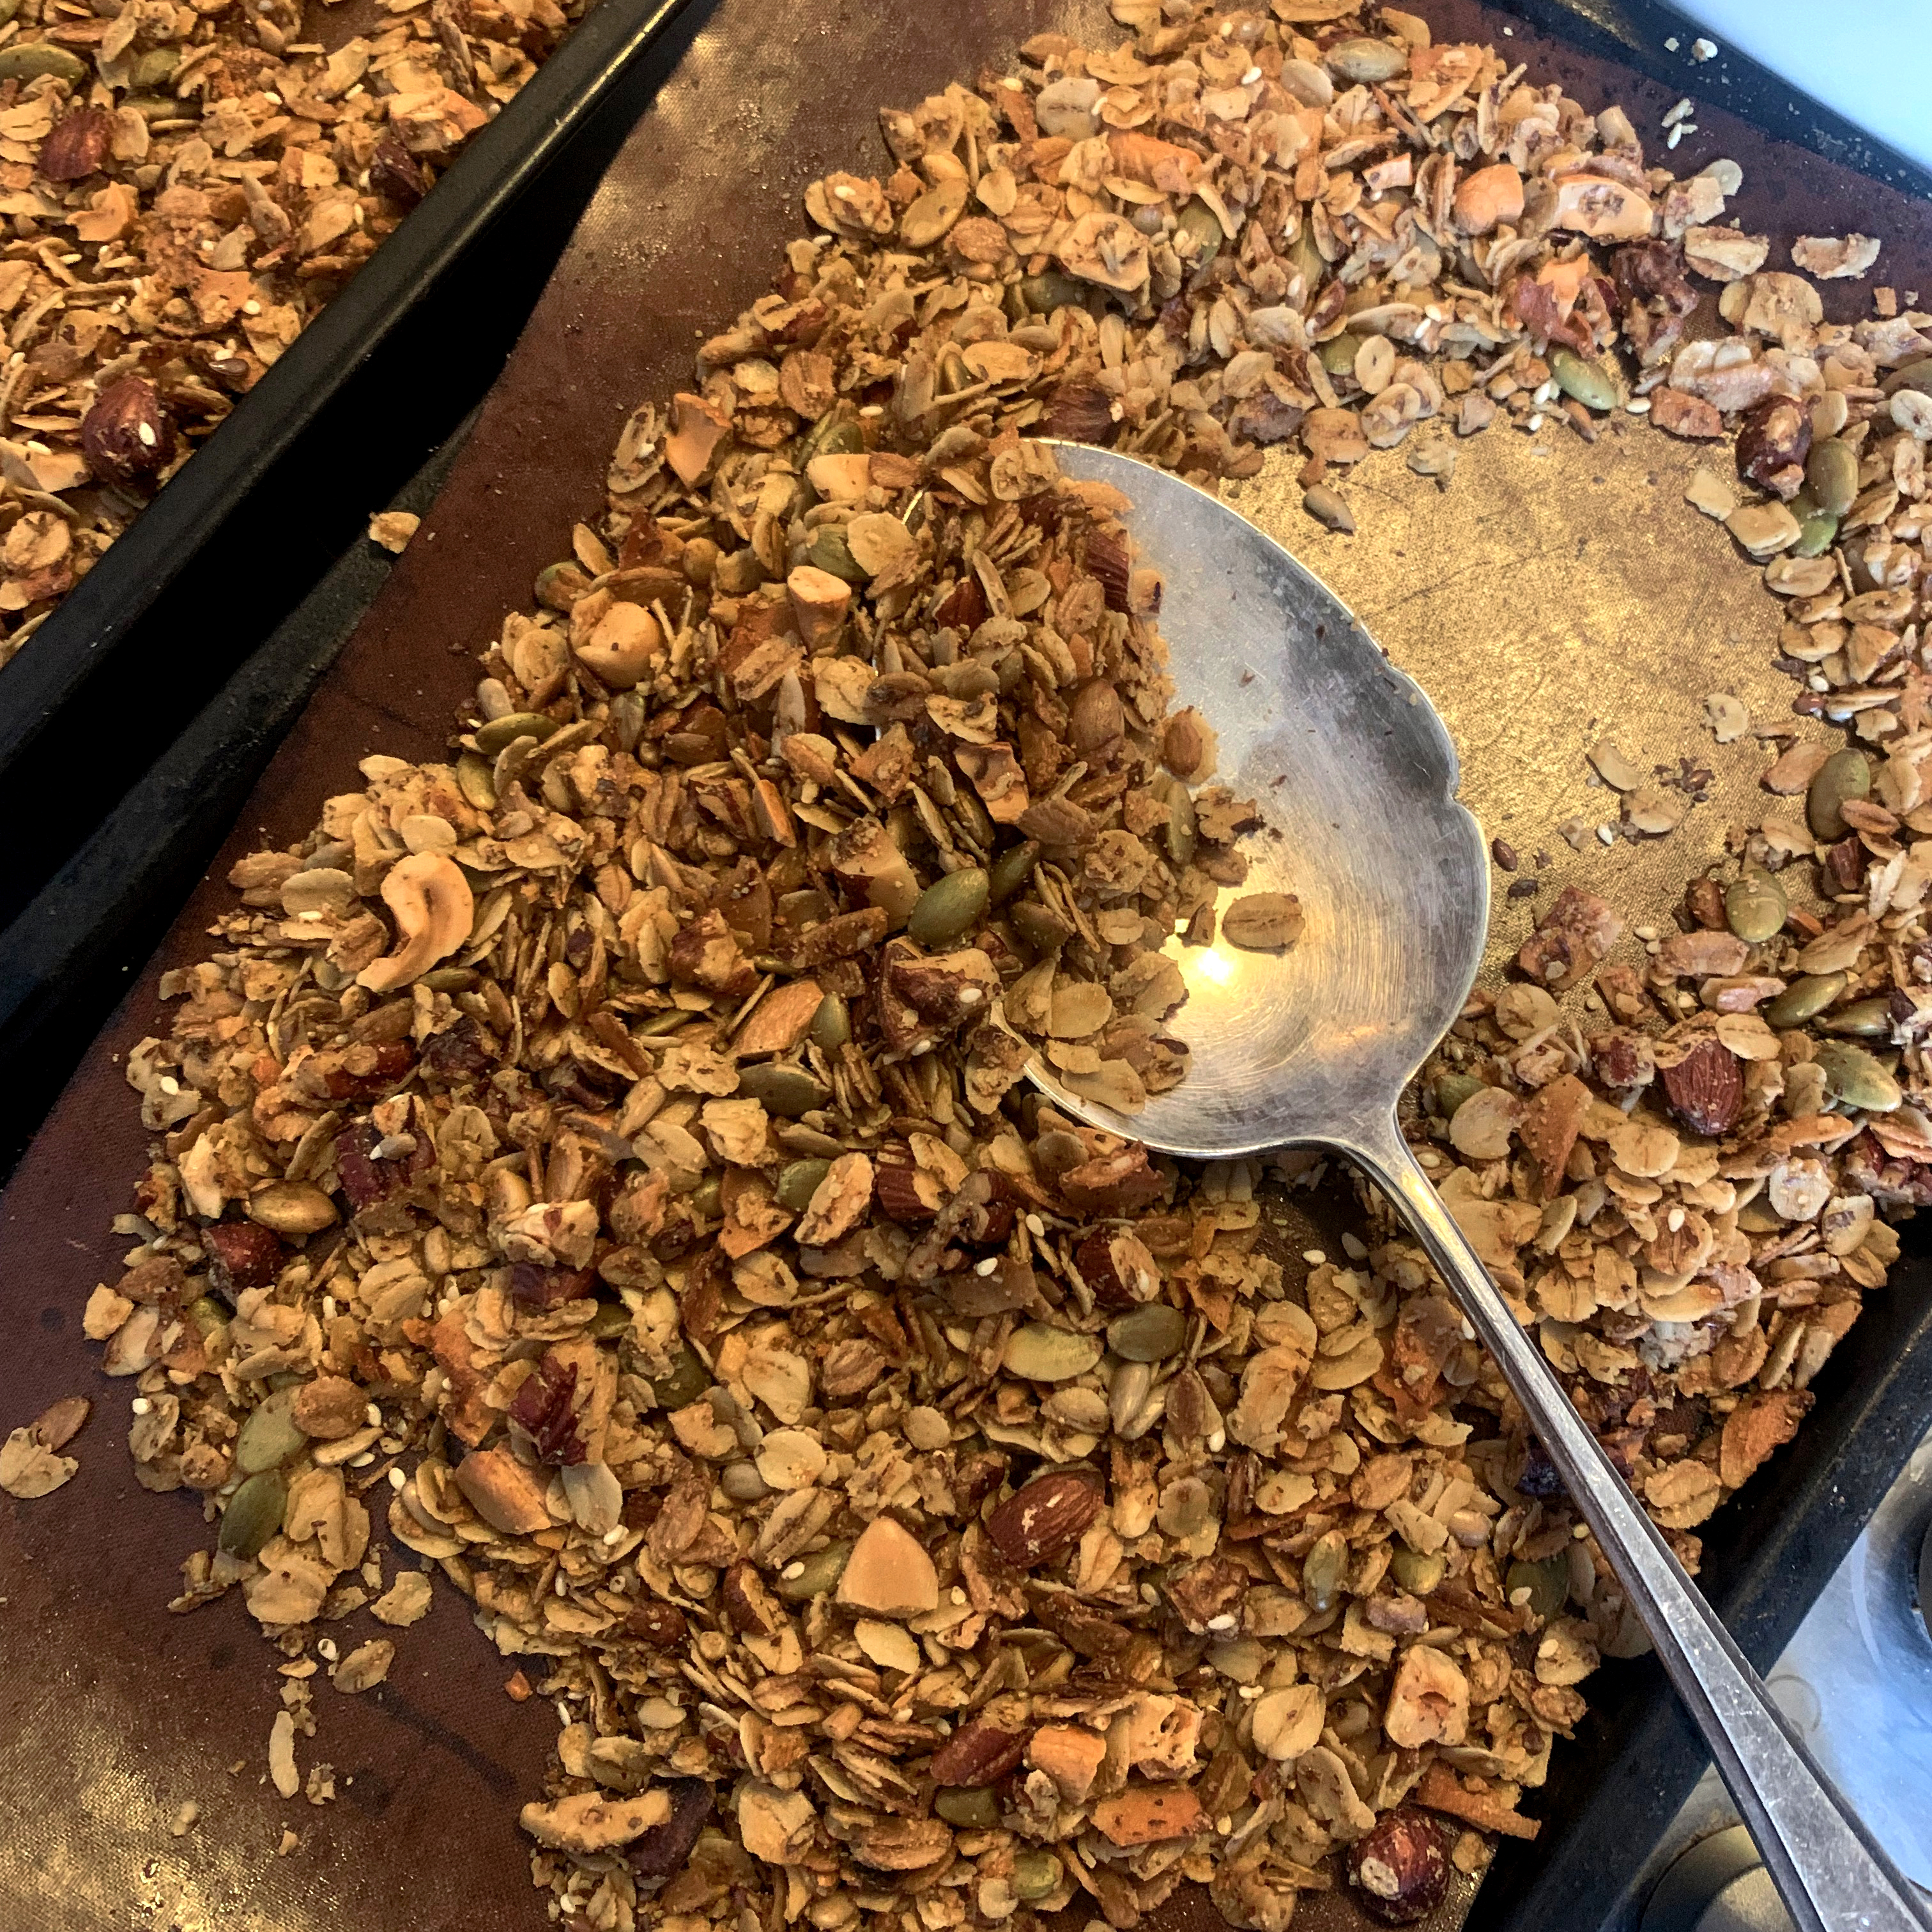
Nutty olive oil granola
Make 1 litre jar / Hands on time 20 min / Total time 55 mins + cooling time / V Vn DfGf Dry ingredients:
100g jumbo rolled oats or gluten free oats 33g spelt flakes 75g mixed nuts, finely chopped 25g mixed seeds 25g pumpkin seeds 15g coconut flakes, finely chopped 15g milled flaxseed Pinch of fine salt Wet ingredients: 35g maple syrup 50ml extra virgin olive oil
Nutty olive oil granola
1. Preheat an oven to 160°C/140°C fan/325°F/gas mark 3 and line two baking trays with parchment paper.
2. Start by roughly chopping the nuts along with the coconut flakes (I tend to chop mine quite finely so that I get larger variety of nuts in every mouthful but if you prefer a chunkier texture, then chop them less).
3. Add all the dry to a large bowl and give it a good stir until well combined.
4. Mix together the maple syrup and extra virgin olive oil in a small bowl before adding and mixing well, making sure the mixture is well coated.
5. Divide the granola evenly between the 2 trays and spread out as evenly as possible.
6. Bake in the over for 30 mins making sure to turn the granola gently every 5 mins with a spatula. Bake until the granola is nicely golden and toasted (granola burns easily make sure you keep a close eye on it while it’s cooking).
7. Leave to cool fully on the trays before adding any chopped dried fruit and scooping into an airtight container or jar. Serve with yogurt and fresh fruit.
Nutty olive oil granola
If you’ve had a go at making any of my recipes, I’d love to hear from you. Follow me now @corrieheale and tag your recipe pictures using #corriesrabbitfood.
A dried chickpea is a thing of wonder and mystery. A small hard little bullet that requires soaking and boiling until it finally becomes edible. Sounds like a lot of effort to me. I’m the kind of gal who likes to shmoosh up a can of ready prepared chickpeas in 5 minutes and call it hummus –isn’t that what canned chickpeas are for? That being said, I have it on good authority that soaking and cooking dried chickpeas makes a vast improvement over my tinned version so was intrigued enough to try it for myself. Soaking the chickpeas overnight is the only step that makes the process lengthy but other than that, the task was relatively effortless and well worth it. My hummus was silky smooth, buttery and creamier than any I have ever made. Sprinkled with smoked paprika and drizzled with lashings of extra virgin olive oil, I served mine warm straight out the pot shovelled on top a hot pita bread. Nom nom.
Authentic hummus Makes approx 600g / Hands on time 15 mins / Total time 1 hr 20 mins + soaking overnight /V VnGfDf You’ll need: Food processor or hand blender 250g dried chickpeas 1tsp sea salt flakes ½ tsp bicarbonate of soda For the hummus: 2 garlic cloves 2 tbs tahini Juice of half a lemon 2 tbs water (more if you like a looser texture) 1tsp sea salt flakes To serve: Smoked paprika, chopped parsley and a good quality extra virgin olive oil
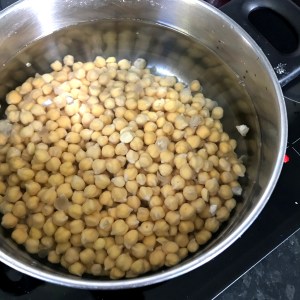
Add the dried chickpeas to a large bowl and cover with twice the volume of cold water (filtered if you have it). leave to soak for at least 12 hours – I tend to do this overnight.
Drain and rinse the chickpeas well before transferring to a large saucepan. Cover again with twice the volume of cold tap or filtered water and add 1 tsp of salt and ½ a tsp of bicarbonate of soda and stir well.
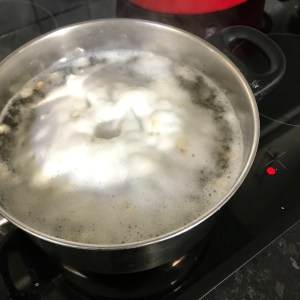
Place over a high heat and bring to a furious boil for 10 mins, skimming off any foam and loose skins that have come away. Turn the heat down to a simmer and continue to skim off and disregard any other loose skins occasionally for 50 mins. Your chickpeas should be soft enough to squish between your fingers. If they’re still little hard, continue to cook them until they are soft.
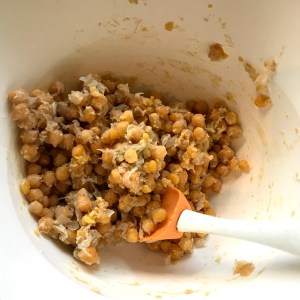
Drain the chickpeas over a large bowl to reserve the water and leave to cool in a colander for 10-15 mins. Tip the warm chickpeas into a food processor or large bowl (if using a hand blender) and add the tahini, garlic, lemon juice, salt and 2 tbs of the reserved water. Blitz until you have your desired texture. If you like your hummus extra smooth, add additional chickpea water and blend for longer until you get your desired textured.
Spoon into a bowl and serve warm topped with chopped fresh parsley, a dusting of smoked paprika and a good glug of good quality extra virgin olive oil.
Authentic Hummus
If you’ve had a go at making any of my recipes, I’d love to hear from you. Follow me now @corrieheale and tag your recipe pictures using #corriesrabbitfood.
If you’ve had a go at making any of my recipes, I’d love to hear from you. Follow me now @corrieheale and tag your recipe pictures using #corriesrabbitfood.
Would you judge me if I told you that I ate half a stuffed crust pizza, a tube of Smarties and three Percy Pigs for breakfast? Perhaps let’s not go there then, but suffice to say, I feel disgusting – diet starts tomorrow.
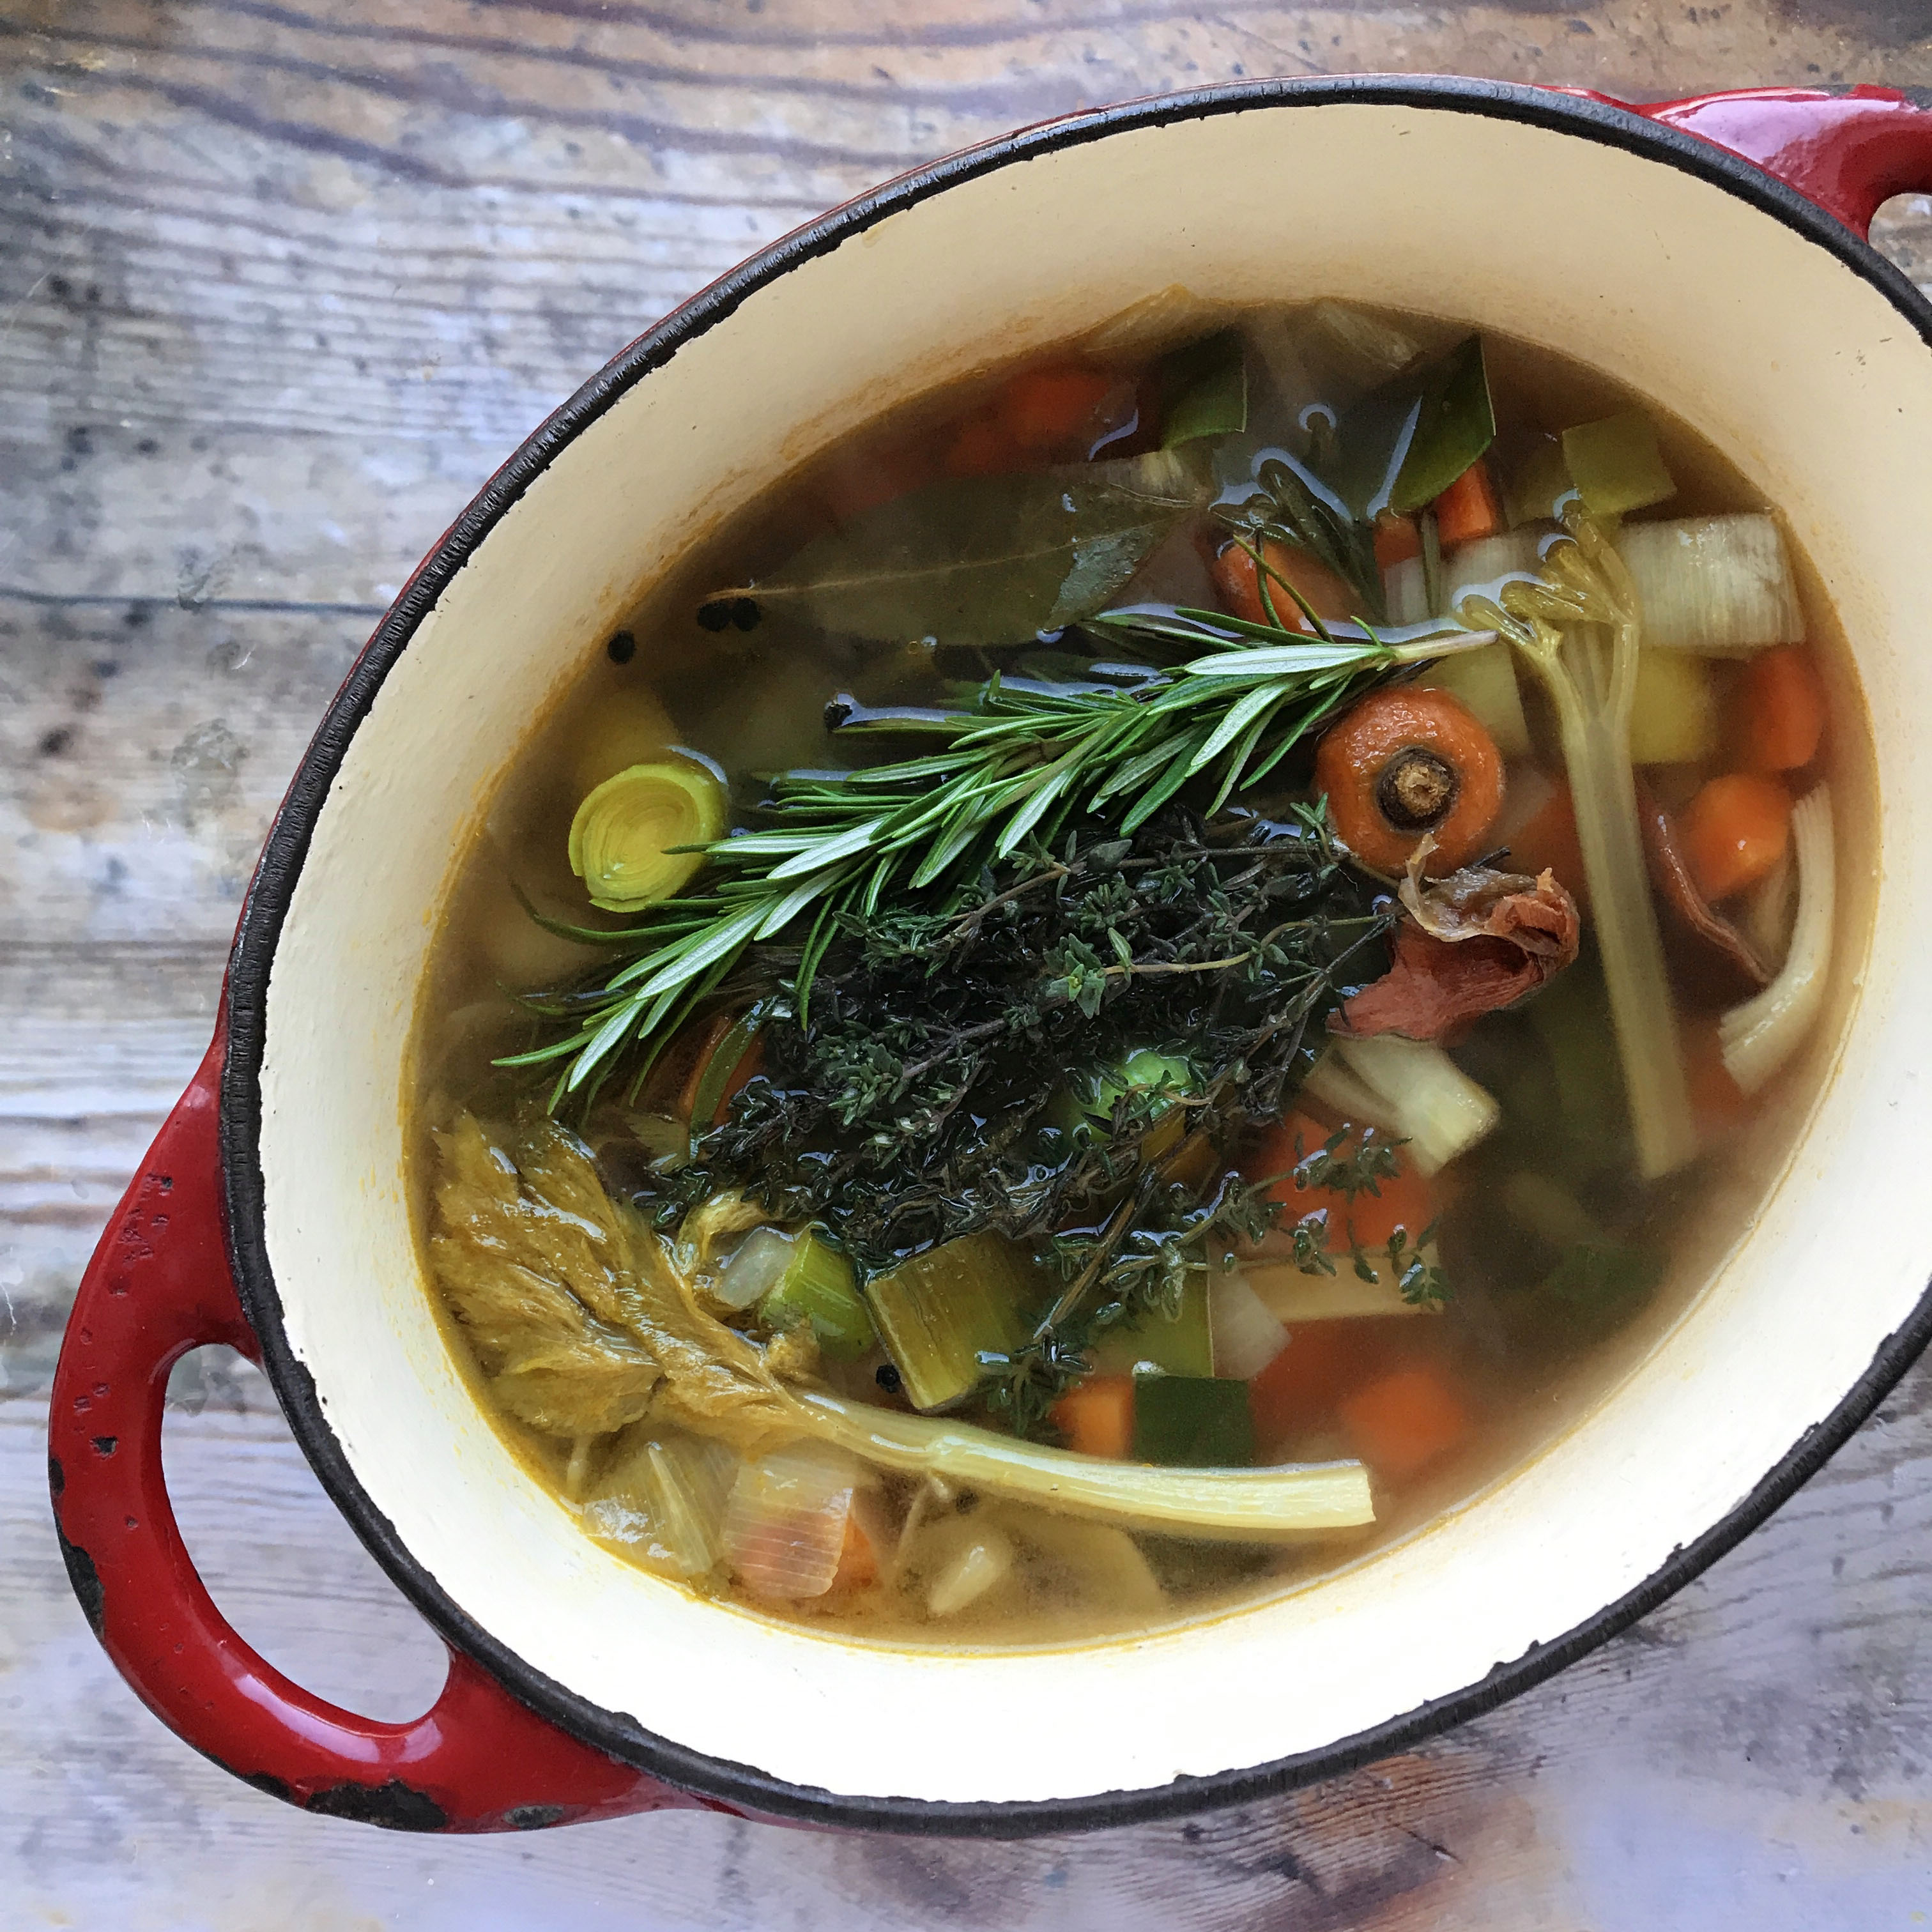
So in a bid to absolve myself, I made this hearty vegetable stock that I could drink to cleanse my junk-food-laden soul – or simply to make a delicious soup that I will share with you next week. I’m sure you’re on tenterhooks.
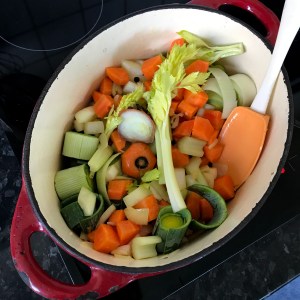
Homemade vegetable stock Makes 1 litres / Hands on time 15 / Total time 1 hr 30 mins /V VnGfDf❄ You’ll need: A large pot with a lid
1 tbs rapeseed oil
3 garlic cloves, bashed
3 carrots, peeled and roughly chopped
3 onions, peeled and roughly chopped
5 sticks of celery, roughly chopped
1 large leek, roughly chopped
4 sprigs rosemary
1 small bunch of thyme
1 Bay leaf
2 tsp salt flakes
1 tsp black peppercorns
2 litres boiling water
Tip: Bear in mind that you will be left with half the amount of stock than water you put in. If you wish to make more than one litre consider doubling the recipe.
Method
1. Peel and roughly chop the carrots, onions, celery and leek. Using the flat part of a knife, apply pressure to the garlic cloves until they split open (no need to chop them). Add a tbs of rapeseed oil to a large pot with a lid and set over a medium heat. Add the chopped vegetables along with the salt before giving a stir and covering with the lid. Leave to sweat for 15 minutes, stirring occasionally.
2. Once softened, add 2 litres of boiling water straight from a kettle, turn up the heat and bring to a boil. Turn down the heat to a simmer and add the rosemary, thyme, peppercorns and bayleaf. Simmer away for one hour.
3. Carefully strain the stock through a sieve into a large bowl and use immediately or allow to cool and freeze to use another day.
Homemade vegetable stock
If you’ve had a go at making any of my recipes, I’d love to hear from you. Follow me now @corrieheale and tag your recipe pictures using #corriesrabbitfood.
V– Vegetarian Vn– Vegan Gf– Gluten free Df– Dairy free
❄ Suitable for home freezing once cooled. Consume within 3 months.
When it comes to making things like cheese and bread, I have to admit that I have a bit of a bad attitude. I mean, why would I bother when I can buy a lovely loaf of bread from the shop made by someone who actually knows what they’re doing? I know that’s not the point, but sometimes I find it hard to snap out of my stubborn, convenience-obsessed self.
So, after accidentally adding two pots of Greek yoghurt to my online shopping basket, I decided to roll up my sleeves and have a go at making labeh* – I mean, there’s only so much yoghurt a girl can eat.
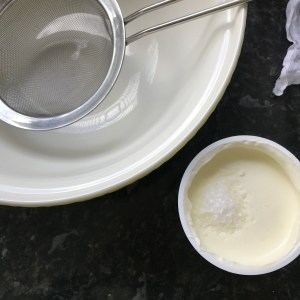
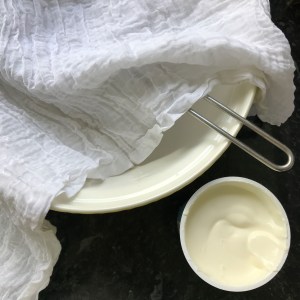
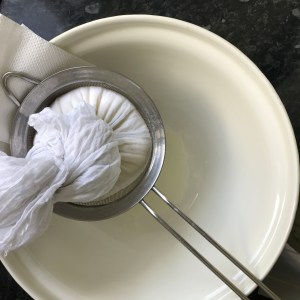
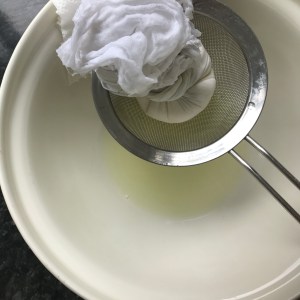
I dug out the muslin cloth I used to make cheese three years ago and draped it over an inadequately sized sieve, balanced over an inadequately sized bowl. I added salt to my yoghurt and poured it straight into the muslin and tied it in a knot. Okay, what next? Oh, is that it? Well, that was easy. So I walked off and enjoyed an afternoon watching Blake Lively almost get eaten by a very big shark in The Shallows.
*For those of you that don’t know, labneh is literally strained yogurt. It has the texture of cream cheese but the flavour of Greek yoghurt and is utterly delicious. Serve with salads, roasted vegetables, on toast or check out what I decided to make with it next week. Oh, I bet you’re on tenterhooks.
Homemade labneh Makes 350g / Hands on time 10 mins / Total time 10 mins + 20-24 hours draining /VGf You’ll need: Roughly a metre of fine muslin
500g full-fat Greek style yogurt
1 heaped tsp of sea salt flakes
Method
1. Place a sieve over a large bowl and cover with a muslin cloth folded in half (you need to fold the muslin to prevent yogurt seeping through, you only want to remove the liquid).
2. Add the salt directly to the tub of yogurt and stir well with a butter knife (you can use a spoon but the surface area of a butter knife is smaller so you’re less likely to spill the yogurt).
3. Once combined, spoon the yogurt straight into the muslin cloth. Gather up the edges and tie in a tight knot (the liquid draining out of the yogurt should be relatively clear). Keep in a cool dry place for 20-24 hours covered with a tea-towel (the longer you leave the labneh the thicker it will become).
4. When you’re ready, give the labneh a final squeeze to get rid of any excess water before untying the knot. Tip the labneh into an air-tight container and store in the fridge. Consume within 3 days.
If you’ve had a go at making any of my recipes, I’d love to hear from you. Follow me now @corrieheale and tag your recipe pictures using #corriesrabbitfood.
Just in case you didn’t know, drinking numerous Smirnoff Ices through a straw containing shots of sambuca is not a good idea past the age of 30. This goes without saying, but if you’re as a dumb as me and choose to ignore this advice, then a two-day hangover is winging it’s way to you. Brace yourself, it’s gonna hurt.
Why do I do this to myself? I can hardly manage a large glass of wine these days, let alone alco-pops followed by shots. I mean, who do I think I am, Keith Richards? No, just give me a nice cup of tea, a sit down, and a lovely bowl of hummus topped with roasted vegetables, please. It won’t cure your hangover (only Lucozade and salt-and-vinegar crisps can do that), but it’s darn good, and will have you feeling all nourished and smug – you can pretend you’re a Hemsley sister.
Roasted vegetable hummus bowl Serves 2 / Hands on time 30 mins / Total time 30 mins /VVnDf You’ll need: A hand blender or food processor
1 tsp rapeseed oil
3 sprigs of rosemary
1 aubergine, chopped into chunks
1 small red pepper, de-seeded and roughy chopped
1 red onion, peeled and roughly chopped
100g baby carrots
½ tsp smoked paprika Pomora extra virgin olive oil For the hummus
1 can of chickpeas, drained
1 garlic clove, crushed
1-3 tbs of water
1 ½ tbs tahini
½ lemon, juice
1 tbs extra virgin olive oil To serve 2 wholemeal pita breads (optional)
TIP: This is a good way of using up the unwanted vegetables in the fridge so feel free to adapt the recipe to whatever you have.
Method
1. Start by pre-heating your oven to 200°C/fan 180°C/400°F/gas mark 6. In a large roasting tin, add the whole baby carrots, chopped aubergine, red pepper, red onion and rosemary sprigs. Sprinkle the vegetables with smoked paprika, olive oil and a generous grind of salt and pepper and give it all a good stir. Once the veg is evenly coated in the oil and spices, roast in the oven for 20-25 minutes.
2. Meanwhile make your hummus by combining the chickpeas, crushed garlic, tahini, lemon and a good crack of salt and pepper in a bowl. Start by adding 1 tbs of water and then blitz until smooth with a hand blender – if the mixture is too firm add a dash more water until you get your desired thickness. Stir in a tablespoon of extra virgin olive oil and season to taste.
3. Spoon the hummus evenly into bowls and using the back of a tablespoon, create a rough bed for your roasted vegetables. Once the vegetables are nicely roasted, remove from the oven, discard the rosemary sprigs and spoon into the centre of your hummus. Drizzle with a generous glug of regular or Pomora rosemary infused extra virgin olive oil and serve with warm pita breads.
Roasted vegetable hummus bowls
If you’ve had a go at making any of my recipes, I’d love to hear from you. Follow me now @corrieheale and tag your recipe pictures using #corriesrabbitfood.
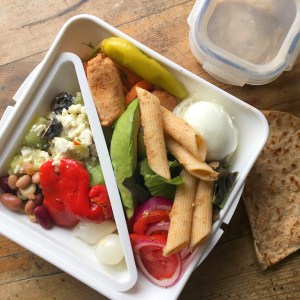
I spend a fortune on salad boxes. At least twice a week, I find myself at a salad buffet, filling up a teeny-tiny plastic tupperware box that I could frankly make myself for half the price.
“That will be £6.50 please” says a skinny girl with dreadlocks.
“£6.50? But I only got a small box?!” I blurt out.
“Yeah but you pay by weight” she says, looking me up and down. What the hell did she mean by that? She snatches my tenner our of my hand and replaces it with a few pound coins.
Have I just been robbed and insulted? When did we start paying for things by weight? No salad should ever cost more than a fiver, no matter how much it weighs or how much halloumi you manage to cram in it.
I look down disappointedly at my little box, for something so small, it really is rather heavy (the girl may have had a point). It looks visibly stressed, all angry and shmooshed pressed up against the plastic. Sorry salad, I feel like I’ve killed you.
Anyway I tip it out onto a plate and scoff the lot at my desk and as usual, it’s under seasoned, underwhelming and disappointing.
Well no more! I’ve decided to take matters into my own hands and make my own buffet style salad, minus the disappointment.
I find the key to building a good salad box is to keep it simple but a bit exotic. Treat yourself to a few of your deli favourites, add a bit of roasted veg, a sprinkle of seeds and you’re good to go. Take that dreadlock girl! You’re not getting you’re hands on my £6.50 this week.
How to build your salad: 2 handfuls of leaves: If buying a bag of salad I would stick to either rocket, watercress or spinach, they last longer than the mixed varieties. I tend to buy baby gem or just a regular lettuce and chop it up as I need it. It’s cheaper and can last up to a week.
1 handful of vegetables: Here are a few ideas I like that are quick and easy to make yourself. You only need to pick one of these… Baked sweet potato/butternut squash, minted new potatoes, roasted carrots with dill and lemon (see recipe) mixed roasted vegetables, tomato and onion salad (see recipe), roasted peppers. Feeling lazy? Then shop bought deli artichokes or even jarred peppers such as Karats Roasted Red Peppers are delicious and a great substitute.
Pick your star: Mine is nearly always cheese, 50g of either feta, mozzarella, goats cheese or halloumi. For a more substation lunch though, I like to also include either a boiled eggs (hard boiled these can last up to a week in the fridge), half an avocado or even quorn. (If you eat meat this is your chance to add a bit of cooked chicken or fish).
Make it hearty with 2 tablespoons of…Couscous, brown rice, five bean salad (see recipe) quinoa, pasta salad (see recipe). You don’t need to make much of this, 100g should be enough for the week.
A sprinkle of crunch: This is optional but I always like to sprinkle my salads with either pumpkin seeds, sunflower seeds, croutons or pomegranate seeds to give it some bite.
Carbs: I literally can’t eat a salad without at least a little bit of bread. I like a mini pitta, a small brown flat bread or even a couple of oat cakes.
Dress is up: 1 tablespoon of either homemade dressing (see recipe) shop bought dressing, humous, zatziki or even a good drizzle of chilli sauce.
Extra acidity: Again this is optional but I always think a salad is greatly improved by acidity, tang and bit of heat. I always include a few olives, a sprinkle of chilli flakesand some sort of pickle, whether is be a couple of pickled onions, gherkins, pickled chillies or jalapeños.
So there you have it! The building blocks to make your very own buffet salad without the buffet. Here are a few of my favourite staples to get you started…
Roasted carrots with dill and lemon dressing: Preheat an oven to 220°C (200°C fan). Peel and chop two large carrots and pop them on a baking tray. Sprinkle with salt and pepper and spray them with spray oil. Pop them in the oven for 10 minutes before giving them a quick turn with a spatular. Continue to cook for a further 10 minutes. Meanwhile chop a small handful of dill and make the dressing by combining 1 teaspoon of lemon juice, 1 teaspoon of olive oil and a sprinkle of salt and pepper. Once the carrots are roasted leave to cool fully. Once cool, tip the carrots into a bowl and stir in the dressing and the chopped dill. Put in an airtight container and keep for up to 3 days in the fridge.
Five been salad:
I literally buy a can Napolina Five Beans, strain them and give them a quick rinse (not too much or you’ll lose the flavour as they are slightly spiced). I then add a finely chopped stick of celery and that’s it! Pop in an air tight container and use within 3 days.
Cucumber, feta and olive salad: Peel and chop half a cucumber and pop it into a bowl with a sprinkle of salt. Roughly chop a large handful of black pitted olives (roughly 80g) and add this to the cucumber. Crumble over half a pack of feta cheese (around 100g) and give it all a good mix. Finish with a drizzle of extra virgin olive oil and keep in an airtight container for up to 3 days.
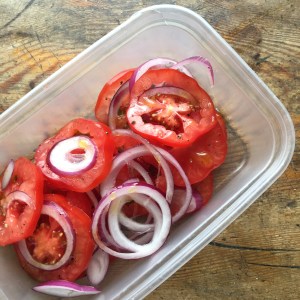
Tomato and onion salad: Slice 2 tomatoes along with a few slices of peeled red onion. Season well with salt and black pepper and finish with a drizzle of olive oil. Keep in an airtight container for up to 3 days. (This is so easy that you don’t even really need to pre-prepare it, you could just chop them up in the morning if you have time before work.)
Whole baked sweet potato: Preheat an oven to 220°C (180°C fan). Carefully score a sweet potato with a sharp knife along the skin and insert into the centre. Withdraw the knife and pop in the oven for 40 minutes turning half way through. Leave to cool before cutting up and adding to salads. Wrap in foil and keep in the fridge for up to 4 days.
Pesto pasta salad: Cook 50g wholewheat pasta according to instructions. Once cooked, drain and cool with a stream of cold water before returning it back into the saucepan. Cover with cold water and leave to cool. Drain again. Stir through a tablespoon of your favourite pesto (I like Sacla’s Chargrilled Aubergine). Transfer to an air tight container and refrigerate for 3 days.
Dressing: I like to keep it simple when it comes to salad dressing so I tend to stick to honey and mustard, I find it also goes with almost any salad. For a single salad I would use 1 tsp of extra virgin olive oil, 1 tsp of balsamic vinegar and mix together in a small ramekin. Add a quarter teaspoon of Dijon mustard and a drizzle of honey. Season with salt and pepper and stir again until combined. Sometimes I even add a teaspoon of humous to make a creamier more indulgent dressing.
Lunch boxes:
If you ever needed an excuse to buy some snazzy Tupperware then surely this is it. I have a bit of an unhealthy obsession with Tupperware but this is my current favourite by Box Appetit, I have two of the same box, one in pink and one in green and I use them all the time. Happy lunching everyone!
Homemade Salad Boxes
If you’ve had a go at making any of my recipes, I’d love to hear from you. Follow me now @corrieheale and tag your recipe pictures using #corriesrabbitfood.
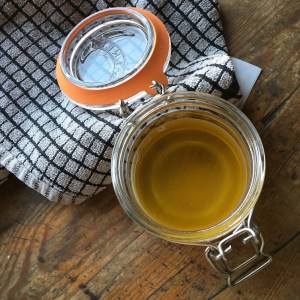
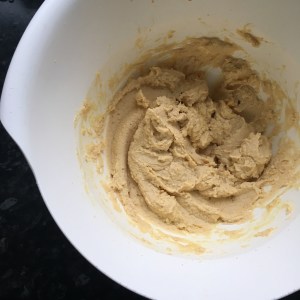
I started using Clinique Take The Day Off Cleansing Balm a couple of years ago and fell in love with it. Rubbing it over my make up felt very weird, but using a warm flannel to massage my face on top of the balm, was far more effective and gentle at removing my make up than my usual harsh face wipes. But as Clinique is now one of the products I’m trying to avoid, I need a cruelty free alternative.
As it happened, I actually already had one in my cupboard EVE LOM Cleanser.I started using it and found the results similar to the Clinique so was initially very happy, until I went to buy more and found out it was £85! Where did I even get this from? Must have been a present. Anyway, as lovely as it was, it’s a little too pricy for me so I thought I’d have a go at making my own, I mean, how hard can it be? Turns out it was easy, so I’ve been using my homemade balm for three months now with similar results to the above products, for a fraction of the price. So I’ve made some more and this time, I took some pictures for you and wrote down the recipe in case you fancy having a go yourself. I used lavender, lemon and forget me not to fragrance my cleanser but you can use any essential oils you like.
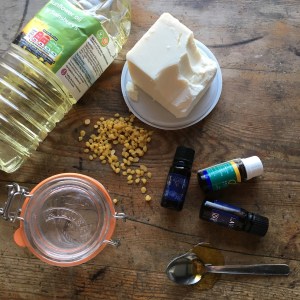
Lavender & Forget Me Not Cleanser
100ml Sunflower oil
2tsp Extra virgin olive oil
12g Unrefined Shea butter
12g Beas Wax (I recommend using pellets as they melt quicker)
12 drops of Lavender essential oil
8 drops of lemon essential oil
4 drops of forget me not essential oil
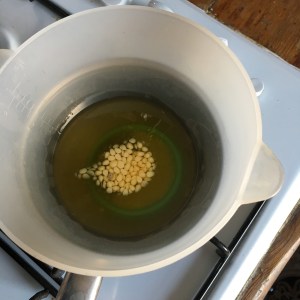
How to make: 1. In a bain-marie, heat all the ingredients apart from the essential oils until the wax has melted stirring occasionally with a teaspoon. This should take about 20 minutes.
2. Meanwhile, sterilise a jar by pouring boiling water carefully over it drying with a clean tea towel.
3. Once the mixture has melted take off the heat and add the essential oils as the mixture begins to cool. Pour into your jar and leave for 1-2 hours to set. Store in a cool dry place and keep up to three months. (It’s a good idea to stick a small label on the bottom of your jar with a use by date on, especially if you’re giving it to someone as a gift.)
How to use: 1. Scoop out a coin sized amount and rub in-between your fingers to loosen up a bit.
2. Apply to your face bare or on top of make up in small circular movements. Work the product into your skin for about a minute.
3. immerse a clean flannel into a basin of warm water, rinse and hold over your face for three deep breaths. Wash and rinse the flannel and then using circular motions, carefully remove the balm from your face. Rinsing the flannel as and when needed. Lovely.
I really should stop buying horrible cheap tomatoes, I mean they aren’t even red for starters, tomatoes should be red right? These were more of an orange colour. I’ve tried several times to ripen them in a fruit bowl but they stubbornly just stay the same – the little shits. I refuse to be out-smarted by a tomato.
Tasting literally of nothing and with a firm almost furry texture, these ghastly toms are franky not worth the 70p I paid for them… But that’s such a reasonable price I remember thinking, staring down at them on the supermarket shelf. Whatever, I’m sure they’ll taste fine so I chuck them in my basket. NOOOOOOOO! Why do I always make the same mistake?!
Well that’s an easy question, I’m always skint, so spending £2 on Taste The Difference tomatoes (even though they look devine and juicy) makes me wince ever so slightly, especially when I know I could buy at least 4 Snickers bars for the same price. But as I chomp down on my sad, flavourless, sandwich, I realise my 70p tomatoes are duds. Perhaps tomatoes are just one of those foods you should spend the money on? I guess it wouldn’t kill me to eat a few less Snickers bars – cue sad face.
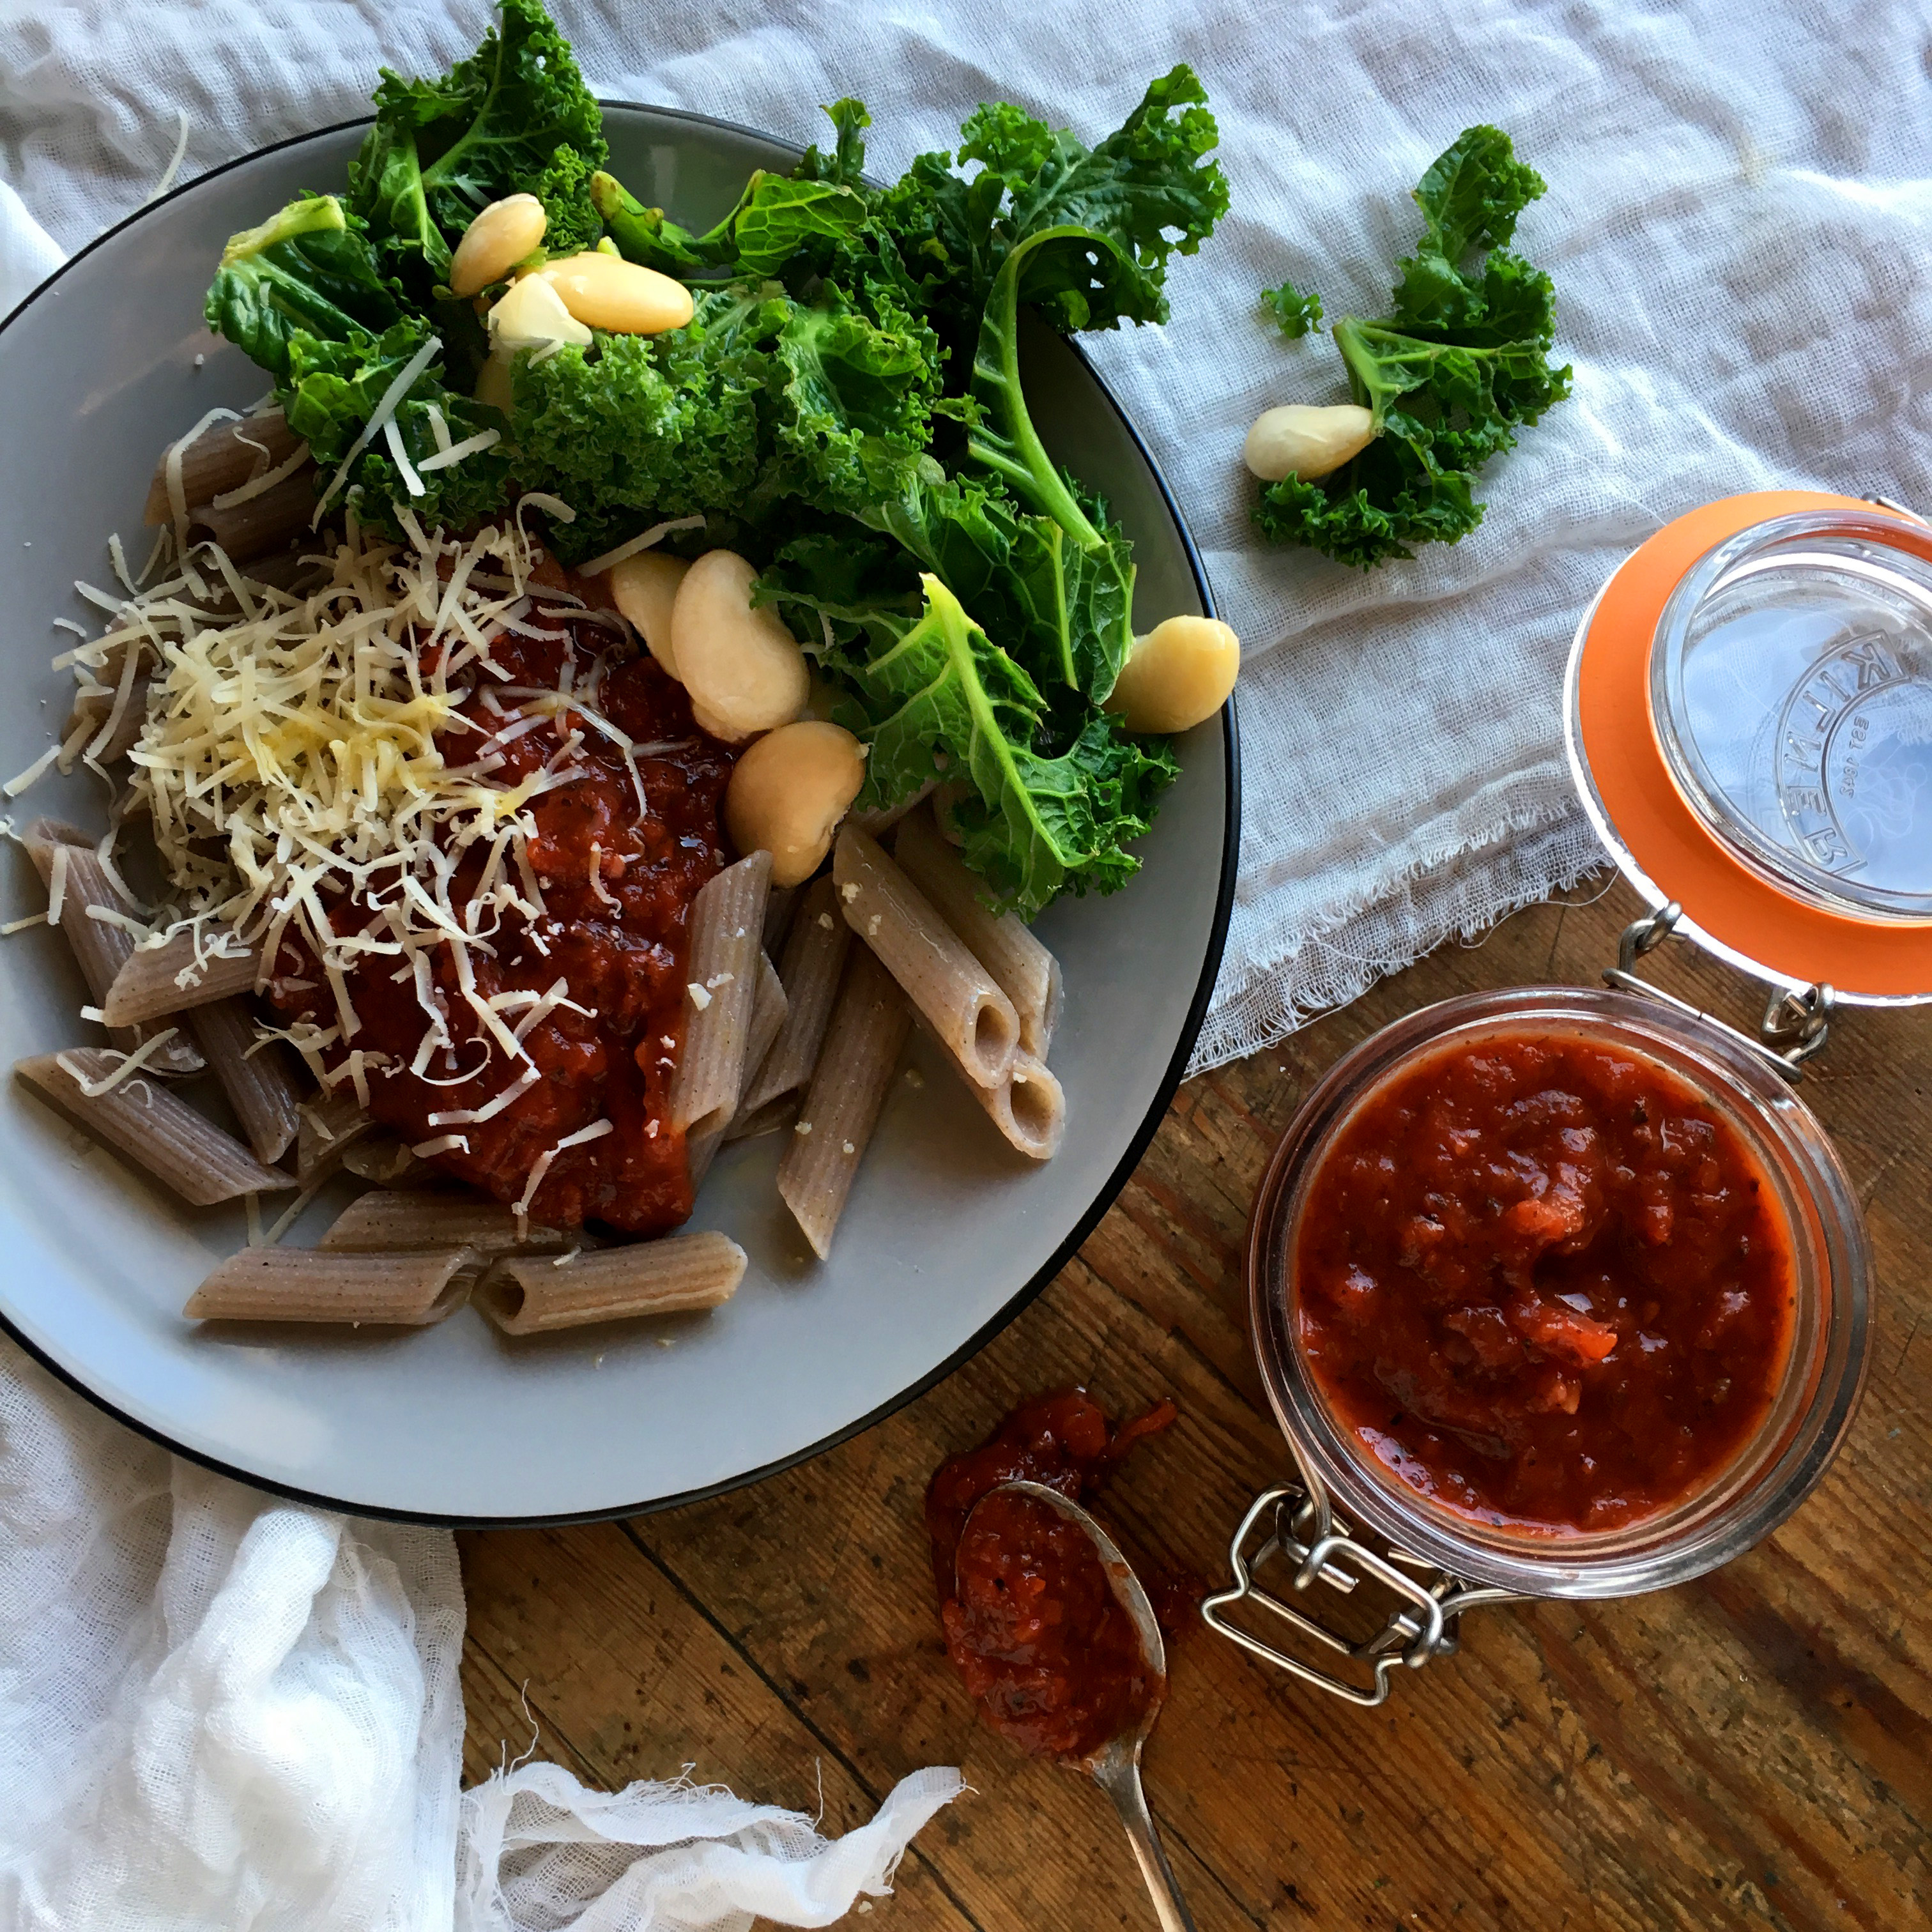
Anyway, so now I’m left with five, unripe, tomatoes so it’s either ruin my sandwiches for the rest of the week, or turn them into pasta sauce. Not only is this a great way to use up unwanted tomatoes but it makes enough sauce to jazz up your pasta dishes for the rest of the week. It’s easy, healthy and turns those rock hard tasteless toms into something rather splendid. Good times.
Tomato penne with greens & butter beans
Makes 1 jar of sauce / Serves 2 / Takes 30-40 minutes / V ❄ You’ll need: Food processor or a hand blender Pasta Sauce ½ red onion, finely chopped
2 garlic cloves, chopped
5 tomatoes
2 tbs tomato puree
4 tbs vegetarian red wine
1 can plum tomatoes
1 tsp dried oregano
1 tsp dried basil
1 tsp olive oil To serve
140g wholewheat penne
3 handfuls kale
½ can butterbeans, rinsed and drained
Handful mature vegetarian cheddar, grated Pomora extra virgin olive oil
Method
1. Roughly chop the onion and pop it in a large pot or saucepan with a tsp of olive oil, on a medium heat. Cook for about 5 mins until it starts to soften. Once soft, add the chopped garlic and cook for a further 2 mins (add a dash of water to help them steam if they start to sizzle).
2. Roughly chop the tomatoes and add them to the pan along with the tomato puree. Give it a good stir and cook for a further 5 mins, until the tomatoes start to break down a bit. Add the wine and the can of plum tomatoes. Break the plum tomatoes up with a spoon and give it another good stir. Up the heat until the sauce begins to boil, then reduce down to a simmer. Add the dried herbs and season with salt and pepper and cook for a further 10 mins, stirring frequently.
3. Meanwhile rinse and drain your butterbeans and put to one side (you’ll steam/boil them 5 minutes before you serving).
4. Weigh out your pasta and bring a large saucepan of water to the boil. When you’re sauce is 10 mins away from being cooked, add your pasta to the boiling water and season with salt (follow packet instructions). This is also a good time to get a smaller saucepan ready to steam/boil your kale and butter beans together (I tend to steam mine but it’s up to you, just remember to season them).
5. Whilst the pasta is boiling and your veg steaming take the tomato sauce off the heat and blitz with a hand blender or pop into a regular blender. Be careful not to over blend the sauce, you still want a bit of texture.
6. Finally drain your pasta and portion onto plates. Top with grated cheese, a drizzle of extra virgin olive oil and season with salt and pepper. Serve with the steamed butterbeans and kale. Good times.
Tomato Penne with Greens & Beans
If you’ve had a go at making any of my recipes, I’d love to hear from you. Follow me now @corrieheale and tag your recipe pictures using #corriesrabbitfood.
V– Vegetarian ❄– The pasta sauce is suitable for home freezing once cooled. Consume within 3 months.
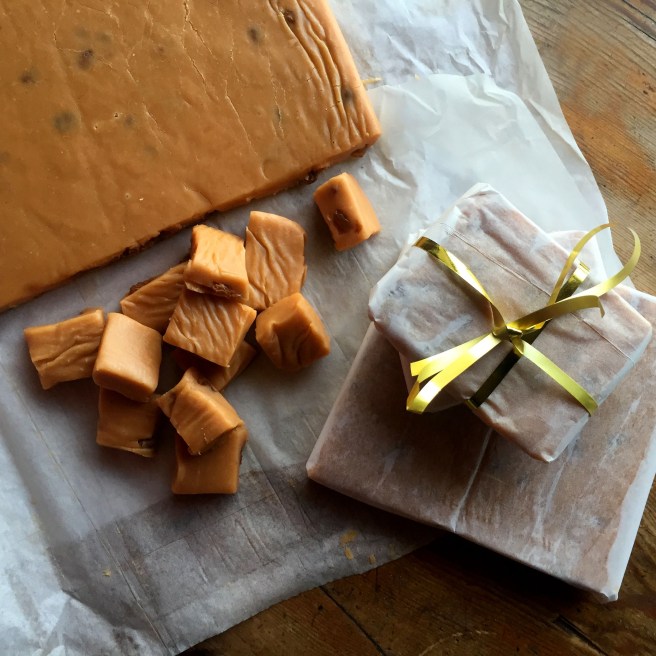
Oh I do love an edible gift don’t you? Not that I’ve ever received one (sigh) but I imagine it’s rather lovely. I tend to be the edible gift maker myself but don’t feel too sorry for me, being the maker has it’s perks. First of all, it’s the only way you can give someone a cheap gift without them them thinking you’re a tight – which you are. Secondly, it allows you to buy a nice new pair of trainers for yourself with the savings.
Now, I know Christmas already feels like a distant memory but edible gifts aren’t just for Christmas. You can of course be a cheapskate all year round.
“Are those new trainers?”
“Why yes, yes they are” you say.
“Oh and thank you so much for the fudge, what a thoughtful gift.”
“Oh not at all, I’m a very thoughtful person, glad you liked it” you say smugly looking down and admiring your new trainers. Mwah ha ha ha!
So Happy New Year to all, may your gifts be edible and your purse brimming with precious stones.
Salted sultana and rum fudge Makes 1 slab / Hands on time 40 mins / Total time 40 mins + 2 hrs cooling / V Gf You’ll need: Electric hand whisk, 1 large or 2 small deep baking trays, baking paper and ice
Rapeseed oil spray
120g sultanas
3 tbs dark rum
1 can condensed milk
2 tbs golden syrup
175ml whole milk
1 vanilla pod, seeds scraped out
1 tsp vanilla extract
800g granulated sugar
¼ tsp sea salt
250g unsalted butter
Method
1. In a small bowl, soak the sultanas in the rum and put to one side.
2. Line a large baking tray with baking paper and spray with oil.
3. Set a small bowl of iced water near the stove, you’ll need it later.
4. In a large heavy bottomed pan over a low heat, add the butter, milk, sugar, condensed milk and golden syrup. Bring to the boil stirring continuously.
5. Once boiling, continue to stir until the toffee goes a golden colour – this will take between 12-15 mins. To test it’s ready to whisk, drop a small amount of mixture into the iced water – if it solidifies it is ready (you should be able to pick it out with our fingers).
6. Take off the heat, add the vanilla and whisk with an electric whisk for 5 mins – it’s the whisking that turns toffee into fudge.
7. Once the fudge has the consistency of loose peanut butter, fold in the soaked sultanas, rum and salt. Pour into the lined tray and set in the fridge for a maximum of 2 hrs – the fudge will become too hard if left for longer.
8. Cut into squares and store in an airtight container in a cool dry place for up to 4 weeks.
If you’ve had a go at making any of my recipes, I’d love to hear from you. Follow me now @corrieheale and tag your recipe pictures using #corriesrabbitfood.
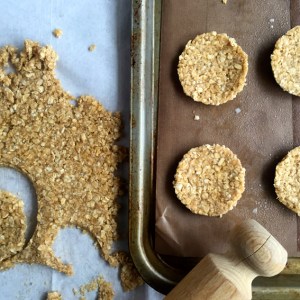
Shall we have some more treats? Yes, I think we should. I only have a wedding in two weeks that I need to lose at least four stone for but that should be fine. Worst comes to the worst, I can always chop my leg off, a leg surely must weigh about 4 stone. Maybe I shouldn’t have made biscuits after all but it’s too late for that – I’ve already eaten five.
I actually learnt to make these oaty biscuits at school but haven’t made them for about ten years, I stumbled across the recipe the other day. I managed to make them out of ingredients I found in the back of my cupboard. This has literally never happened to me before and probably never will again, I never have everything I need to make anything in this life.
Anyway, I love these biscuits because they’re short and buttery but not too sweet. If you have a sweet tooth though, feel free to dip them in melted chocolate for a more indulgent biscuit… Kind of wish I’d done that now. Enjoy!
Homemade Hobnobs (oat biscuits) Makes 12-14 biscuits / Hands on time 20 mins / Total time 30 mins / V ❄
You’ll need: Baking paper, rolling pin, biscuit cutter or anything else use can use (I use a mug)
100g softened unsalted butter
100g demerara sugar
50g plain flour
160g rolled oats
½ tsp bicarbonate of soda
2 egg yolks
Pinch of sea salt flakes
Method
1. Preheat an oven to 180°C/160°C fan/ 350°F/gas mark 4. Line 2 baking trays with baking paper and put to one side. 2. Cream the butter and sugar together and beat in the egg yolks. Add all the dry ingredients and mix well.
3. Turn the mixture out onto a large piece of baking paper. Dust a rolling pin with flour and roll out the mixture to around half a centimetre. Cut the biscuits out with your chosen cutter and place on a lined baking tray. Once you’ve cut out all the biscuits, gather up the mixture and roll out again and cut out more biscuits. Sprinkle each biscuit with a pinch of Demerara sugar and bake in the oven for 10-12 mins.
4. Cool for 5 mins on the trays before transferring the biscuits to a cooling rack. Enjoy with a nice cup of tea.
If you’ve had a go at making any of my recipes, I’d love to hear from you. Follow me now @corrieheale and tag your recipe pictures using #corriesrabbitfood.
V– Vegetarian ❄– The biscuits are suitable for home freezing. Wrap individually in clingfilm and freeze for up to 3 months. Defrost fully before consuming.


 Roasted carrots with dill and lemon dressing:
 Cucumber, feta and olive salad: