Black bean quesadillas

Black bean quesadillas

Essentially, a quesadilla is a Mexican cheese toastie – and seriously, what’s not to like about that?! There’s also no toastie machine/fancy single- contact grill involved, you can simply squidge these babies into your frying pan and fill them with all sorts of magical fillings. In fact, it reminded me of the Branston pickle and cheese toasties my mum used to make me. I remember it like it was yesterday, that first glorious bite that would send a molten cheesy Branston pickle lava to run down my chin, burning my face and the inside of my mouth. Good times.
Anyhoo, until I come up with a safe alternative to the Branston pickle toastie, let’s squash some black beans together with some cheese and have a fiesta. Quesadillas are easy to make and a great way to get rid of leftovers, because you can fill them with pretty much anything, just as long as you have some kind of cheese to bind it all together. I’ve said it once and I’ll say it again (a bit more sincerely this time) ‘good times’.

Black bean quesadillas
Makes 2 quesadillas (serves 2) / Hands on time 30 mins / Total time 35 mins /
1 tsp rapeseed oil
1 small white onion, peeled and thinly sliced
½ tsp ground cumin
1 tsp smoked paprika
Pinch of chilli flakes
1 corn on the cob, kernels removed
1 can black beans, drained and rinsed
1 lime
Handful of fresh coriander chopped
150g grated vegetarian cheddar (75g per quesadilla)
4 large wholemeal tortillas
To serve 
2 spring onions, chopped
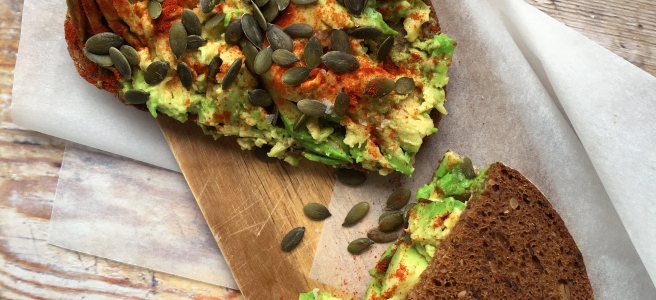
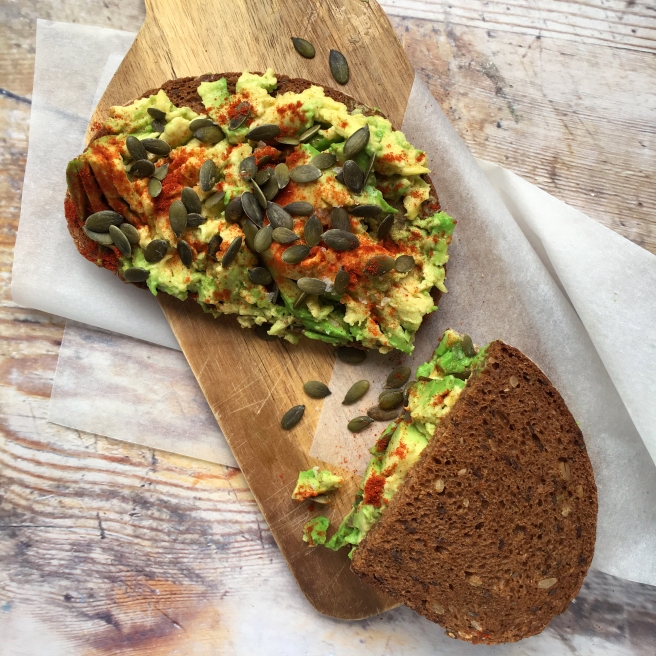
Avocado, stoned and scooped out

Method
1. In a large frying pan or casserole dish, sweat the sliced onions in the rapeseed oil with a good pinch of salt until softened (add a dash of water if the onions are catching to help them steam).
2. Once the onions are soft, add the smoked paprika, cumin and chilli flakes and continue to cook for a few minutes, stirring continually (if the spices start to stick to the bottom
, add a dash of water to loosen them up). Meanwhile, carefully run a sharp knife down the sides of the corn on the cob to remove the kernels and add them to the pan along with the black beans and the juice of half a lime. Give it all a good stir and season with salt and pepper to taste. Cut the remaining lime into wedges and put to one side. Preheat an oven to 140°C/120°C fan/ 275°F/gas mark 1 and place 1 large oven-proof plate inside.
3. Cook the bean mixture for a further 5 mins on a medium to high heat before adding a handful of chopped coriander. Take off the heat, cover with a lid and put to one side.

TIP: Once cooled the filling can be frozen. I usually only make one quesadilla and freeze the other half of the bean mixture for another day. To freeze, fully cool before spooning into an airtight container and freezing for up to 3 months. 


4. Grate the cheese (75g per quesadilla) and put to one side. Put a large non-stick frying pan on a medium to high heat and place a tortilla in the centre. Top with half the bean mixture and spread it out evenly. Sprinkle with half the cheddar and top with another tortilla. Press down on the quesadilla with a spatular as it’s cooking to make sure it is as flat as possible for 3-5 mins. To flip the quesadilla over, carefully place a large plate over the top of the pan face down and turn up-side-down. Put the frying pan back on the heat and slide the quesadilla back into the frying pan from the plate. Cook on the other side for around 5 more mins before transferring onto the warm plate in the oven. Repeat this process with the other quesadilla.
5. Once the second quesadilla is cooked, carefully remove the first quesadilla for the oven. Cut each quesadilla into eighths and serve immediately topped with sprinkled spring onions, scooped out avocado and the remaining lime wedges.

Black bean quesadillas


If you’ve had a go at making any of my recipes, I’d love to hear from you. Follow me now @corrieheale and tag your recipe pictures using #corriesrabbitfood.


V– Vegetarian     – The bean mixture can be frozen for up to 3 months once cooled.


Saag paneer with kale

Saag paneer
Saag paneer
Saag paneer

This is what I order every time I eat in an Indian restaurant. I always have the intention of trying something new, but I don’t like change. So, when the waiter looks at me, pen poised, I always utter the same words. “…And I’ll have a saag paneer, taka dhal and a chapati, please. Oh and I’ll just share Jamie’s rice.” (Jamie scowls.)

This isn’t the first time I’ve had a go at making saag paneer, though – I’ve made it once before the more traditional way, using a ton of fresh wilted spinach, drained and squeezed by hand – but I ain’t got time for that these days, far too hungry. So I came up with this quicker, less labour-intensive version (#storyofmylife).


Saag paneer with kale 
Serves 4 / Hands on time 50 mins / Total time 50 min / V ❄ 
You’ll need: A hand blender or food processor, kitchen roll
1 tbs rapeseed oil
500g paneer, cut into chunks
1 white onion, peeled and chopped
½ tsp sea salt flakes
Knob of ginger (1 inch), grated
5 garlic cloves, peeled roughly chopped
1 green chilli, de-seeded
2 tsp ground cumin
1 tsp ground coriander
1 tsp ground turmeric
½ tsp ground fenugreek
½ tsp garam masala
500ml vegetable stock, I use 1 Knorr vegetable stock pot
150g spinach leaves
150g kale, roughly chopped
Handful of fresh coriander, roughly chopped
To serve
Lime wedges, chapatis, brown basmati rice

Method
1. Slice the paneer into chunks and fry in batches in the rapeseed oil over a medium to high heat in a casserole dish with a lid (the paneer can spit a bit so you may need to cover with the lid). Once the paneer has browned on all sides, remove from the pan and leave to drain on kitchen roll. Put to one side.
2. In the same casserole dish, add the chopped onion and a dash more oil and the salt. Give it a mix before covering with a lid and cook on a medium heat until soft – around 10 mins. Add a dash of water to the onions if needed halfway through to help them steam.
3. Add the garlic, fresh ginger and the chopped green chilli. Cook for a further few minutes before adding all the spices. Add a dash of water to help loosen the spices a bit and to stop them from sticking to the bottom of the pan. Cook for a further 5 mins.

4. Add the stock and give it a good stir before adding the spinach in batches. Once wilted, add the kale and continue to cook until the kale has softened. Remove from the heat and blend with a hand blender until smooth.
5. Return the sauce to a medium to high heat and add the paneer. Bring to the boil and cook for 5 mins or until the paneer has softened. Serve immediately with rice, chapatis and lime wedges.  

Saag paneer
Saag paneer

If you’ve had a go at making any of my recipes, I’d love to hear from you. Follow me now @corrieheale and tag your recipe pictures using #corriesrabbitfood.


V– Vegetarian    Freeze the fried paneer and curry sauce separately. Defrost before combing and heating through until piping hot. Consume within 3 months.


Avocado breakfast sarnie to go ​

Avocado breakfast sarnie to go

I would love to be the kind of person who springs out of bed at 6am to enjoy 30 minutes of yoga before mindfully eating a homemade smoothie bowl. The kind of person who has their clothes already laid out from the night before and who needs nothing more than a sweep of red lipstick before they’re out of the door catching the early bus to work. Clearly, I am not this person. Occasionally I manage to get up at 7.30am to do 10 minutes of Pilates in my pyjamas before making an omelette – but that’s as close as I’m ever going to get.
Most of the time, you’ll find me crawling out of bed at around ten past eight, before rushing around like a headless chicken until I’m out the door with my top on inside out. I suppose I could try to get up earlier and make myself a nutritious breakfast, and you know what – sometimes I do. But on the days I don’t/can’t be arsed, I need a solution – and this is it. One piece of rye bread filled with avocado, smoked paprika and pumpkin seeds, BOOM! It’s quick, easy and not too messy and stinky to eat on the bus. Hallelujah!


Avocado breakfast sarnie to go
Serves 1 / Hands on time 5 mins / Total time 5 mins / V Vn Df
1 piece of dark rye bread
½ a ripe avocado
1 tsp smoked paprika
Small handful pumpkin seeds
Few drops of Tabasco smoked chipotle sauce or Sriracha (optional)

Method
Lightly toast a piece of rye bread before mashing half an avocado on top of it with a fork. Spread the avocado out evenly and sprinkle with salt, pepper, smoked paprika and a few drops of Tabasco or Sriracha. Scatter over the pumpkin seeds before halving the toast and sandwiching one piece on top of the other. Wrap in baking paper or pop in a sandwich bag and enjoy on the go.
TIP: I freeze rye bread a loaf at a time to insure I always have some ready to go. If toasting from frozen, allow a bit of extra time

Avocado breakfast sarnie to go

If you’ve had a go at making any of my recipes, I’d love to hear from you. Follow me now @corrieheale and tag your recipe pictures using #corriesrabbitfood.


V– Vegetarian    Vn– Vegan    Df– Dairy free


Plum & ginger cobbler

Plum and ginger cobbler

So, this was supposed to be a peach and gooseberry cobbler, but Morrisons ran out of peaches and gooseberries (let’s be honest, it’s unlikely Morrisons stock gooseberries, but I live in hope). So my peach and gooseberry cobbler turned into an apricot and blackberry cobbler – but guess what? No blackberries. However, to my amazement, they had apricots. YES! But what goes with apricot other than peach? Plum? That old classic combination of plum and apricot. Is that a thing? Probably not, but I decided to give apricot and plum cobbler a chance.
So, after wrestling with a rather elderly but scrappy lady* for the last two packets of plums, I returned home only to realise my apricots were rock hard, so I settled for a plum and ginger cobbler – it was clearly meant to be.

*Don’t worry about the elderly scrappy lady, she could clearly look after herself and had a whiff of Stella Artois about her.


Plum & ginger cobbler
Serves 6 / Hands on time 35 mins /Total time 1 hr / V
You’ll need: Deep casserole dish
For the filling
12 ripe plums, each sliced around the stone in 4 big chunks
80g light brown sugar
Juice and zest of a lemon
Juice of an orange
1 tbs self raising flour
1½ tsp ground ginger
For the topping
250g self-raising flour
100g ground almonds
1 tsp baking powder
½ tsp ginger
60g caster sugar
90g cold unsalted butter, cubed
150g full fat Greek yogurt
4 tbs semi-skimmed milk
1 egg yolk
1 tsp vanilla extract
Handful flaked almonds 
2 tsp soft brown sugar
Crème fraîche or vanilla ice cream to serve (optional)

Method
1. Start by taking each individual plum and standing it upright on a chopping board. Using a sharp knife as close to the stone as possible, slice in a downwards motion on all four sides of the plum leaving you with four chunks. Discard the stone and repeat this process with the rest of the plums.
2. Tip the plums into a deep oven dish and squeeze over the juice of an orange and a lemon along with the lemon zest. Sprinkle over the soft brown sugar, 1 tablespoon of flour and ground ginger and give it all a good mix. Put to one side.
3. Meanwhile in a bowl, whisk together the Greek yogurt, milk, vanilla extract and egg yolk. Put to one side and preheat an oven to 200°C/180°C fan/400F/gas mark 6.
4. In a larger separate bowl, combine the self-raising flour, ground almonds, caster sugar, salt, ground ginger and the baking powder. Add the cubed cold butter and start rubbing it into the flour mixture using your hands until you have breadcrumbs.
5. Pour the wet ingredients into the dry and mix well with a wooden spoon until you have a sticky dough. Using wet hands (this prevents the dough sticking to your hands) take small handfuls of dough, roll in-between your palms before topping the plums. Repeat this process until the plums are covered in an even layer of dough (don’t worry if the top looks a bit messy and you have a few holes, the dough will rise and expand in the oven disguising your shoddy workmanship). Sprinkle over a handful of flaked almonds and couple of teaspoons of soft brown sugar.
6. Bake in the oven for around 20-25 minutes or until the top of your cobbler is well risen and golden in colour. Remove from the oven and allow to sit for 5-10 minutes before serving. Spoon into bowls and top with crème fraîche or vanilla ice cream. 
Plum and ginger cobbler

If you’ve had a go at making any of my recipes, I’d love to hear from you. Follow me now @corrieheale and tag your recipe pictures using #corriesrabbitfood.


V– Vegetarian     Once cooled, suitable for home freezing in an airtight container. Consume within 3 months.


kale & walnut pesto

Kale and walnut pesto

I don’t know why I thought that making my own pesto would be such a chore, but even in my hungover state it only took 10 minutes. Good thing, too, as I’d spent the previous evening dancing the night away – along with 60,000 other people – to Britney Spears at Brighton Pride. The last time I saw Britney thrust her way across a stage in her knickers was back in 2003, and she hasn’t changed a bit. Unfortunately, the same cannot be said for me, although I did manage to squeeze my rather soft 34-year-old self into a corset and some fishnets – classy.
Anyway, so Sunday morning was a bleak affair, waking up with panda eyes and covered in other people’s glitter. I couldn’t face leaving the house’ so made do with what I had – a bit of kale, a handful of walnuts and an overactive basil plant. I hope you enjoy the results stirred through some delicious pasta.


Kale and walnut pesto
Serves 2-4 / Hands on time 10 mins / Total time 10 mins / V Vn Gf Df 
You’ll need: A food processor
50g walnuts (about 2 handfuls)
1 garlic clove, peeled and roughly sliced
1 handful of kale, heavier stems removed and discarded
20-30g fresh basil
4 tbs Pomora extra virgin olive oil


Method
1. Roughly peel and chop the garlic before adding it to a food processor, along with the walnuts and a handful of kale (heavier stems removed). Blitz on full for about 10 seconds or until you have a rough paste.
2. Add the fresh basil, a good sprinkle of salt and pepper and give it another blitz – this time for a bit longer until you have a slightly smoother paste.
3. Lastly, add 3 tbs of extra virgin olive oil before blending for a final time (how long you blend is up to you depending on how smooth you like your pesto).
4. Spoon into a jar and top with 1 tbs of extra virgin olive oil. Store in the fridge for up to a week and enjoy stirred through pasta, drizzled on salads or simply spread on toast. Tasty!

Kale and walnut pesto

If you’ve had a go at making any of my recipes, I’d love to hear from you. Follow me now @corrieheale and tag your recipe pictures using #corriesrabbitfood.


V– Vegetarian    Vn– Vegan    Gf– Gluten free    Df– Dairy free    – Suitable for home freezing in an airtight container. Consume within 3 months.


Bruschetta

Bruschetta
Bruscetta
Bruschetta

Let’s be honest, it’s too damn hot to cook this week, so I’ve been living off a nutritious diet of fresh tomatoes and gin and tonics. I was hoping to save this recipe for when my tomato plant started to produce fruit, but insultingly, he (my plant) has only produced two tiny green tomatoes so far, and that does not a bruschetta make. Selfish. Just remember who waters you, mate.
So instead, I scampered off to Waitrose and came back with a big bag of overpriced tomatoes, sourdough and enough tonic water and ice to sink HMS Belfast. Within 10 minutes I was chomping on delicious bruschetta and sipping ice cold G&Ts while staring daggers at my tomato plant. I’m not angry, just disappointed – he hangs his head in shame. 


Bruschetta
Serves 2 as a starter / Hands on time 10 mins / Total time 10 mins / V Vn Df
2 pieces of sourdough (I used a rye variety)
4 ripe tomatoes, de-seeded and roughly chopped
1 garlic clove, peeled
Handful of fresh basil, roughly chopped
1 tsp balsamic vinegar
Pomora extra virgin olive oil


Method
1. Start by de-seeding and roughly chopping your tomatoes – I do this by halving my tomatoes, removing the core and spooning out the seeds. Roughly chop and place in a bowl before sprinkling with a generous pinch of salt and pepper. Stir in the chopped basil, balsamic vinegar and a good drizzle of extra virgin olive oil. Put to one side.
2. Toast 2 large pieces of sourdough on either a grill pan or in a toaster. Meanwhile, cut the end off the garlic clove and peel. Once toasted, rub the toast with the cut side of the garlic to give it a gorgeous flavour. Finally sprinkle the toast with salt and pepper and drizzle with olive oil before topping with the tomato mixture. Tasty.

Bruscetta
Bruschetta

If you’ve had a go at making any of my recipes, I’d love to hear from you. Follow me now @corrieheale and tag your recipe pictures using #corriesrabbitfood.


V– Vegetarian    Vn– Vegan    Df – Dairy free   


5 minute mixed berry frozen yogurt

5 minute mixed berry frozen yogur
Mixed berry frozen yogurt

I have nothing else to say, other than it’s hot, it’s sweaty and I am very sunburnt. It’s time to cool down with some frozen yogurt. Easiest. Recipe. Ever! The frozen berries freeze the yoghurt as you blend, so no need to wait before diving in with a spoon. Who knew science was this cool – literally?


5 minute mixed berry frozen yogurt
Serves 2 / Hands on time 5 mins / Total time 5 mins V Gf
You’ll need: A food processor
200g mixed frozen berries
4 tbs full fat Greek yogurt
1 tsp maple syrup or honey + extra for drizzle


Method
1 Assemble all ingredients in a food processor and blitz for about 30 seconds
or until the mixture is smooth.
2. Serve immediately in bowls topped with a few extra frozen berries, an extra dollop of Greek yogurt and a drizzle of maple syrup or honey.

Mixed berry frozen yogurt

If you’ve had a go at making any of my recipes, I’d love to hear from you. Follow me now @corrieheale and tag your recipe pictures using #corriesrabbitfood.


V– Vegetarian    Gf– Gluten free


Black & green olive tapenade

Black & green olive tapenape
Black & green olive tapenade

Last Saturday, I had so much to do that I decided to do nothing. Instead, I stayed in bed and watched back-to-back episodes of Ally McBeal and ate Marmite on toast. It was the best weekend ever. I laughed, I cried, I even ‘laughied’, which is when you laugh and cry at the same time. Anyway, the next day I managed to peel myself out of bed having achieved nothing – unless you count the new litigation skills I learnt from watching so much Ally McBeal. I do.
Regardless of what an amazing lawyer I’m convinced I would make, it quickly dawned on me that I a) have no money and b) have no food – i.e. not a great start when you’re a food blogger. Luckily, I had just enough money to go to the corner shop and buy a few jars of olives. My friend Anne-Marie had recently asked me if I had a recipe for tapenade on my website, and I said no – so thought I’d do that. Later that day, I found myself back in bed, watching back-to-back episodes of Ally McBeal and eating two different types of tapenade on toast. What? At least I did something!


Black & green olive tapenade
Serves 6-8 / Hands on time 10 mins / Total time 10 mins / V Vn Gf Df 
You’ll need: A food processor
Black olive tapenade
200g (drained weight) pitted black olives in brine. I used a mix of Kalamata olives and black.
1 tsp capers
1 Tbs extra virgin olive oil
1 garlic clove, peeled and roughly chopped
1 tsp red wine vinegar
Juice of half a lemon
Small handful of chopped parsley to serve (optional)

Green olive tapenade
200g (drained weight) pitted green olives in brine
1 tsp capers
1 tbs extra virgin olive oil
2 garlic cloves, peeled and roughly chopped
1 pickled jalapeño pepper, stalk removed
1 tsp white wine vinegar or cider vinegar
½ lemon, juice
2 tsp pine nuts
Small handful of chopped parsley to serve (optional)

Method (For both the green and the black tapenade)
Drain the olives and put them in a food processor along with the other ingredients, leaving out the parsley. Blitz until you have your desired texture, I like my tapenade quite coarse so keep the blitzing to a minimum. Serve on toast, sprinkled with freshly chopped parsley and drizzled with extra virgin olive oil.

Black & green olive tapenape

If you’ve had a go at making any of my recipes, I’d love to hear from you. Follow me now @corrieheale and tag your recipe pictures using #corriesrabbitfood.


V– Vegetarian    Vn– Vegan    Gf– Gluten free    Df– Dairy free.
– Freeze on the day of making, in an air tight container. Defrost fully and consume within 3 days. Freeze for up to 3 months. 


Salted chocolate & olive oil mousse

Salted chocolate & olive oil mousse

Let’s have one last hurrah before bikini season and pour some salty chocolateyness down our throats. Actually, if you can pour the mousse, then you’ve probably made it incorrectly. The mousse should be nicely aerated and set – perfect for plunging your face and/or spoons into. Personally, I prefer face, but whatever floats your boat.


Salted chocolate mousse with olive oil
Serves 4 / Hands on time 20 mins / Total time 20 mins + chilling / Gf
You’ll need: A standing mixer with a balloon whisk attachment and an electric hand whisk
150g *Green & Black’s Organic 70% dark chocolate
4 large eggs, separated
80g caster sugar
80ml Pomora extra virgin olive oil
1 tbs brandy
Good pinch of sea salt flakes


Method
1. Start by separating the egg yolks from the whites into two separate bowls.
2. Break your chocolate into pieces and gently melt over a pan of simmering water in a heatproof bowl. Whilst the chocolate it melting, use this time to measure out the sugar and the extra virgin olive oil.
3. Once melted, take off the heat and leave to cool (but not set). Meanwhile, beat the egg yolks with a hand whisk until combined and slightly paler in colour.
4. Add a good pinch of salt to the melted chocolate and give it a good mix before tasting (to get the balance of salt right you need to keep tasting the chocolate). Once salted, beat the olive oil straight into the melted chocolate using an electric hand whisk on a slow setting. Add the oil in a steady, slow stream until your chocolate is lovely and glossy. Add the egg yolks slowly along with a tablespoon of brandy and whisk again, put to one side.
5. In your standing mixer, whisk the egg whites on a high speed until you have white soft peaks. Turn the speed down slightly and add the sugar a tablespoon at a time until incorporated. On a medium speed, beat a third of the chocolate mixture into the egg whites before folding the rest of the chocolate in by hand using a metal spoon (try not to over beat as you’ll knock the air out of the mousse).
6. Pour into four ramekins and chill for at least 3 hours before serving topped with a little sea salt.

Salted chocolate & olive oil mousse

If you’ve had a go at making any of my recipes, I’d love to hear from you. Follow me now @corrieheale and tag your recipe pictures using #corriesrabbitfood.


V– Vegetarian    Gf– Gluten free
*The Green & Black’s Organic 70% dark chocolate I use in this recipe is gluten free but some other brands may not be. Always check the label.


Leek mac and cheese

Leek mac & cheese
Leek mac & cheese

This was actually suppose to be a jalapeño mac and cheese, but the ones I had in my fridge had gone all manky, and there appeared to be a jalapeño shortage in north London. I was a bit peeved about this, until I spoke to my friend, Abbie, who informed me that the best mac and cheese she had ever eaten was Delia’s leek and bacon. I pondered for a moment – maybe I didn’t need jalapeños. I certainly didn’t need bacon. Maybe I just needed leeks. Leeks and cheese make excellent bed fellows, so why not throw them together to make hot, passionate cheesy love?
Gosh, where did that come from? Anyway, enjoy – I certainly did.


Leek mac and cheese
Serves 4-6 / Hands on time 30 mins / Total time 50 mins / V
You’ll need: Deep casserole dish and a food processor (if making breadcrumbs)
250g macaroni
2 tbs unsalted butter
2 garlic cloves, crushed
1 tsp Dijon mustard
1 large leek, roughly chopped
3 tbs plain flour
250ml semi-skimmed milk
250g vegetarian cheeses (you can use a mixture of any cheeses you like as long as it melts easily. I used a mix of Emmental and cheddar)
Breadcrumbs 
50g of stale bread
1 garlic clove
1 knob of butter
30g vegetarian Italian hard cheese or *Parmesan, grated
To serve
leaves and pickles

Method
1. Preheat your oven to 200°C/180°fan/400°F/gas mark 6. Cook your macaroni according the the packet instructions, drain and put to one side. Meanwhile, make your breadcrumbs by blitzing up 50g of stale bread in a food processor, put to one side. Add a knob of butter to a large frying pan along with a crushed garlic clove on a medium heat. Once melted add the breadcrumbs and fry until golden brown. Put to one side.
2. In a large saucepan add the butter, crushed garlic cloves and dijon mustard on a medium heat. Add the roughly chopped leek stir until well coated in the mix. Put the lid on and allow to sweat for 10 mins, keeping an eye on the mixture to make sure it doesn’t burn. Meanwhile, use this time to grate the cheese.
3. Once the leeks have softened, add the the flour, stir and continue to cook for a minute stirring continually. Add the milk bit by bit and incorporate into the leeks stirring well until smooth (as smooth as it can be with the leeks in it). Season well with salt and pepper and take off the heat.
4. Add the cheese a handful at a time and stir after each addition, until you have a thick, silky cheese sauce. Stir in the macaroni and pour into an oven proof dish. Sprinkle over the breadcrumbs, grate over the Italian hard cheese. Bake in the oven for 20 minutes. Once cooked, leave to stand for 5 minutes before serving with a simple salad and few pickles.
Leek mac & cheese
Leek mac & cheese

If you’ve had a go at making any of my recipes, I’d love to hear from you. Follow me now @corrieheale and tag your recipe pictures using #corriesrabbitfood.


V – Vegetarian
*Parmesan (Parmigiano Reggiani) is always made using animal rennet, therefore it is not vegetarian. Substitute for Italian hard cheese if applicable.