With the cost of living rising and energy levels soaring to unprecedented levels, we’ll all be tightening our belts for the next hundred years – so probably not the best time to buy a flat. Oh well, we’ve done it now, so we might as well snuggle up with a bowl of jammy baked oats and think warm thoughts, as it’s going to be a long cold winter… Wow, that came out bleaker than anticipated… Here’s a funny cat video to make up for it.
Blueberry baked oats Serves 1 large or 2 smaller portions / Hands on time 5 mins / Total time 25 mins VGf* You’ll need: Oven-proof ramekins
40g gluten free or regular porridge oats
100g full-fat or fat-free Greek yogurt
1 medium egg
1 tsp maple syrup
½ tsp vanilla extract
75g blueberries (or fruit of your choosing)
Flavourless oil for ramekins (I use Fry Light spray oil)
TIP: This recipe makes one hearty portion of porridge or two slightly more modest portions. I tend to split it into two on a weekday as I prefer to eat lighter midweek. TIP: Not keen on blueberries, try substituting for other fruits such as plum, raspberries or even apples.
Method
Preheat an oven to 180°C/160°C fan/ 350°F/gas mark 4. In a medium sized bowl, measure and combine all the ingredients together and put to one side.
Lightly oil one to two ramekins and spoon in the mixture. Bake on the middle shelf for 20 minutes (it should be springy to the touch when cooked). Allow to cool for a few minutes and serve in the ramekins with extra yogurt and maple syrup if you like.
TIP: Baked oats can be chilled and kept in the fridge for up to 4 days. I like to take them to work in a Tupperware cold and reheat in the microwave.
Blueberry baked oats
V – Vegetarian *Gf – If gluten free, please use gluten free porridge oats
I know I should be spending my Sunday writing up this week’s blog, but I’ve fallen into a Backstreet Boys hole and now I can’t climb out of it. I went to see them last week and it has ignited my teenage obsession. I literally can’t stop Wikipedia-ing, YouTubing, Googling and general ogling my ’90s teenage obsession. After two hours of back-to-back hits and two pints of cheap wine (yes, pints), I was transported back to my 16-year-old self’s bedroom, where my Purple Ronnie wallpaper and blow-up chairs witnessed some truly shocking choreography. Without warning, I busted into my old dance routines in the O2 Arena – much to the horror of my male companion and those around me. I waved my arms, thrust my hips and flicked my hair like a deranged Britney Spears tribute act – I don’t get out much.
That being said, I had a blast and have been writing ‘I heart BSB’ on my pencil case ever since – I’m freelance now, thus the need to carry stationary around with me at all times. Anyhoo, enough about my youth, let’s all just go away and download the Backstreet’s Back album and listen to it as we slice up some fat tofu steaks and whip up my version of this Japanese classic.
Teriyaki tofu steaks with broccoli Serves 2 / Hands on time 10 mins / Total time 40 mins /VDf You’ll need: 20cm oven-proof dish
280g firm tofu, drained
200g tender-stem broccoli
4 whole spring onions, outer layer removed and ends trimmed For the marinade
2 tbs light soy sauce
1 tbs sweet chilli sauce
1 tbs maple syrup
1 tbs mirin
1 tsp sesame oil
1 tsp garlic oil or 1 garlic clove, crushed
1 knob of ginger, grated To serve
Boiled rice or noodles
Black sesame seeds (optional)
Method 1. Pre-heat an oven to 200°C/180°C fan/400F/gas mark 6.
2. Drain the tofu and cut into thick steaks and place in the oven-proof dish before putting to one side.
3. In a bowl, combine the marinade ingredients together and pour evenly over the tofu steaks. Give the dish a shake until all the tofu is evenly covered. Bake in an oven for 15 mins, before taking out and carefully turning the steaks over – I do this by inserting a fork into each tofu steak and carefully flipping them over. Return to the oven for 15 more mins.
4. Meanwhile, use this time to cook the rice or noodles. Steam the broccoli and the spring onions together 5 mins before the tofu is due to come out.
5. Remove the tofu from the oven and leave to rest for 5 mins before lifting the steaks out and placing them on top of rice or noodles. Scrape out any remaining sticky sauce and top the tofu with it. Serve with the steamed greens and a sprinkling of black sesame seeds.
Baked teriyaki tofu with broccoli
If you’ve had a go at making any of my recipes, I’d love to hear from you. Follow me now @corrieheale and tag your recipe pictures using #corriesrabbitfood.
They say don’t judge a book by its cover, although it’s hard not to when you’re staring down at the misshapen, ugly face of a celeriac. Its knobbly, gnarly and often hairy skin looks like something out of a science fiction film.
Like a lot of people, I am guilty of overlooking this vegetable, but I felt sorry for it sitting on the shelf next to the prettier and cutely named munchkin pumpkin – the celeriac never have a chance. So I took his ugly mug home and lovingly peeled, chopped and roasted him in this delicious rice dish. It’s what he would have wanted.
Celeriac baked rice with goats cheese Serves 4 / Hands on time 30 mins / Total time 1 hr 20 mins /V Gf You’ll need: A deep oven-proof casserole dish
2 tsp rapeseed oil
1 white onion, finely chopped
4 cloves of garlic, peeled and sliced
1 medium sized celeriac (roughly 650g), peeled and cut into chunks
½ tsp garlic granules
½ tsp sea salt
Pinch of cayenne pepper
Pinch chilli flakes
500ml vegetable stock, I use 1 Knorr stock pot
150g brown basmati rice
4 rosemary sprigs
200g vegetarian goats cheese (including rind)
100g black olives, drained and halved
Handful of parsley, chopped to serve
TIP: If making for two, half the recipe and use a smaller baking dish.
Method 1. Preheat an oven to 220°C/200°C fan/428°F/gas mark 7. Add the chopped onion and the garlic to a deep casserole dish along with the rapeseed oil, garlic granules, sea salt, black pepper, cayenne pepper and a pinch of chilli flakes. Give it all a good stir.
2. Peel and cut the celeriac into large chunks and add to the dish and mix well. Add the rice and pour over the vegetable stock and stir carefully. Make sure the rice is fully immersed under the stock before adding the rosemary springs. Cover the dish in a layer of tin foil and bake in the oven for 45 mins.
3. Meanwhile, roughly chop the goats cheese, black olives and parsley.
4. Once cooked, remove from the oven and put the foil to one side. Taste the rice to check if it’s cooked – if the rice is still a little tough, cover in foil and return to the oven and cook for a further 5-10 mins. If cooked, sprinkle over the cheese and the black olives and return to the oven, covered in foil for a further 10 mins or until the cheese is melted.
5. Finish sprinkled with fresh parsley and serve with a simple green salad.
If you’ve had a go at making any of my recipes, I’d love to hear from you. Follow me now @corrieheale and tag your recipe pictures using #corriesrabbitfood.
Yes ladies, it’s officially Autumn so you know what that means? We can finally stop shaving our legs, painting our toenails and start eating cheese again, hallelujah! To mark this momentous occasion I thought I’d celebrate by eating my weight in cheese and olive oil, my two favourite things. The cheese we’ll get to later but first lets discuss olive oil, because I can’t get enough of the stuff. I drizzle it on everything, pasta, salads, soups and even my face occasionally. So it’s not really that surprising that I found myself at an olive oil tasting last week. How exciting, six little shooters of golden yellow elixir all lined up and ready to pour in my mouth, lovely jubbly. But before the swirling, smelling and drinking could begin I was stunned to learn that the majority of all Italian extra virgin olive oil on the market is actually fake!
“Err what?”
Yes! So if you’re anything like me and tend to go for the cheaper but well-known brands from your local supermarket, chances are you’ve either been drinking:
A. Low quality olive oil falsely marked as extra virgin.
B. Olive oil that not only isn’t Italian but has been blended with oils from other origins.
C. Worst of all, your olive oil may not even be olive oil but flavoured and coloured vegetable oil.
Well that will teach me for choosing cost over quality although in all seriousness, this has got me pretty miffed. I put a lot of trust in the brands I buy so to find out that I could have been drinking flavoured vegetable oil all these years makes me very cross. Just goes to show that there are some things in life worth forking out for and olive oil is one of them. So from now on, I’m only going to use Pomora Olive Oil in all of my recipes. Pomora Olive Oil is made by either the loving hand of Antonio in Campania or Carmelo in Sicily. From £29 per quarter you could adopt one of Antonio’s or Carmelo’s olive trees and have authentic Italian extra virgin olive oil delivered straight to your door. To find out more click here.
Now lets get on with our olive oil tasting. When you taste olive oil you’re looking for three key dimensions, flavour, bitterness and pungency. Pungency may sound like a funny one but it’s essentially the pepperyness of the oil. A good olive oil will score relatively highly on all three dimensions whereas a poor quality olive oil will have little fragrance and taste. Once you know what a good olive oil tastes like you can start looking for worthy things to drizzle it over, like a hot melty camembert for example. So dig out the elasticated trousers and sink into a hot cheesy melt fest, It’s Autumn now people, bikini season is officially over. Cue big sigh of relief.
Whole baked Camembert Serves 2 / Hands on time 5 mins / Total time 20 mins / VGf 250g vegetarian Camembert
1 garlic clove, whole
5 sprigs of thyme
1 tbs Pomora extra virgin olive oil To serve
Crusty bread
Celery sticks
Red onion chutney
Seedless grapes
Method
1. Preheat your oven to 220°C/200°C fan/425°F/gas mark 7. Remove the Camembert from the wooden box and place the lid inside the bottom to help prevent leakage during baking (if your Camembert didn’t come in a box, simply place it on a suitably sized oven-proof dish).
2. Spear the top of the cheese carefully with a knife in 5 places, creating 5 deep slits. Insert a sprig of thyme into each slit.
3. Peel the garlic clove and insert it into the cut closest to the middle.
4. Drizzle the top of the cheese with extra virgin olive oil and place on a baking tray. Bake in the oven for 10-15 minutes or until the cheese has started to bubbled and has melted all the way through (insert a knife in the centre to check ion you’re unsure).
5. Carefully fish out the garlic clove and discard along with the thyme sprigs. Serve with crusty bread, celery, onion chutney and grapes.
Whole Baked Camembert
If you’ve had a go at making any of my recipes, I’d love to hear from you. Follow me now @corrieheale and tag your recipe pictures using #corriesrabbitfood.
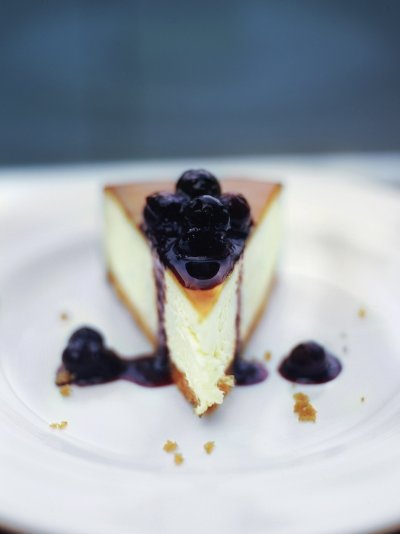
Sweet baby Jesus. If I had to eat one food for the rest of my life, it may very well be this cheesecake. Not sure what possessed my boyfriend to bake a cheesecake in the first place but that doesn’t matter now. Brandishing Jamie Oliver’s recipe on his iPhone, he started digging around the cupboards for a 24cm springform cake tin.
“I don’t think we have one of them” I yelled from the living room watching Nancy and Whitney having a fight on Eastenders. Jamie emerges from the kitchen holding a 24cm springform cake tin.
“Huh, who knew we had one of those?” I said drawing my attention back to Eastenders. Hang on, Ryan’s back? I thought he was dead?..
Anyway after a million questions about vanilla essence, corn flour and caster sugar I went to work, expecting to return home to a kitchen full of smoke and tears. But no, I came home to this…
It was without a doubt, one of the best cheesecakes I’ve ever eaten. It had a beautiful creamy texture and the flavour was subtly citrusy. Well done Jamie Oliver and Jamie Green, you’ve both made me a very happy woman. 10/10.
Oh and Jamie would like it noted that “it’s the chef that makes the cheesecake not the recipe.” I have feeling he’s referring to himself as the chef in this instance, sorry Jamie Oliver.
Jamie Olivers New York vanilla cheesecake with blueberries