Carrot cake loaf: A slice of seasonless happiness

Come rain or shine (and I think it’s fair to say we’ve had a lot of both recently) there is always a good time for carrot cake. Although bursting with vitamins, antioxidants and fibre we all know the healthiest thing about a carrot cake is its name and the minuscule amount of cardio that goes with grating carrots – which frankly is the worst part about making carrot cake. But there is a reason this sweet vegetable deserves its place in the cake hall of fame, and that’s because it’s utterly delicious and worth grating your finger nails for. So why not whip up this seasonless classic and enjoy slice after slice with numerous cups of tea, because that is how carrot cake should be gobbled up – by the wedge load. Although I’m pretty sure Bugs Bunny would have a few words to say about that and not all of them so savoury.
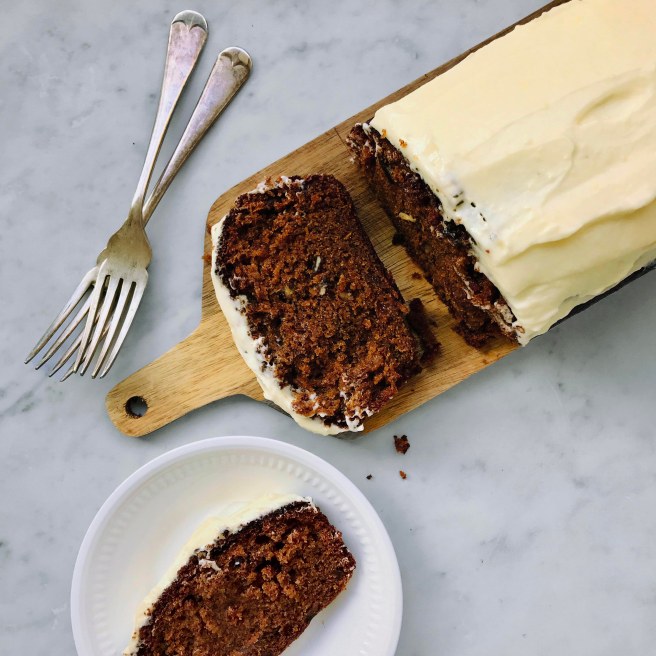
Carrot cake loaf
Carrot cake loaf

Carrot cake loaf
Make 1 loaf / Hands on time 35 mins / Total time 1 hr 45 mins / V
You’ll need: 2 lb loaf tin, electric hand whisk
Juice of 1 orange
45g sultanas
150g carrots, peeled and grated
150g soft brown sugar
80g self-raising flour
80g wholemeal flour
1 tsp bicarbonate soda
1 tsp baking powder
2 tsp ground cinnamon
1 tsp ground mixed spice
1 tsp ground ginger
50g pecans, roughly chopped
Pinch of salt
150ml rapeseed oil
2 eggs
For the icing:
130g cream cheese
30g soft unsalted butter
65g icing sugar


Method
1. In a small saucepan, heat the juice of an orange over a low to medium heat and add the sultanas. Warm through for 10 minutes before putting to one side to cool.
2. Meanwhile, grease the base and sides of a loaf tin with a bit of extra rapeseed oil and line the bottom with baking paper. Put to one side and preheat an oven to 180°C/160°C fan/ 350°F/gas mark 4.
3. Peel and grate the carrot before weighing out the sugar, self-raising flour, wholemeal flour, cinnamon, ginger, mixed spice, bicarbonate of soda, baking powder and a pinch of salt in a large mixing bowl. Add the roughly chopped pecans and give it a good mix before incorporating in the grated carrots using a wooden spoon.
4. In a separate smaller bowl, whisk together the rapeseed oil and the eggs until combined. Pour into the carrot mixture and mix thoroughly. Spoon into the loaf tin and bake on the middle shelf for 1 hr or until a skewer comes out clean.
5. While the cake is baking, make the cream cheese icing by whisking the butter and the cream cheese together in a bowl with an electric whisk. Fold in the icing sugar with a spoon before whisking again for a couple of minutes. Cover loosely with cling film and refrigerate.
6. Allow the carrot cake to cool completely in the tin before turning out and topping with lashings of cream cheese icing.
7. To store, keep the cake refrigerated for up to 3 days in an airtight container or wrapped in cling film. Ideally, allow the cake to come up to room temperature before serving.

Carrot cake loaf
Carrot cake loaf

If you’ve had a go at making any of my recipes, I’d love to hear from you. Follow me now @corrieheale and tag your recipe pictures using #corriesrabbitfood.


Fresh cherry & lemon drizzle

Fresh Cherry & lemon drizzle

I love cherries but hate cherry cake. Nearly always made with horrid glacé cherries and with an amaretto after-taste I can’t think of anything worse. But I  do love fresh cherries and guess what? Cherries are currently in season and I’m in the mood for something sweet so I thought I’d have a go at making a fresh version with added lemon drizzle – because who doesn’t love a lemon drizzle? This cake is sweet,  fruity and perfect for yet another wet July afternoon – seriously what is up with the weather? I’m wearing a wooly jumper!


Fresh Cherry & lemon drizzle
Serves 8-10 / Hands on time 25 min / Total time 1hr 30 mins + cooling / V
You’ll need: 20cm cake tin, tin foil, electric hand whisk, cherry pitter (optional)
250g pitted fresh cherries
225g caster sugar
2 eggs
115g unsalted butter + extra for greasing
140ml semi-skimmed or whole milk
½ tsp vanilla essence
185g plain flour
1 ½ tsp baking powder
Drizzle
85g caster sugar
1 lemon


Method
1. Preheat an oven to 180°C/160°C fan/ 350°F/gas mark 4. Grease the cake tin and line the bottom with baking paper. Put to one side.
2. Pit and de-stork the fresh cherries. If you have a cherry pitter (lucky you) keep the cherries whole. If you don’t (like me) you can click here to watch a very smug man pit cherries using a chopstick and bottle – which is what I’ll do next time. However, I didn’t know this at the time, so I used a sharp knife to cut the cherry all the way around from top to bottom, then twist the two halves apart in opposite directions – like you would with an avocado. If the cherry pit doesn’t pull away neatly from one half (mine didn’t) just roughly cut around the stone. You’ll be left with a mixture of cherry halves and smaller chopped cherry pieces which is fine.
3. Put the butter and the milk in a small saucepan over a low heat until the butter has melted. Once melted take off the heat to cool slightly.
4. Meanwhile, in a large bowl, whisk together the eggs and the caster sugar for at least 2 mins until you have a very pale, creamy mixture and the whisk leaves a trail behind it.
5. Add the vanilla essence and the melted butter and milk slowly to the egg mixture and mix well with the electric whisk until combined.
6. Measure out the flour and the baking powder in a seperate bowl before sieving over the top. Fold in with a wooden spoon until just combined with minimal lumps – be careful not to overwork the mixture.
7. Pour into your cake tin (the mixture will be quite runny) and sprinkle all the cherries over on top – don’t worry, they will sink durning baking.
8. Bake in the oven for 35 mins. At this stage the cake will have formed a crust on the top. Carefully top the cake with a loose sheet of foil whilst still in the oven and continue to bake for a further 25-30 mins or until a skewer inserted into the cake comes out clean.
9. Remove from the oven and leave to cool in the tin for 30 mins Meanwhile, make the drizzle by combining the juice of one lemon and the caster sugar.  Turn the cake out, prick all over with a skewer and evenly pour over the drizzle whilst still warm. Leave to set and cool fully before serving. This cake will last up to 5 days wrapped up in the fridge.

Fresh Cherry & lemon drizzle

If you’ve had a go at making any of my recipes, I’d love to hear from you. Follow me now @corrieheale and tag your recipe pictures using #corriesrabbitfood.


V – Vegetarian


Vanilla apple cake

Vanilla apple cake

This was the first recipe I ever blogged, which was a bit of a surprise, as this was supposed to be a dating blog. After two and a half years of dating hell, my disastrous mishaps had become my identity and – in some friendship circles -legendary. My shenanigans were often met with gasps, laughter and even horror, which to me, was preferable to pity. Since when did being thirty and single become such a terrible affliction? So I wrapped myself up in humour and performed my party pieces to crowds of hungry, happily married people, who couldn’t get enough of my hilarious existence.
But when it came to writing it all down, I wasn’t laughing. So I wrote a cake recipe instead; this cake recipe, in fact, and never looked back. This cake is sweet, delicious and handsome, just like my boyfriend Jamie who I met a month later – I got there in the end!

Vanilla apple cake
Serves 8 / Hands on time 25 mins / Total time 1 hr 30mins + cooling / V
You’ll need: 20cm cake tin, foil, electric hand whisk or standing mixer
350-400g Brambly apples, peeled, cored and sliced
½ lemon, juiced
250g unsalted butter + extra for greasing
250g caster sugar
3 large eggs
250g self-raising flour
¼ tsp salt
1 tsp vanilla extract
1 tbs demerara sugar
1 tbs icing sugar for decoration


Method
1. Preheat an oven to 180°C/160°C fan/350°F/gas mark 4 and grease your cake tin with butter.
2. Peel, roughly slice and core the apples. Put them in a large bowl, squeeze over the juice of half a lemon and give the apples a good toss – this prevents the apples oxidising and turning brown. Put to one side.
3. In a large bowl or standing mixer, cream the butter and sugar together until using an electric whisk until light and fluffy. Add the vanilla and beat the eggs in one at a time, stopping occasionally to scrape down the sides. If the mixture starts to curdle, simply add a tbs of the self-raising flour and continue to whisk until combined.
4. Sift in the remaining self-raising flour along with the salt and baking powder. Use a wooden spoon to fold in the mixture. The batter should be pale and thick.
5. Fold in the apples and spoon into your prepared tin, using the back of a spoon to push the mixture evenly to the edges (it may seem like there isn’t enough batter to cover the apples but don’t worry, the apples sink to the bottom of the cake during baking). Smooth over the top with a wooden spoon and sprinkle over 1 tbs of Demerara sugar.
6. Bake in the oven for 40 mins. At this stage the cake will be very brown but don’t worry, it’s not burning. Remove the cake from the oven and swiftly cover the top loosely with foil before returning to the oven. Continue to bake for a further 20-30 minutes or until a skewer that is inserted comes out clean, making sure you don’t mistake raw cake batter or baked apples.
7. Remove from the oven and leave the cake to rest in the tin for 15 minutes before turning out onto a wire rack. Leave to cool fully before dusting with icing sugar and serving with clotted cream and a cup of tea.


Vanilla apple cake

If you’ve had a go at making any of my recipes, I’d love to hear from you. Follow me now @corrieheale and tag your recipe pictures using #corriesrabbitfood.


V – Vegetarian
 – This cake is suitable for home freezing once cooled. Wrap well in cling film and freeze fore up to 3 months. Defrost fully before serving.


Strawberry sponge ‘traycake’

Strawberry sponge traybake

This week I’ve been craving those little strawberry Tom and Jerry cakes, Remember those? Anyone born before 1984 in Britain should, but if you don’t, allow me to enlighten you. They were small, strawberry flavoured fairy cakes topped with strawberry icing and sugar-paper illustrations of Tom, Jerry and friends. They were deliciously artificial and came in a box ready for you to just add water. Sickly sweet and with a bright pink sponge, these tiny cakes featured in many a party bag in my youth and go hand-in-hand with other ‘wrong’ foods of the ’90s, such as Push Pops, Micro chips and Squeezit’s.
That being said, I’ve had a real hankering for them, so I’ve made a slightly more acceptable ‘grown-up’ version with real strawberry icing. They’re not quite the same, but perhaps that’s no bad thing, as I’m pretty sure the original mix wouldn’t even be classified as food today.


Strawberry sponge ‘traycake’
Makes 12 squares / Hands on time 30 mins  / Total time 50 mins + cooling / V
You’ll need: 25cm square cake tin, electric whisk and a food processor
110g soft unsalted butter + extra for greasing
110g caster sugar
2 medium eggs
110g self-raising flour
½ tsp baking powder
½ tsp vanilla extract
Topping
Handful fresh strawberries, stalks removed and blended
50g unsalted butter
100g icing sugar
6 fresh strawberries, sliced to decorate


TIP: This recipe is easily doubled if you fancy making a two tiered cake.


Method
1. Preheat an oven to 180°C/160°C fan/350°F/gas mark 4 and grease a 25cm square tin with butter. Line the bottom of the tin with baking paper and put to one side.
2. Measure out the self-raising flour in a small bowl and put to one side. In a large mixing bowl, using an electric whisk, cream the butter and sugar together for 3 mins until light and fluffy. Crack in one of the eggs along with 1 tbs of the self-raising flour and mix with a spoon before whisking for a further 2 mins (adding flour prevents the mixture from curdling and mixing it with a spoon stops flour going everywhere). Once incorporated, add the second egg along with another tbs of the self-raising flour and repeat the process, although this time add the vanilla extract.
3. Add half a tsp of baking powder to the remaining self-raising flour and fold into the mixture using a wooden spoon, being careful not to overwork the batter. Spoon into the tin and spread the mixture out evenly using the back of a spoon to push it to the edges and smooth the surface. Bake in the oven for 20-25 mins. Once baked, leave to cool in the tin for 10 mins before turning out onto a cooling rack.
4. Once the cake has cooled completely, make the icing by blending a handful of strawberries in a blender. In a small bowl whisk the butter until light and fluffy with an electric whisk for a couple of mins before adding 2 tbs of the pureed strawberries and 100g of icing sugar. Mix carefully with a spoon (to prevent icing flying everywhere) before whisking with an electric whisk until you have a light fluffy icing.
5. Spread the icing over the cake evenly and leave to set for 20 minutes before decorating with slices of fresh strawberries. Cut in to squares and serve immediately. Store in the fridge in an air-tight container. Consume within 3 days.


Strawberry sponge traybake

If you’ve had a go at making any of my recipes, I’d love to hear from you. Follow me now @corrieheale and tag your recipe pictures using #corriesrabbitfood.


V – Vegetarian.


Carrot cake loaf

Carrot cake loaf
Carrot cake loaf
Carrot cake loaf

I’m going to keep this short but sweet – much like this carrot cake. Partly because it’s past my bedtime and partly because I’m grumpy after spending my entire Sunday burning multiple carrot cakes – would have helped if my oven wasn’t an old tin can with no temperature markings on it.


Carrot cake loaf
Make 1 loaf / Hands on time 35 mins / Total time 1 hr 45 mins / V
You’ll need: 2 lb loaf tin, electric hand whisk
Juice of 1 orange
45g sultanas
150g carrots, peeled and grated
150g soft brown sugar
80g self-raising flour
80g wholemeal flour
1 tsp bicarbonate soda
1 tsp baking powder
2 tsp ground cinnamon
1 tsp ground mixed spice
1 tsp ground ginger
50g pecans, roughly chopped
Pinch of salt
150ml rapeseed oil
2 eggs
Cream cheese icing
130g cream cheese
30g soft unsalted butter
65g icing sugar


TIP: To store, keep the cake refrigerated for up to 3 days in an airtight container or wrapped in clingfilm. Allow the cake to come up to room temperature before serving.


Method
1. In a small saucepan, heat the juice of an orange over a low to medium heat and add the sultanas. Warm through for 10 minutes before putting to one side to cool.
2. Meanwhile, grease the base and sides of a loaf tin with a bit of extra rapeseed oil and line the bottom with baking paper. Put to one side and preheat an oven to 180°C/160°C fan/ 350°F/gas mark 4.
3. Peel and grate the carrot before weighing out the sugar, self-raising flour, wholemeal flour, cinnamon, ginger, mixed spice, bicarbonate of soda, baking powder and a pinch of salt in a large mixing bowl. Add the roughly chopped pecans and give it a good mix before incorporating in the grated carrots using a wooden spoon.
4. In a separate smaller bowl, whisk together the rapeseed oil and the eggs until combined. Pour into the carrot mixture and mix thoroughly. Spoon into the loaf tin and bake on the middle shelf for 1 hr or until a skewer comes out clean.
5. While the cake is baking, make the cream cheese icing by whisking the butter and the cream cheese together in a bowl with an electric whisk. Fold in the icing sugar with a spoon before whisking again for a couple of minutes. Cover loosely with clingfilm and refrigerate.
6. Allow the carrot cake to cool completely in the tin before turning out and topping with lashings of cream cheese icing. Delicious!

Carrot cake loaf
Carrot cake loaf

If you’ve had a go at making any of my recipes, I’d love to hear from you. Follow me now @corrieheale and tag your recipe pictures using #corriesrabbitfood.


– Vegetarian
 – This cake is suitable for home freezing once cooled and before icing. Wrap well in cling film and freeze fore up to 3 months. Defrost fully before icing and serving.


Stout & chocolate graveyard cake

Stout & Chocolate Graveyard Cake

For someone who hates Halloween as much as I do, I’ve baked a pretty good cake for it. Today is the office Halloween Bake Off to help raise money for Mind, a charity that provides advice and support to anyone experiencing mental health issues.
So in the name of charity, Halloween and I have put our differences aside to create this (dare I say it) rather pretty graveyard cake. So let’s enjoy this stupid, nonsensical day and raise some dosh by eating loads of cake… The things I do for charity.

Psst… If you like the look of this cake but don’t want all the bells and whistles, then click here for my regular Guinness Chocolate Cake recipe.


Stout & chocolate graveyard cake
Serves 8-10 / Hands on time 45 mins / Total time 1 hr 30 mins + decorating /
You’ll need: A stand up mixer or electric whisk and a 9 inch round cake tin
250ml Guinness stout
60g cocoa powder, I use Green & Black’s Organic Cocoa Powder
350g golden caster sugar
250g unsalted butter
150ml buttermilk
2 large eggs
1 tsp vanilla extract
280g plain flour
2 tsp bicarbonate of soda
Pinch of salt
Cream cheese frosting
250g cream cheese
250g icing sugar
200ml whipping cream
Decorations
1 packet of Oreos, crushed
8 rich tea finger biscuits
200g Green & Black’s Organic White Chocolate, melted
1 black icing pen
1 small paint brush (optional, although I find a paint brush handy if the icing pen is too thick)
A few sprigs of thyme


Method
1. Preheat your oven to 180°C/160°C fan/350°F/gas mark 4 and line a 9-inch round tin with baking paper and grease the sides with butter.
2. Pop the Guinness and butter on a low heat in a large saucepan until melted. This could take 5-10 minutes, so use this time to measure and prepare the rest of the ingredients. Once the butter has melted, give it a good stir and take off the heat. Tip in 350g of golden caster sugar and 60g of cocoa powder and beat until combined with a hand whisk.
3. In a separate bowl, beat the eggs, vanilla and the buttermilk together with a fork then whisk them into the warm mixture using your hand whisk. (You can use an electric and whisk if you prefer but be careful not to over whisk the mixture). By now the mixture should look lovely and glossy.
4. Sieve 280g of plain flour, 2 tsp of bicarbonate of soda and pinch of salt, straight into the mixture. Whisk for a final time until combined and the lumps reduced (don’t try and work out all of the lumps out, just whisk until smooth-ish for not longer than a few minutes).
5. Pour the mixture, into your tin and bake for 45 minutes. Leave to cool fully in the tin. (The cake might be raised in the middle when you take it out the oven but as it cools, it tends to level out.)
6. To make the cream cheese frosting you will need either a stand alone mixer or hand whisk. In a big bowl, whisk the cream cheese until smooth and then sieve in all of the icing sugar. Whisk until fully combined before adding the whipping cream. Whisk on a high speed for 2-3 minutes or until the frosting is thick and spreadable.
7. Turn the cake out and carefully, using a large knife, slice the cake horizontally as even as you can, giving you two large disks. Spread an even layer of buttercream on the bottom layer, before topping with the other disk to create a sandwich (this bit is optional, if you’d rather not have any layers, then simply jump to step 8.
8. Using a spatular or palette knife, carefully spread the remaining buttercream over the whole cake, including the sides as evenly as you can. Put to one side.
9. Pop your Oreos in a sealable plastic bag and give them a good crunching with a rolling pin. Keep working the rolling pin over the Oreos until you have a good soil texture. Sprinkle the soil over the cake and pat down slightly with your hand, making sure they stick to the buttercream.
10. Melt the 200g of white chocolate in a heatproof bowl over a pan of boiling water. Meanwhile, line a Tupperware with foil and put to one side. Once melted, carefully dip in your rich tea biscuits one at a time, leaving a quarter of the biscuits uncoated (this is the part you’re holding). Once you have an even coating of chocolate front and back, pop the biscuit in the Tupperware by lean it against the side keeping it upright. Repeat with the other 7 biscuits and make sure they don’t touch each other in the Tupperware. Put the biscuits in the freezer for 5-10 minutes or until the chocolate has fully set.
11. Pull each biscuit away from the foil (there’ll be a small chocolate indent on the back of each biscuit but as it’s at the back no one will notice). One by one, pipe on the words RIP onto the front of each biscuit using your icing pen or your pain brush, dipped in a pool of your icing pen. On a chopping board remove the quarter of the biscuit without the chocolate on using a sharp knife and then submerge your gravestone into the cake. Repeat until you have the desired number of graves.
12. Finally, cut several thyme storks and submerge them next to a few graves on top of the cake and Bobs your uncle, you’ve just made my stout and chocolate graveyard cake.

Stout & Chocolate Graveyard Cak

If you’ve had a go at making any of my recipes, I’d love to hear from you. Follow me now @corrieheale and tag your recipe pictures using #corriesrabbitfood.


V– Vegetarian  – Once cooled, wrap individual slices in a few layers of clingfilm and freeze. Consume within 3 months.


Banana bread with ricotta & honey

Banana Cake with Ricotta & Honey

Admittedly this is a bit of an odd post from someone who dislikes bananas but I don’t just dislike them, I f**king hate them. I’ve spent my whole life, trying to avoid bananas (which really wasn’t difficult) but they’ve managed to ruin almost every fruit salad I’ve ever eaten.
But when I look back and try to identify the root of my banana problem, it seems to stem from monkey’s. Staring down at the bottom of the monkey cage at Whipsnade Zoo was not a pretty sight. Half eaten bananas strewn all over the floor and rolled in a mixture of mud and monkey turds. Not very appetising. That being said, this didn’t seem to put me off eating oranges, a common accompaniment to the monkey breakfast. Oranges are just nicer though aren’t they? Let’s move on.
A banana is just a fruit though for god’s sake, I need to stop being such a wimp. Full of potassium and very portable, the banana is the perfect snack so what is my problem? It isn’t like I haven’t tried, every couple of years I attempt to eat a banana, and every couple of years I fail miserably. It always starts off well, ‘this aint so bad’ I think to myself as I unzip the yellow skin but then get a wiff of that unpleasant banana smell. Okay, so just breath through your mouth, no problem, easy. Right, now bite the top, don’t even think about it, just do it. Shit, where’s that brown bit gone? Did I eat it? Why are there always brown bits on bananas? Oh god, it’s now turned to mush in my mouth, I try to swallow it but I can’t, I just can’t, so instead I retch, quick abort, ABORT!
I like my mum’s banana bread though so that’s weird. Enjoy her recipe!


Banana bread with ricotta & honey
Makes 1 loaf / Hands on time 15 mins / Total time 1 hr 5 mins + cooling time /
V Vn*
You’ll need: 9 inch loaf tin
150g wholemeal flour + extra for dusting
75g plain flour
1 tsp bicarbonate soda
1 tsp ginger
½ tsp cinnamon
Pinch of salt
175g demerara sugar
100ml rapeseed oil + extra for greasing
100ml semi-skimmed milk or unsweetened soya milk
½ tsp vanilla extract
2 large or 3 small over-ripe bananas, peeled and mashed
2 handfuls walnuts, roughly chopped
Vegetarian ricotta and runny honey to serve (optional)


*Make it vegan: This is actually my mums vegan banana bread recipe, I only used semi-skimmed milk and butter because that’s what I had in the fridge at the time. If you’re vegan, forgo serving with honey and ricotta and serve simply toasted with lashings of vegan alternative butter – that’s how my mum likes it.


TIP: If you have any bananas in your fruit bowl that have gone a bit brown, wait until they go completely brown and freeze them in their skins in a plastic bag. We have a lot of brown bananas in my house, so I tend to just keep adding them to the plastic bag in my freezer. When I’m ready to make banana bread, I simply defrost the bananas, slip them out of their skins and straight into my cake mix.


Method
1. Preheat an oven to 180°C/160°C fan/ 350°F/gas mark 4. Grease a loaf tin with rapeseed oil and line the bottom with baking paper. Add a tbs of wholemeal flour and shake around the tin until the sides are evenly coated – I do this over a bin as it can be a bit messy. Put to one side.
2. Mix together the flour, bicarbonate of soda, ginger, cinnamon and salt in a medium sized bowl and put to one side.
3. In a larger bowl, peel and mash the bananas before adding the sugar, oil, milk and vanilla. Give it a good stir.
4. Once combined, add half the dry mix to the wet mixture and fold in with a wooden spoon. Fold in the chopped walnuts and the rest of the dry mixture until combined.
5. Spoon the cake mixture into the loaf tin and bake in an oven, on the middle shelf for 50 minutes. Using your fingers, gently press down on the top of the cake to see if it feels firm and springy. If it still feels a little wet and wobbly, cover it in a layer of foil and continue to cook for 10-15 more minutes or until the cake is firm to the touch. Once cooked, insert a clean knife into the centre of the cake, if it comes out clean the cake is cooked.
6. Leave to cool in the tin for 10 minutes before turning out onto a cooling rack. Leave the cake for 30 mins before wrapping up in foil whilst the cake is still a little warm and popping in the fridge – this helps to keep the cake moist.
7. This cake will last for 2-4 days wrapped well in cling film and stored in a tin at room temperature or up to a week in the fridge. To freeze, wrap in three layers of clingfilm and freeze for up to 3 months.


Banana Cake with Ricotta & Honey

If you’ve had a go at making any of my recipes, I’d love to hear from you. Follow me now @corrieheale and tag your recipe pictures using #corriesrabbitfood.


V – Vegetarian     Vn – The cake can be made vegan (see recipe)
❄ – Suitable for home freezing once cooled. Wrap well in three layers of cling film and freeze. Consume within 3 months.


styled_group

Broccoli & cheese potato cake

Broccoli & Cheese Potato Cake

Hey everyone, guess what I got for Valentines Day? Gastroenteritis, yay! Luckily I managed to make this lovely potato cake before I was so diseased, I had to be quarantined in our bedroom like a rabid dog. So with me incapacitated, Jamie was left with an entire potato cake to himself (lucky bugger) which kept him alive the rest of the week.
It’s funny though, I found that even when I was feeling very nauseated, I still couldn’t stop thinking about food. Even when I tried not to, my mind would somehow drift back to ‘so how many bananas do I need for a banana loaf?’ Cue wave of nausea… Oh yeah, can’t think about food… Something not food… What about plastic chairs? They’re pretty great aren’t they, awful to look at but very practical… I wonder if the bananas in the fruit bowl will be ready to use by Sunday… Damn it Corrie!
See, it’s official, I’m obsessed. Anyway, this potato cake is brilliant! Not only is it easy, it tastes great hot or cold, it’s a bit like a Quiche but without the pastry and waaaaaay better. I hope you enjoy it as much as Jamie did, I was too busy talking on the porcelain telephone. At least I’m nice and thin now, #silverlinings.


Broccoli & cheese potato cake
Serves 6 -8 /  Hands on time
 40 minutes / Total time 1 hr 20 mins + cooling / V
You will need:
 9 inch round cake tin, food processor (if making your own breadcrumbs)
1kg potatoes (roughly 5 baking potatoes)
200g tender-stem or purple sprouting broccoli
1 handful of fresh parsley (or any fresh herb)
150g vegetarian mature cheddar cheese
50g vegetarian Italian hard cheese or Parmesan*, grated
4 medium eggs
Knob of butter (for greasing)
1 slice of brown bread for the breadcrumbs or a handful of shop bought
Dash of semi-skimmed milk
3 tbs Pomora extra virgin olive oil


TIP: This recipe is easily halved. Simply opt for a 2lb loaf tin and follow the same instructions with half the amounts. 
TIP:
You can use many vegetables for this. I recently made it with 200g of leeks instead of broccoli but choose ‘quick cook’ vegetables such as broccoli, tomatoes, mushrooms, peppers, sweetcorn, peas, asparagus that can be added raw.


Method
1. Peel and cut your potatoes into big chunks and boil in a large saucepan until soft, around 25 mins (it’s important to use a large saucepan as you’ll be incorporating all the other ingredients into it later).
2. Whilst the potatoes are boiling, line the cake tine with greaseproof paper at the bottom and grease the sides well with butter. Put to one side.
3. C
ut the storks off the broccoli and discard. Pull the remaining florets apart with your fingers leaving you with nice even-ish pieces. Finely chop the parsley and put both to one side.
4. 
Grate the cheddar and the Parmesan. Take a small handful of Parmesan and put to one side, you’ll need this to sprinkle on top of your cake later.Blitz a piece of bread into breadcrumbs in a food processor for a few seconds and put to one side.
5. Preheat your oven to 200°C/180°fan/400°F/gas mark 7.
6. By now your potatoes should be soft. Drain them and pour back into the saucepan. Add a dash of milk to help loosen them up a bit and start mashing (don’t try to get all the lumps out, they add a bit of texture). Season well with salt and pepper, give it a good mix and start to add the cheese a handful at a time before mixing in the eggs. Finally add the broccoli and the parsley.
7. Once all the ingredients have been incorporated, spoon the mixture into the tin. Spread it out and flatten the top with a spoon. Sprinkle over the breadcrumbs and the small handful of parmesan. Drizzle with 3 Tbs of extra virgin olive oil and pop in the oven on the middle shelf. Bake for 30-35 mins.
8. Once cooked, leave to cool in the tin fully. Once cooled, refrigerate in the tin to help the potato cake keep it’s shape. When you’re ready for it, score around the edge of the tin with a sharp knife and turn out. Cut into wedges and serve with a simple watercress salad.


Broccoli & Cheese Potato Cake


If you’ve had a go at making any of my recipes, I’d love to hear from you. Follow me now @corrieheale and tag your recipe pictures using #corriesrabbitfood.


V– Vegetarian
* Parmesan (Parmigiano Reggiani) is always made using animal rennet, therefore it is not vegetarian. Substitute for Italian hard cheese if applicable.


healesmed_big
styled_group

Apricot & passion fruit cake

12


It was my Dad’s birthday last week, so thought I’d bake him a cake. I hardly ever baked for him when he was alive, probably because I was off doing twenty-something things – like drinking white wine spritzers and flying kites.
Although looking back, I don’t think I even started baking until after he died. I remember becoming quite obsessed with it actually. I even sent myself on a rather serious pudding and baking course in Dorest and applied for the second series of The Great British Bake Off (your loss Mary Berry). Baking was, and still is a nice distraction on days like his birthday. Six years on, I decided to make him a tropical twist on a classic Victoria sponge. So happy birthday dad, this one’s for you.


Apricot & passion fruit cake
Serve 8-10 / Hands on time 40 mins / Total time 1 hr + cooling and icing /
V
You’ll need: Electric hand whisk and a 20cm cake tin
200g butter, at room temperature
200g self-raising flour
200g golden caster sugar
1 tsp vanilla extract
Dash of milk
4 large eggs
Filling
3 passion fruit
250g mascarpone
1 tsp vanilla extract
300ml double cream, whipped
3 heaped tbs of icing sugar
2 tbs apricot jam


Method
1. Preheat an oven to 200°C/180°C fan/400F/gas mark 6. Line the bottom of a round baking tin with baking paper and grease the sides with butter.
2. Cream the butter, sugar and vanilla extract in an electric mixer on a medium speed, until light and fluffy (you can do this by hand if you like, I’m just lazy.) Up the speed and add one of the eggs and a tablespoon of flour – this stops the mixture from curdling. Once combined add the second egg with another tablespoon of flour and so on.
3. Add a dash of milk and continue to add the flour bit by bit until you have a thick silky batter. Spoon into a cake tin and bake for 20 minutes. Remove from the oven, cover with foil and continue to bake for a further 10 minutes (this prevents the cake getting too brown on top). Once the cake is springy to the touch and a skewer comes out clean the cake is done. If it doesn’t, continue to bake for a few more minutes.
4. Leave the cake to cool in the tin for 10 minutes before turning out onto a cooling rack. Once cool, you can either ice the cake immediately or wrap it well in cling film and ice it later.
5. Slice the cake in half lengthways so you have two cakes, you’re essentially making a Victoria Sandwich – don’t over think it, just take a big knife and do your best, doesn’t matter if it’s a bit wonky.
6. Make the filling by pouring the double cream and vanilla extract into a large bowl and whisking it until it thickens – be careful not to over-whip the cream.
7. Cut the passion fruits in half and spoon out the seeds of 2 straight into the cream – save the other passion fruit for later. Add the mascarpone and 3 heaped tablespoons of icing sugar until you have a think glossy filling. Spread the bottom layer of your cake with half of your cream filling and the other with apricot jam, as it it were a giant scone. Scoop the last passion fruit out onto the cream and sandwich both cakes together.
8. Finally, top the cake with the rest of the cream and serve.


Apricot & Passion Fruit Cake

If you’ve had a go at making any of my recipes, I’d love to hear from you. Follow me now @corrieheale and tag your recipe pictures using #corriesrabbitfood.


V – Vegetarian
– The sponges is suitable for freezing. Wrap in several layers of clingfilm and freeze for up to 3 months. Defrost fully before icing. 


healesmed_big

Vanilla apple cake

Vanilla Apple Cake
Vanilla Apple Cake

Let me just start by saying that this cake is not the slimmers option, so if you have type two diabetes look away now. I don’t usually bake cakes but tomorrow is my dear old dads birthday. Sadly he is no longer around to eat cakes but when he was he seemed to like this one. Happy 62nd birthday Dad.


Vanilla apple cake
Serves 8 / Hands on time 25 mins / Total time 1 hr 30mins + cooling / V
You’ll need: 20cm cake tin, foil, electric hand whisk or standing mixer
350-400g Brambly apples, peeled, cored and sliced
½ lemon, juiced
250g unsalted butter + extra for greasing
250g caster sugar
3 large eggs
250g self-raising flour
¼ tsp salt
1 tsp vanilla extract
1 tbs demerara sugar
1 tbs icing sugar for decoration


Method
1. Preheat an oven to 180°C/160°C fan/350°F/gas mark 4 and grease your cake tin with butter.
2. Peel, roughly slice and core the apples. Put them in a large bowl, squeeze over the juice of half a lemon and give the apples a good toss – this prevents the apples oxidising and turning brown. Put to one side.
3. In a large bowl or standing mixer, cream the butter and sugar together until using an electric whisk until light and fluffy. Add the vanilla and beat the eggs in one at a time, stopping occasionally to scrape down the sides. If the mixture starts to curdle, simply add a tbs of the self-raising flour and continue to whisk until combined.
4. Sift in the remaining self-raising flour along with the salt and baking powder. Use a wooden spoon to fold in the mixture. The batter should be pale and thick.
5. Fold in the apples and spoon into your prepared tin, using the back of a spoon to push the mixture evenly to the edges (it may seem like there isn’t enough batter to cover the apples but don’t worry, the apples sink to the bottom of the cake during baking). Smooth over the top with a wooden spoon and sprinkle over 1 tbs of Demerara sugar.
6. Bake in the oven for 40 mins. At this stage the cake will be very brown but don’t worry, it’s not burning. Remove the cake from the oven and swiftly cover the top loosely with foil before returning to the oven. Continue to bake for a further 20-30 minutes or until a skewer that is inserted comes out clean, making sure you don’t mistake raw cake batter or baked apples.
7. Remove from the oven and leave the cake to rest in the tin for 15 minutes before turning out onto a wire rack. Leave to cool fully before dusting with icing sugar and serving with clotted cream and a cup of tea.


IMG_4012


If you’ve had a go at making any of my recipes, I’d love to hear from you. Follow me now @corrieheale and tag your recipe pictures using #corriesrabbitfood.


V – Vegetarian
 – This cake is suitable for home freezing once cooled. Wrap well in cling film and freeze fore up to 3 months. Defrost fully before serving.