A squash is for life, not just Halloween

On my daily stroll around the block (gotta’ get those lockdown steps in) my route is surprisingly still peppered with shrivelled decaying Halloween pumpkins. Staring at me with their empty eyes from windowsills and porches got me thinking. After the 31st of October, do pumpkins and squashes get a little forgotten about? A squash is for life not just for Halloween… Well perhaps not for life, but this versatile ingredient can be baked, curried, squashed (literally) and stuffed – which is my favourite method, especially when it involves cheese. I opted for an onion squash for this recipe but feel free to experiment as you’ll be spoilt for choice this time of year.

Mini Squash Fondues
Mini Squash Fondues

Mini squash fondues
Serves 2 / Hands on time 30 mins / Takes 1 hour
2 mini squashes (roughly 550g each) I used onion squash
75g vegetarian Emmental
75g Gruyere or medium cheddar cheese
50g Parmesan
2 garlic cloves, crushed
Handful of finely chopped fresh parsley
4 tbs white wine or prosecco
2 tsp extra virgin olive oil
Crusty bread and salad leaves to serve


Method
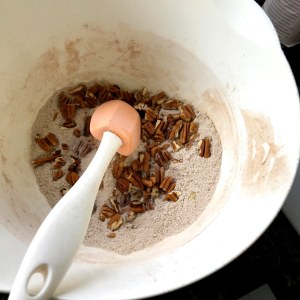
1. Preheat oven to 200°C/180°C fan/400°F/gas mark 6. Finely grate the cheeses and mix them together in a large bowl. Put to one side.
2. Using a sharp knife carefully cut the tops off the squashes to create the lids and put to one side. Carefully hollow out the squash by cutting a hole in the top and then scooping out the seeds with a spoon.
3. Once you’ve hollowed out the squash, check to see if each squash stands up on its own. If they’re uneven and tilt, carefully level off the bottom of your squash with a knife, taking care not to cut too deep (if you do accidently create a hole, pop the bottom back on and make a little foil coat for your squash to sit in to prevent it from leaking). Alternatively, use foil to create a stable bed for your squashes to sit in.
4. Crush a garlic clove into each squash, followed by a small sprinkle of parsley and 1 tablespoon of white wine into each. Season well with salt and pepper.
5. Fill each squash with half the cheese and then add another tablespoon of wine to each squash. Season again and stuff the squashes with the rest of the cheese. Top with the remaining parsley, season with salt and pepper and pop the individual squash lids on.
6. Put both squashes on a baking tray and bake them for 30-35 minutes. Remove from the oven, remove the lids and drizzle with a little extra virgin olive oil. Serve immediately with a simple green salad and stale for dipping and scooping.

Mini Squash Fondues
Mini Squash Fondues

For more foodie blogs, recipes and courses, visit learningwithexperts.com.


If you’ve had a go at making any of my recipes, I’d love to hear from you. Follow me now @corrieheale and tag your recipe pictures using #corriesrabbitfood.


Authentic hummus

Authentic Hummus

A dried chickpea is a thing of wonder and mystery. A small hard little bullet that requires soaking and boiling until it finally becomes edible. Sounds like a lot of effort to me. I’m the kind of gal who likes to shmoosh up a can of ready prepared chickpeas in 5 minutes and call it hummus –isn’t that what canned chickpeas are for? That being said, I have it on good authority that soaking and cooking dried chickpeas makes a vast improvement over my tinned version so was intrigued enough to try it for myself. Soaking the chickpeas overnight is the only step that makes the process lengthy but other than that, the task was relatively effortless and well worth it. My hummus was silky smooth, buttery and creamier than any I have ever made. Sprinkled with smoked paprika and drizzled with lashings of extra virgin olive oil, I served mine warm straight out the pot shovelled on top a hot pita bread. Nom nom. 


Authentic hummus
Makes approx 600g / Hands on time 15 mins / Total time 1 hr 20 mins + soaking overnight / V Vn Gf Df 
You’ll need: Food processor or hand blender
250g dried chickpeas 
1tsp sea salt flakes 
½ tsp bicarbonate of soda 
For the hummus:
2 garlic cloves
2 tbs tahini 
Juice of half a lemon
2 tbs water (more if you like a looser texture) 
1tsp sea salt flakes 
To serve:
Smoked paprika, chopped parsley and a good quality extra virgin olive oil 


  1. Add the dried chickpeas to a large bowl and cover with twice the volume of cold water (filtered if you have it). leave to soak for at least 12 hours – I tend to do this overnight.
  2. Drain and rinse the chickpeas well before transferring to a large saucepan. Cover again with twice the volume of cold tap or filtered water and add 1 tsp of salt and ½ a tsp of bicarbonate of soda and stir well.
  3. Place over a high heat and bring to a furious boil for 10 mins, skimming off any foam and loose skins that have come away. Turn the heat down to a simmer and continue to skim off and disregard any other loose skins occasionally for 50 mins. Your chickpeas should be soft enough to squish between your fingers. If they’re still little hard, continue to cook them until they are soft.
  4. Drain the chickpeas over a large bowl to reserve the water and leave to cool in a colander for 10-15 mins. Tip the warm chickpeas into a food processor or large bowl (if using a hand blender) and add the tahini, garlic, lemon juice, salt and 2 tbs of the reserved water. Blitz until you have your desired texture. If you like your hummus extra smooth, add additional chickpea water and blend for longer until you get your desired textured.
  5. Spoon into a bowl and serve warm topped with chopped fresh parsley, a dusting of smoked paprika and a good glug of good quality extra virgin olive oil.


If you’ve had a go at making any of my recipes, I’d love to hear from you. Follow me now @corrieheale and tag your recipe pictures using #corriesrabbitfood.


V – Vegetarian    Vn – Vegan     Gf – Gluten free     Df – Dairy free


If you’ve had a go at making any of my recipes, I’d love to hear from you. Follow me now @corrieheale and tag your recipe pictures using #corriesrabbitfood.


Is that an aubergine in your pocket or are you … Oh, it is an aubergine

Aubergine & Chickpea Stew

At their best from July to September, now is the perfect time to get your hands on the nations favourite emoji. The aubergine. With its glossy purple skin and spongy centre, this vegetable loves nothing more than to soak up flavours and I have just the recipe! This aubergine and chickpea stew is warm with cinnamon spice but fresh with mint and yogurt, perfect to see out the last of the Summer nights before welcoming Autumn in all her golden glory.


Aubergine & chickpea stew
Serves 4 / Hands on time 30 mins / Total time 1 hr / V Vn Gf Df 
1 tsp olive oil
1 white onion, finely diced
2 garlic cloves, finely chopped
2 aubergines, cut into large chunks
6 medium sized tomatoes, cut into eighths
1 can tinned chickpeas, drained
500ml vegetable stock, I use Knorr stock pots
3 bay leaves
1 ½ tsp cinnamon
1 tsp smoked paprika
1 tsp cumin
1 tsp turmeric
1 tsp dried parsley
100ml *vegan red wine
To serve 
Handful of fresh mint leaves
Greek or dairy free yogurt (optional)
Drizzle of Pomora extra virgin olive oil
Serve with crusty bread or couscous


Method

  1. Finely chop the onion and add to a large cooking pot with a teaspoon of oil and a good pinch of salt. Over a medium heat, sweat the onions for 5 minutes or until softened (if the onions are getting a little too much colour, add a dash of water to the pot to help them to steam).
  2. Add the garlic and cook for 2 minutes before adding the cumin, turmeric, smoked paprika and cinnamon. Give it a stir and add a dash of water to help loosen it up a bit.
  3. Cook the spices for a couple of minutes before adding the freshly chopped tomatoes, vegetable stock, red wine, aubergine, drained chickpeas, bay leaves and dried parsley. Give it a good mix and season well with salt and pepper. Bring to the boil.
  4. Turn the heat down to a simmer, pop the lid a jar and cook for 15 minutes stirring occasionally. After 15 minutes, take the lid off, give it another stir and continue to cook without the lid for a further 15 minutes. Meanwhile, use this time to prepare your chosen accompaniment – I like to serve it with couscous or with a loaf of crusty bread on warmer days and mashed potato on cooler ones.
  5. Take the stew off the heat and carefully pick out the bay leaves. Divide into bowls along your chosen accompaniment, a generously sprinkle of fresh mint, yogurt (optional), and a drizzle of extra virgin olive oil.

    Aubergine & Chickpea Stew
    Aubergine & Chickpea Stew


    For more foodie blogs, recipes and courses, visit learningwithexperts.com.

Carrot cake loaf: A slice of seasonless happiness

Come rain or shine (and I think it’s fair to say we’ve had a lot of both recently) there is always a good time for carrot cake. Although bursting with vitamins, antioxidants and fibre we all know the healthiest thing about a carrot cake is its name and the minuscule amount of cardio that goes with grating carrots – which frankly is the worst part about making carrot cake. But there is a reason this sweet vegetable deserves its place in the cake hall of fame, and that’s because it’s utterly delicious and worth grating your finger nails for. So why not whip up this seasonless classic and enjoy slice after slice with numerous cups of tea, because that is how carrot cake should be gobbled up – by the wedge load. Although I’m pretty sure Bugs Bunny would have a few words to say about that and not all of them so savoury.

Carrot cake loaf
Carrot cake loaf


Carrot cake loaf
Make 1 loaf / Hands on time 35 mins / Total time 1 hr 45 mins / V
You’ll need: 2 lb loaf tin, electric hand whisk
Juice of 1 orange
150g carrots, peeled and grated
150g soft brown sugar
80g self-raising flour
80g wholemeal flour
1 tsp bicarbonate soda
1 tsp baking powder
2 tsp ground cinnamon
1 tsp ground mixed spice
1 tsp ground ginger
50g walnuts, finely chopped
Pinch of salt
150ml extra virgin olive oil or cold-pressed rapeseed oil
2 eggs
For the icing:
130g cream cheese
30g soft unsalted butter
65g icing sugar, sifted


Method
1. Grease the base and sides of a loaf tin with a bit of oil and line the bottom with baking paper. Put to one side and preheat an oven to 180°C/160°C fan/ 350°F/gas mark 4.
2. Peel and grate the carrot before weighing out the sugar, self-raising flour, wholemeal flour, cinnamon, ginger, mixed spice, bicarbonate of soda, baking powder and a pinch of salt in a large mixing bowl. Add the finely chopped walnuts and give it a good mix before incorporating in the grated carrots using a wooden spoon.
3. In a separate smaller bowl, whisk together the rapeseed oil and the eggs until combined. Pour into the carrot mixture and mix thoroughly. Spoon into the loaf tin and bake on the middle shelf for 50 mins before covering with foil for a further 10 mins (or until a skewer comes out clean).
4. While the cake is baking, make the cream cheese icing by whisking the butter and the cream cheese together in a bowl with an electric whisk. Fold in the icing sugar with a spoon before whisking again for a couple of minutes. Cover loosely with cling film and refrigerate.
5. Allow the carrot cake to cool completely in the tin before turning out and topping with lashings of cream cheese icing.
6. To store, keep the cake refrigerated for up to 3 days in an airtight container or wrapped in cling film. Ideally, allow the cake to come up to room temperature before serving.

Carrot cake loaf
Carrot cake loaf


If you’ve had a go at making any of my recipes, I’d love to hear from you. Follow me now @corrieheale and tag your recipe pictures using #corriesrabbitfood.


Broccoli fusilli with kale & walnut pesto

Broccoli fusilli with kale & walnut pesto


In the back of the vegetable crisper it waits patiently. Its bushy green head turning ever so slightly yellow, it’s pine coloured leaves wilt and shrivel whilst its branches begin to soften. But it doesn’t have to be this way! Liberate your head of broccoli by chopping it up (stalk and all) and serving it al dente stirred through wholemeal pasta with a vibrant kale and walnut pesto. Delish! Alternatively, leave the dish to cool fully before refrigerating and serving as a summery accompaniment to any barbecue. Adding crumbled feta or parmesan shavings add a bit of extra indulgence or leave it as it is to please any plant-based guests you may be entertaining.


Broccoli fusilli with kale and walnut pesto
Serves 2 / Hands on time 15 mins / Total time 20 mins / V Vn Df
You’ll need: A food processor
50g walnuts (about 2 handfuls)
½ regular sized garlic clove, peeled and roughly sliced
1 handful of kale, heavier stems removed and discarded
20-30g fresh basil
3 tbs Pomora extra virgin olive oil
150g wholemeal brown fusilli
1 head of broccoli


TIP: This recipes makes enough pesto to serve 4. Refrigerate any leftover pesto for up to 2 days or freeze for up to 3 months.


Method
1. Put a full kettle on to boil and pour the pasta into a large saucepan (big enough to accommodate an entire chopped head broccoli).
2. Meanwhile, make the pesto by peeling and roughly chopping the garlic before adding it to a food processor, along with the walnuts and a handful of kale (heavier stems removed). Blitz on full for about 10 seconds or until you have a rough paste.
2. Add the fresh basil, a good sprinkle of salt and pepper and give it another blitz – this time for a bit longer until you have a slightly smoother paste.
3. Lastly, add 2 tbs of extra virgin olive oil before blending for a final time (how long you blend is up to you depending on how smooth you like your pesto). Put to one side.
4. Pour the boiling water from the kettle over the pasta and add a half a tsp of salt to the water. Use more water than you would usually as you will need to boil the broccoli in it too. Cook the pasta according to the packet instructions until 4 mins before the end of the cooking time. Meanwhile, pull he florets off the broccoli with your fingers and chop into big chunks include the stalk and the leaves.
5. Four minutes before the pasta is cooked add the broccoli florets to the pasta pan and boil for the remaining cooking time.
6. Strain the pasta and the broccoli well before transferring back into the saucepan off the heat. Add half the pesto and stir well until evenly distributed. Divide onto plates and serve immediately with a drizzle of extra virgin olive oil and a crack of black pepper. Any remaining pesto can be used another day or frozen (see tip).

Broccoli fusilli with kale & walnut pesto


If you’ve had a go at making any of my recipes, I’d love to hear from you. Follow me now @corrieheale and tag your recipe pictures using #corriesrabbitfood.


V – Vegetarian    Vn – Vegan     Df – Dairy free


The side salad revamp

Side salads needn’t be a sad looking lettuce, cucumber and tomato combo. Jazz up your sides with these summery recipes along with a few tips and tricks.  


Courgette carpaccio

Courgette carpaccio
Yes, raw courgette can be delicious thing! Using a potato peeler, peel the 2 raw courgettes into ribbons and put in a large bowl. Squeeze over the juice of a lemon, 2 tbs of extra virgin olive oil and sprinkle over a large pinch of salt. Add a handful of chopped fresh dill and give it a good mix (being careful not to break up the courgette ribbons). Once everything is nicely dressed, pour out onto a large platter and dot with chunks of goat’s cheese. Drizzle with more extra virgin olive oil and serve.


Broccoli slaw with flaked almonds

Raw broccoli slaw
Eating raw broccoli may seem odd but it’s no different than eating raw cabbage in a slaw and it’s very tasty. Prepare a head of broccoli by cutting it into bite-sized florets and discarding the chunky stalk. Pop in a large bowl with a quarter of a finely sliced red onion and put to one side. In a small frying pan, over a medium heat, infuse 1 clove of bashed garlic clove in a tbs of extra virgin olive oil until it starts to sizzle slightly. Take off the heat, discard the garlic clove and put the oil to one side. In a smaller bowl make the dressing by whisking together 150g of Greek yogurt, the juice of half a lemon, 1 tsp of cider vinegar, 1 tsp of Dijon mustard and the warm garlic oil until combined. Season well with salt and pepper before pouring over the raw broccoli.Mix together along with a couple of handfuls of flaked almonds. Pour into a bowl, season and dust with smoked paprika.  Finish with a good drizzle of extra virgin olive oil and serve.


Mango mozzarella salad

Mango and mozzarella
Mango and mozzarella make excellent bedfellows and a refreshing summer salad. Start by making the dressing by mixing the juice of a lime, 1 small garlic clove crushed and a tbs of extra virgin olive oil in a small bowl. Chop the mango into chunks and finely chop 2 spring onions, fresh coriander, half a deseeded red chilli and mix them together in a large bowl along with the dressing. Wash and chop 1 gem lettuce and add to the other ingredients and mix well. Drain 2 balls of mozzarella and tear into pieces with your fingers and add them to the salad. Season with salt and pepper and garnish with a sprinkle of dried chilli flakes.


Not quite ready for raw broccoli and exotic fruit in your salad? Try adding a bit of texture by sprinkling over a handful of seeds or some chopped nuts. Pumpkin seeds, sunflower seeds and pine nuts are a good option as they’re mild in flavour but add a nice bit of bite. You could also try including grains and pulses to make your salads more substantial. Chickpeas and kidney beans work well as do grains such as couscous and rice. Freshly chopped herbs can be a fragrant addition along with flavoured oils used in dressings. So, jazz up those side salads and have a party why don’t you!


For more foodie blogs, recipes and course, visit learningwithexperts.com.

Better feta

Feta isn’t just for crumbling over salads, this ewe’s cheese is much more versatile than you may have originally thought. Softly brined, tangy, salty and ever so slightly sour and sweet in flavour, feta can add a welcome depth and texture to a number of dishes. Whipped, baked or even fried, this pleasing block of ‘white gold’ deserves to be centre stage to bring the taste of Greece to your dinner table.


Whipped feta and avocado dip

Whipped feta and avocado dip
Add 100g of feta to a food processor and blitz until it resembles breadcrumbs. Add a handful of fresh mint leaves and blitz again until combined. Add the flesh of a whole avocado along with 2 tbs of extra virgin olive oil and season with salt and pepper. Blitz for a final time until you have a smooth creamy consistency. Serves 2.


Fried feta on toast with honey & thyme

Fried feta on toast with thyme and honey
On a small side plate, add a heaped tbs of flour. Slice 100g of feta into two even slices and dust well in the flour. Beat an egg in a small bowl, season well with salt and pepper and pour onto a plate. Dip the cheese into the egg and cover evenly. In a small frying pan on a medium heat, add a tbs of oil. Once hot, carefully place the cheese in and fry gently on each side for a couple of minutes or until golden. Serve on a piece of toasted sourdough, drizzled in good quality honey and sprinkled with fresh thyme leaves. Serves 1.


Baked Feta

Baked Mediterranean feta
Preheat an oven to 200°C/180°C fan/400F/gas mark 6. Slice 1 red pepper along with half a red onion, 8 cherry tomatoes (halved) and 2 handfuls of black olives (halved). Smooth out 2 large pieces of kitchen foil and divide the chopped red pepper and arrange in the centre of each piece of foil. Season well with salt and pepper. Slice 200g of feta in half and pop each slice on top of the bed of sliced peppers. Top the feta with the onions and the cherry tomatoes (it doesn’t matter if a few fall off, just leave them at the side). Scatter over the olives and sprinkle with dried oregano. Season with salt and pepper before folding up the sides of each parcel and scrunching the top until sealed. Place both on a baking tray. Bake in the oven for 20 mins. Once cooked, carefully remove from the oven and open the parcels up just enough to drain away any excess liquid before sliding onto plates. Serve with warm pita bread and a good drizzle of extra virgin olive oil.


Jamie’s Feta & Cherry Tomato Rigatoni

Feta and cherry tomato pasta sauce
Half 20 cherry tomatoes and put in a large saucepan with 1tsp olive oil and 1 tsp of oregano. Cook on a medium heat for 5 mins until softened. Add 3 tbs tomato purée, 3 chopped garlic cloves, 1 grated courgette and season with salt and pepper. Cook on a medium to low heat with the lid on for a further 10 mins. Meanwhile, cook the pasta in a large pot of salted boiling water (follow packet instructions). Drain the pasta and pour straight into the sauce. Stir well before adding the chopped basil and 150g of crumbled feta. Stir again until combined and the cheese begins to melt. Serve topped with a drizzle of extra virgin olive oil and a good crack of pepper.


For more foodie blogs, recipes and course, visit learningwithexperts.com.

Fresh cherry & lemon drizzle

Fresh Cherry & lemon drizzle


I love cherries but hate cherry cake. Nearly always made with horrid glacé cherries and with an amaretto after-taste I can’t think of anything worse. But I  do love fresh cherries and guess what? Cherries are currently in season and I’m in the mood for something sweet so I thought I’d have a go at making a fresh version with added lemon drizzle – because who doesn’t love a lemon drizzle? This cake is sweet,  fruity and perfect for yet another wet July afternoon – seriously what is up with the weather? I’m wearing a wooly jumper!


Fresh Cherry & lemon drizzle
Serves 8-10 / Hands on time 25 min / Total time 1hr 30 mins + cooling / V
You’ll need: 20cm cake tin, tin foil, electric hand whisk, cherry pitter (optional)
250g pitted fresh cherries
225g caster sugar
2 eggs
115g unsalted butter + extra for greasing
140ml semi-skimmed or whole milk
½ tsp vanilla essence
185g plain flour
1 ½ tsp baking powder
Drizzle
85g caster sugar
1 lemon


Method
1. Preheat an oven to 180°C/160°C fan/ 350°F/gas mark 4. Grease the cake tin and line the bottom with baking paper. Put to one side.
2. Pit and de-stork the fresh cherries. If you have a cherry pitter (lucky you) keep the cherries whole. If you don’t (like me) you can click here to watch a very smug man pit cherries using a chopstick and bottle – which is what I’ll do next time. However, I didn’t know this at the time, so I used a sharp knife to cut the cherry all the way around from top to bottom, then twist the two halves apart in opposite directions – like you would with an avocado. If the cherry pit doesn’t pull away neatly from one half (mine didn’t) just roughly cut around the stone. You’ll be left with a mixture of cherry halves and smaller chopped cherry pieces which is fine.
3. Put the butter and the milk in a small saucepan over a low heat until the butter has melted. Once melted take off the heat to cool slightly.
4. Meanwhile, in a large bowl, whisk together the eggs and the caster sugar for at least 2 mins until you have a very pale, creamy mixture and the whisk leaves a trail behind it.
5. Add the vanilla essence and the melted butter and milk slowly to the egg mixture and mix well with the electric whisk until combined.
6. Measure out the flour and the baking powder in a seperate bowl before sieving over the top. Fold in with a wooden spoon until just combined with minimal lumps – be careful not to overwork the mixture.
7. Pour into your cake tin (the mixture will be quite runny) and sprinkle all the cherries over on top – don’t worry, they will sink durning baking.
8. Bake in the oven for 35 mins. At this stage the cake will have formed a crust on the top. Carefully top the cake with a loose sheet of foil whilst still in the oven and continue to bake for a further 25-30 mins or until a skewer inserted into the cake comes out clean.
9. Remove from the oven and leave to cool in the tin for 30 mins Meanwhile, make the drizzle by combining the juice of one lemon and the caster sugar.  Turn the cake out, prick all over with a skewer and evenly pour over the drizzle whilst still warm. Leave to set and cool fully before serving. This cake will last up to 5 days wrapped up in the fridge.

Fresh Cherry & lemon drizzle


If you’ve had a go at making any of my recipes, I’d love to hear from you. Follow me now @corrieheale and tag your recipe pictures using #corriesrabbitfood.


V – Vegetarian


Food labels and drop scones

Oh we do a love a bit of food waste in the UK don’t we. £20 billion in fact (yes £20 billion) worth of food is binned annually in the UK. Contributing to this staggering figure, is consumer confusion around food labelling. The sooner you get to grips with “use by”, “sell by” and “best before” dates, the less waste you’ll produce and the more money you will save. Ka-ching!


Display until/sell by: Is aimed at the retailer, not you. It simply indicates (to them) the date by which the product should be sold or removed from the shelves. However, this is not an indication of when the product should be consumed. Typically, one-third of a products shelf-life remains for the customer to consume safely at home.

Best before: Use your common sense on this one and decide when a product is no longer fit to eat. “Best before” dates are more of a guide, rather than a recommendation. It’s about quality, not safety.

Use by:
Now this is the important one and a label not to be ignored. Unlike “best before”, “use by” dates are about safety and food hygiene. NEVER consume a food product that is past its “use by’ date even if it smells okay – I’m talking to you milk carton sniffers. Just because the product smells safe, doesn’t mean it isn’t crawling with harmful bacteria. Bin it or try and consumer it before the “use by” date.


That being said, do you still find yourself pouring whole pints of milk down the sink? Well, you’re not the only one. £150m worth of milk is wasted every year with 90 percent of it coming from the home – eep! But there’s no use crying over spilt milk, instead I’m going to let you in on my secret to using up this everyday staple before it turns sour.

Pancakes! Not only are they easy, versatile and fun to make, but most batters require at least, half a pint of milk. Savoury, sweet, baked or fried, there is a plethora of recipes out there to experiment with, from Dutch babies to cheesy galettes, plant milks to different flours – doesn’t always have to a sugary lemon treat. In my house, I opt for savoury drop scones, not only are they easy to make but they’re also a great way of using up any surplus veg. Win, win!


Savoury green drop scones

Savoury green drop scones
Makes 8-10 / Serves 2 / Hands on time 30 mins / Total time 30 mins / 
V
175g your choice of flour
200ml your choice of milk – plant milks also work
1 egg
½ tsp baking powder
1 tsp oil
3 springs onions, finely chopped
1 large handful of greens (you can use any chopped greens you like for this recipe – I use a mixture of savoy cabbage and kale but spinach, cavolo nero, chard or even brussels sprouts work. You can also use grated root vegetables such as carrots or parsnips)
2 garlic cloves, finely chopped
50g grated cheese (optional)
½ tsp sea salt


Method
1. Preheat an oven to 100°C/80°C fan/210F/gas mark 1. Put a large plate in the oven.
2. Weigh out the flour and the baking powder and combine in a large bowl. Add 200ml of milk to a jug and crack in 1 egg. Whisk the egg in the jug with the milk until fully incorporated. Put to one side.
3. Finely chop the spring onions, garlic and your selection of greens. Grate the cheese and put to one side.
4. Add the salt and the baking powder to the flour and mix before making a well in the middle and pouring in the milk bit by bit, whisking continuously. Once you have a smooth batter, add the other ingredients until fully incorporated.


5. Put a large non-stick frying pan over a medium to high heat and add a tsp of oil. Once hot, drop a heaped tablespoon of mixture into the pan and push down with the back of the spoon to create a round-dish shape. Repeat this process making sure the drop scones are not too close together. After a couple of minutes, flip the scones over and press down on them with the back of a spatula to help them cook through – feel free to flip them over a couple more time to insure they are cooked all the way through.
6. Remove the warm plate from the oven and turn the scones out onto it. Cover loosely with foil and place back in the warm oven while you make your second batch of scones. Repeat this process until you have no batter left. Serve for breakfast with chilli jam or for lunch with a green salad.


If you’ve had a go at making any of my recipes, I’d love to hear from you. Follow me now @corrieheale and tag your recipe pictures using #corriesrabbitfood.


V– Vegetarian


Roasted new potato salad

Roasted new potato salad


I’ve spoken about my disdain for new potatoes being used to make sad ‘mayonnaisey’ potato salads – or as I like to call it, ‘bowl of mushy white swill’. But it doesn’t have to be this way folks. Roast the little blighters and toss them in a deliciously light salad with crunchy radishes and a zesty hummus dressing. You’ll be queen of the barbecue and the envy of all – apart from the person who made the three tier pavlova. No one can top that.

I actually make this recipe a lot and use whatever ‘salady’ bits we have in the fridge so feel free to freestyle. I tend to make the dressing in a scraped out hummus pot as it saves washing up and disappoint when you realise there ins’t enough hummus to top a single crisp. Devastating.


Roasted new potato salad with hummus dressing
Serves 2 or 4 as a side / Hands on time 20 mins / Total time 1 hr 15 mins / V Gf Df*
350-400g new potatoes
1 tsp sea salt flakes
1 tsp rapeseed oil
½ cucumber, peeled and cut into chunks
4 radishes, sliced
Handful pumpkin seeds
Handful pitted black olives, roughly chopped
½ deseeded bell pepper, finely chopped
¼ small red onion, sliced thinly
2 handfuls salad leaves to serve
100g feta, crumbled (optional)

Dressing
1 tbs hummus
1 tsp extra virgin olive oil
1 tsp apple cider vinegar (or balsamic)
½ tsp dijon mustard
½ tsp honey


TIP: This recipe can easily be doubled or even tripled if making as a side for a barbecue.


Dairy free? Leave out the feta – I often make this recipe without it and it is just as delicious.


Method
1. Preheat an oven to 200°C/180°C fan/400F/gas mark 6.
2. Cut in half the larger new potatoes leaving the smaller one’s whole. Give them a quick wash before patting them dry with a tea towel or kitchen roll. Pour the potatoes into a large mixing bowl and add the oil and the salt.
3.Mix well making sure the potatoes are well coated. Tip out onto a lined baking tray, making sure to space the potatoes apart. (No need to wash up the mixing bowl, save it to make your salad in later).
4. Roast in the oven for 15 mins before giving them a little shake. Continue to roast for a further 10 mins. Give them a final shake, turn off the heat but leave them in the oven while you prepare the salad.


TIP: I often roast the potatoes in the morning and leave them in the oven to rest (sometimes for hours) until I’m ready for the salad. This salad can be enjoyed warm or cold.


5. Start to assemble the salad by adding the chopped cucumber, red pepper, red onion, radishes and pitted black olives to the large mixing bowl you used earlier (the smaller your dice your salad the better to give an even distribution per portion. Sprinkle over the pumpkin seeds and season with salt and pepper. Give it a good mix.
6. Make the dressing either in the hummus pot (if you have about a tbs left) or in a small bowl. Combine all the ingredients together and give it a good stir until combined.
7. Finally remove the potatoes from the oven and tip into the salad along with the crumbled feta (if using). Give it a stir before adding all of the dressing and mix well. Serve on a bed of salad leaves and with an extra drizzle of extra virgin olive oil and a good crack of black pepper.

Roasted new potato salad


If you’ve had a go at making any of my recipes, I’d love to hear from you. Follow me now @corrieheale and tag your recipe pictures using #corriesrabbitfood.


V– Vegetarian.    GF – Gluten Free     DF – Dairy free: Leave out the feta