Summer salsa bites

1


Okay so not very Portuguese but I made these on holiday in Portugal – as you may have guessed, I don’t have a pool in my Camden flat… Or any sun for that matter. Anyway, I seem to only ever make this salsa in Portugal, partly because my best friends Philippa insists on it, and partly because it’s lovely and refreshing. So between drinking buckets of cheap local wine and pushing each other in the pool, not only did I remember the recipe for these little blighters but I managed to make them too…. Twice in fact – Philippa can be very demanding. Now, I know it’s not the weather for summer salsa but guess what, it wasn’t all that sunny in Portugal and we still ate it, so you can too. It’s really easy but a bit time consuming. You need to let the salsa cook down and then you need to chill it. Best to make it on a lazy Sunday when you have time, it’s worth the effort though – even if you do gobble them all up in under 5 minutes like we did.


Summer salsa bites
Makes 400ml / Hands on time 10-15 mins / Total time 1 hr 30 mins + chilling /
12 tomatoes, de-seeded and diced
½ red chilli, de-seeded and diced
1 large garlic clove, peeled and finely chopped
1 red or yellow pepper, de-seeded and diced
1 tbs extra virgin olive oil
½ tsp sea salt flakes
Black pepper
Melba toast to serve (optional)
Vegetarian feta to garnish (optional)


Method
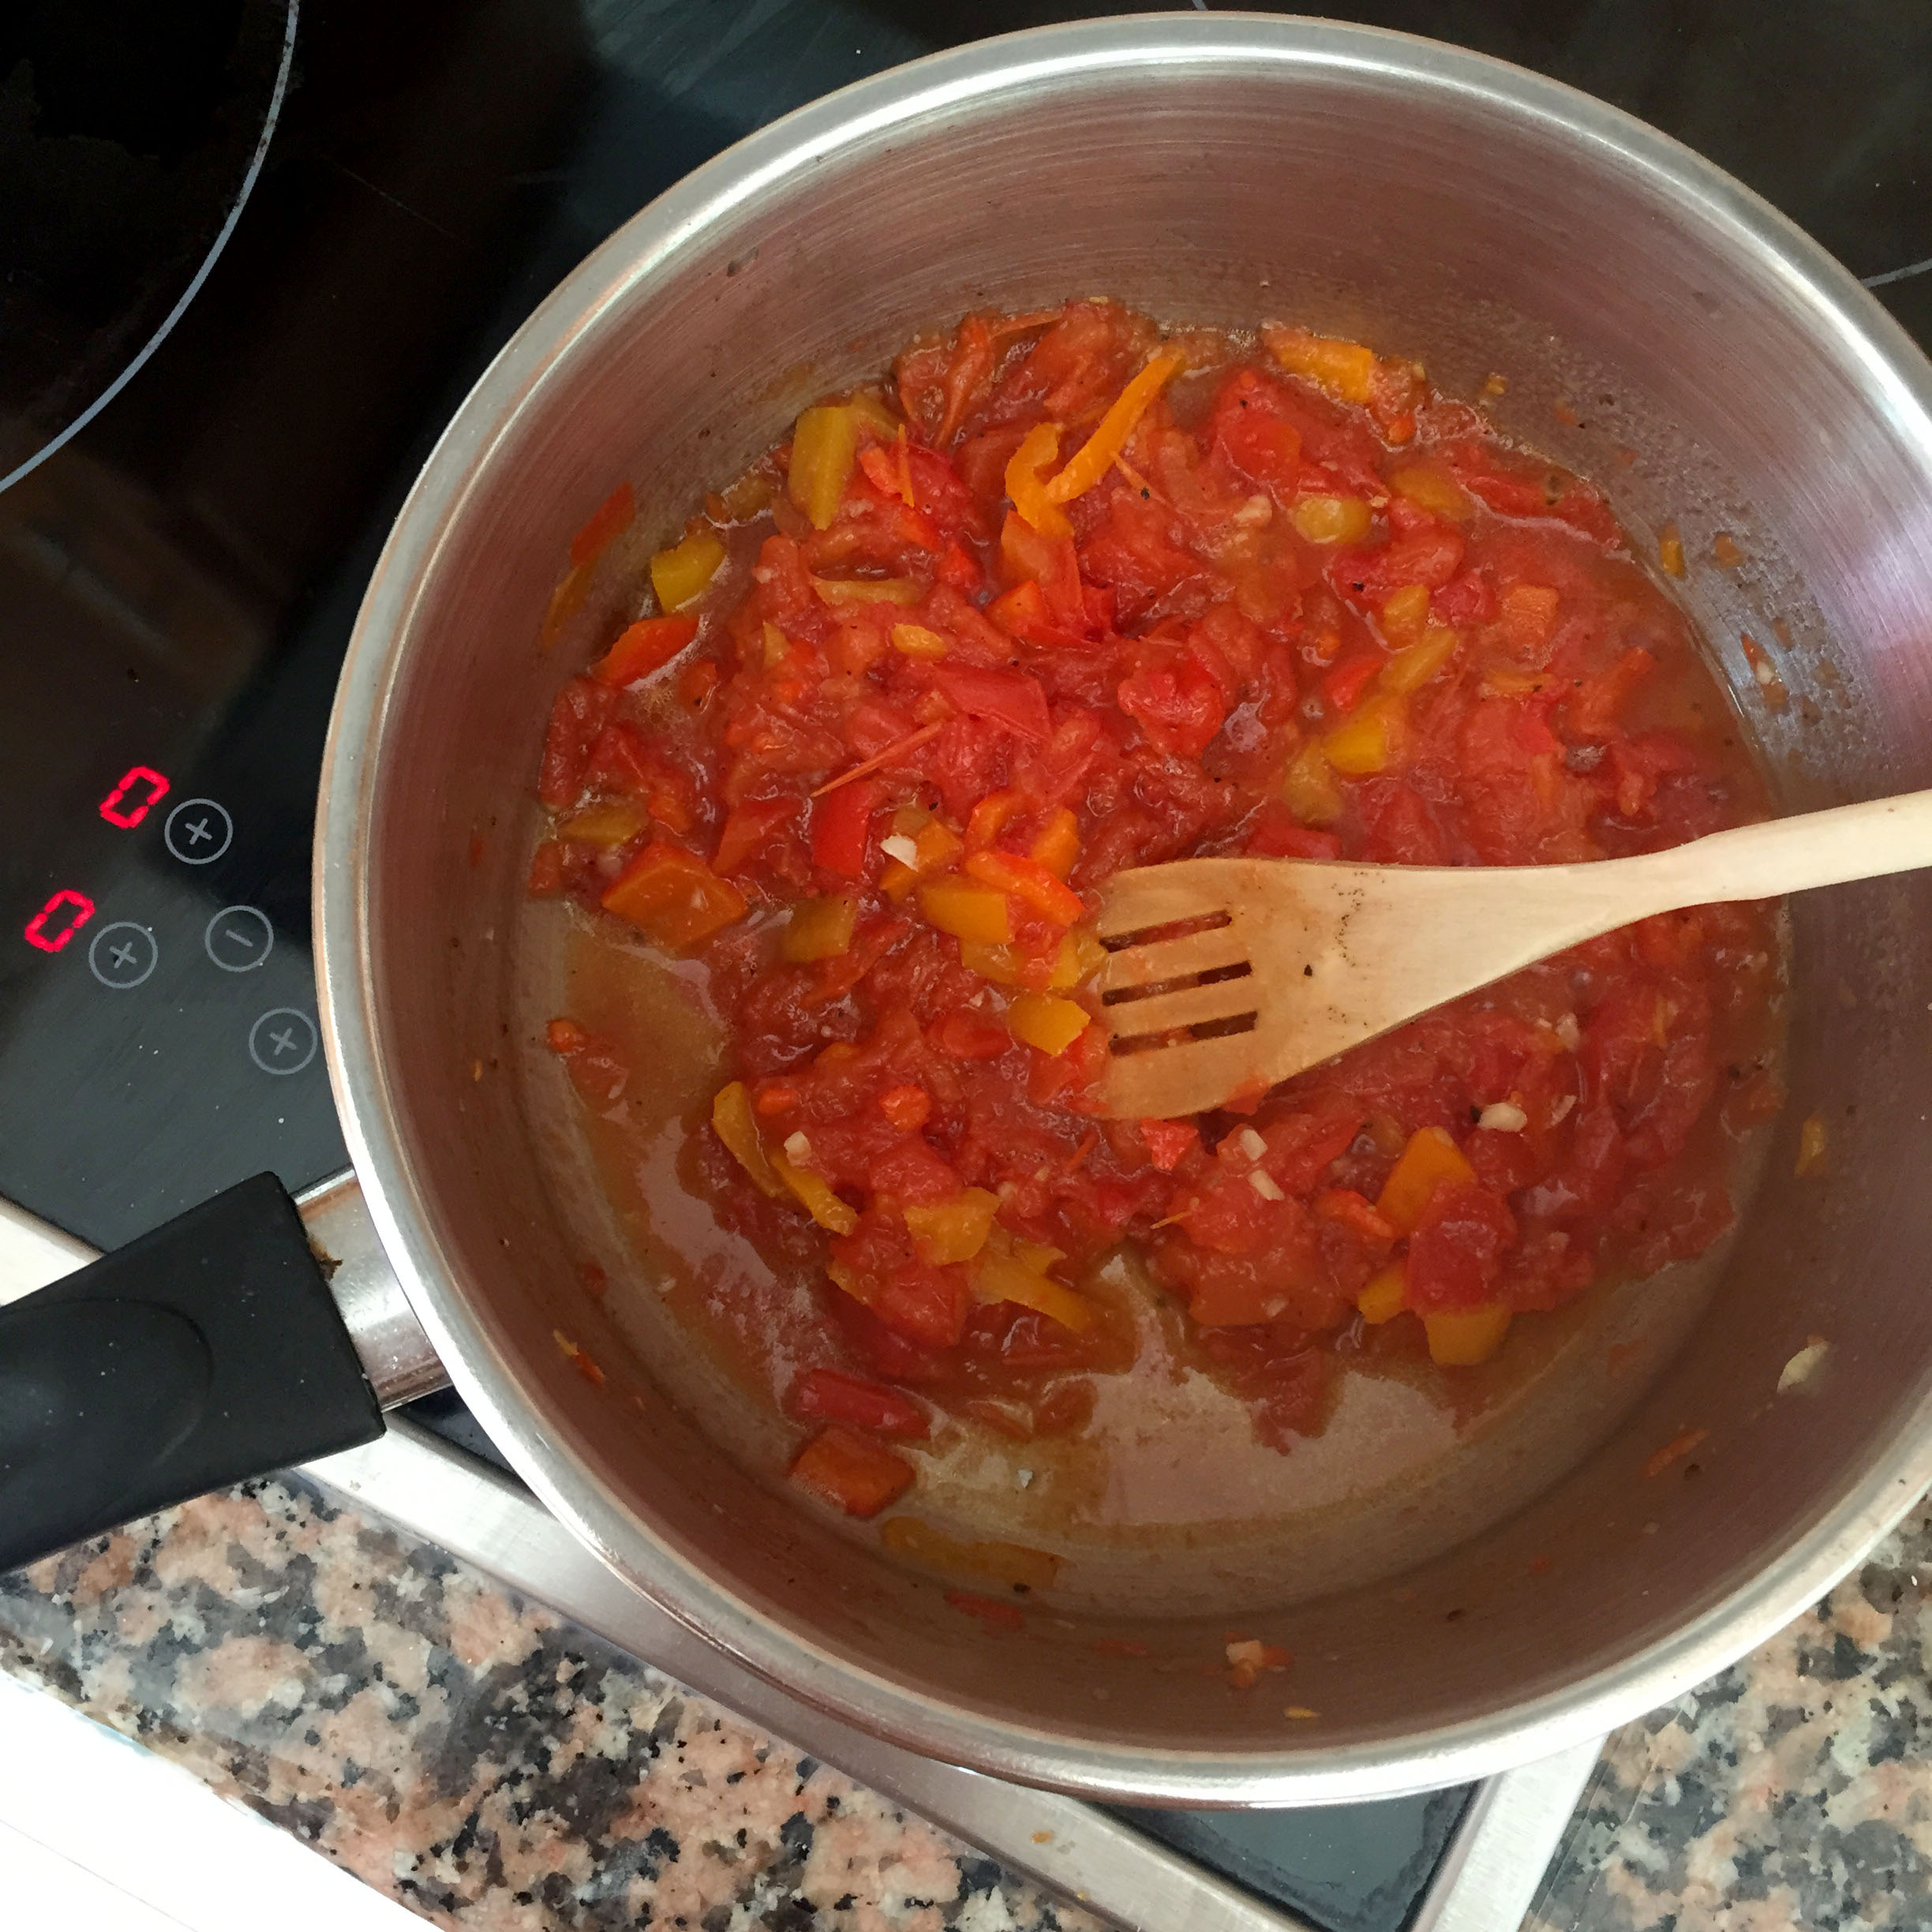
1. De-seed the tomatoes and finely chop along with the peppers and the red chilli. Add to a medium sized saucepan along with the garlic, salt, extra virgin olive oil and a good crack of pepper.
2. Give it a good mix, cover and cook on a low heat for 1hr. Once cooked, pour through a colander to drain off any excess liquid and leave to cool.
3. Once at room temperature, refrigerate for a minimum of 2 hours. Serve cold on Melba toast and topped with crumbled feta. Keep refrigerated and use within 5 days.


1

My best mate Philippa stuffing one in her mouth

If you’ve had a go at making any of my recipes, I’d love to hear from you. Follow me now @corrieheale and tag your recipe pictures using #corriesrabbitfood.


V– Vegetarian


HEAT COOKS THE BOOKS: Natasha corrett’s cauliflower & coconut tart

Feeling totes bloats after a week of excessive boozing, we thought this was the ideal time to try something from Natasha Corrett’s Honestly Healthy Cleanse book. This tart is gluten- and wheat- free, as the base is made of blitzed cauliflower. Clever, eh? And if you don’t have time to trek up the Himalayas for salt, feel free to use your normal stuff (just don’t tell anyone, OK?). So, is this healthy base going to be tastier than buttery pastry? Let’s find out…

REVS Food


Cauliflower & coconut tart
Serves 8
2 eggs
160ml coconut cream
1/4 tsp Himalayan pink salt
30g kale
juice of 1/2 lemon
1/2 courgette
sliced into ribbons
For the tart case:
300g cauliflower
broken into florets
75g ground almonds
3 good gratings of nutmeg,
finely grated zest of 1/2 lemon
a pinch of Himalayan pink salt
1 egg


1 Preheat the oven to 170°C/gas mark 3,
and line a 23cm tart tin with baking parchment.
2 First make the tart case. Put the cauliflower florets in a food processor or blender, and blitz until they look a bit like rice. Alternatively, chop them by hand as finely as possible. Transfer to a bowl and add the ground almonds, nutmeg, lemon zest, salt and the egg. Mix together until a dough forms.
3 Press this mixture into the prepared tart tin, taking up the sides, too, then bake in the preheated oven for 15 minutes.
4 Meanwhile, massage the kale with the lemon juice until it wilts. Set aside.
5 To make the filling, beat together the eggs, coconut cream and salt until smooth and evenly mixed.
6 Once the tart case is out of the oven, arrange a layer of the kale in the bottom. Cover with the courgette ribbons, then pour the egg and coconut mixture on top.
7 Return to the oven for 20 minutes until it’s cooked through.

Heat’s Verdict:
Not knowing what a shortcake was, we decided to triple the ingredient amounts. We also covered it in 450ml of double cream, which is nine times the amount specified. WE LIKE CREAM, OK? We didn’t manage to get a good rise, either, most likely because we didn’t beat the mixture enough, so cutting our flat shortcake lengthways was challenging. But,once assembled, it looked great and tasted even better.

HEAT COOKS THE BOOKS: Natasha Corrett's Cauliflower & Coconut Tart
HEAT COOKS THE BOOKS: Natasha Corrett’s Cauliflower & Coconut Tart

If you fancy trying this or any other of Natasha’s recipes, then why not treat yourself to her book Honestly Healthy Cleanse by Natasha Corrett.


Also, if you have a taste for the good, the bad and the unmissable, check out the brand spanking new heat magazine.

Cashew rainbow slaw

Cashew Rainbow Slaw
Cashew Rainbow Slaw

Hey guess what? I went on holiday to a magical land called Bath. I climbed some trees, ate some fudge, saw a life sized sculpture of a minotaur (horrible), met a herd of unfriendly sheep, went to Jane Austin’s house, snuck into some old churches and dressed like a Victorian milk maid. So, pretty standard holiday but I’m sorry if you feel neglected my dears. I’m back now so you can dry those weeping eyes – sorry for my use of the word ‘weeping’, it was unnecessary. Please click here for your apology present that has nothing whatsoever to do with anything.

Anyway, let’s move swiftly on to the all mighty SLAW! Over the past few months, I’ve indulged in my fair share of coleslaw, but now barbecue season is over and I’ve been left a little traumatised. Coleslaw is certainly something I enjoy eating but not watching other people eat. Perhaps I’ve just seen one too many grannies with coleslaw gathered in the corners of their crinkly old mouths, but I crave something a little fresher and less mayonnaise-y. So, lucky for us, I came up with this recipe. It’s a nod to the humble coleslaw but the toasted cashews and ginger give it a warmer and slightly more Autumnal feel than the wet sloppy white stuff. Enjoy!


Cashew rainbow slaw
Serves 4 as a side / Hands on time 20 mins / Total time 20 mins /  V Vn Gf Df 
You’ll need: A large non-stick frying pan
200g toasted cashew nuts
½ small red cabbage
2 carrots, peeled and grated
1 red pepper, de-seeded and diced
Handful fresh coriander, chopped
1 garlic clove, crushed
Knob ginger, grated
1 tbs cider vinegar
1 tbs sesame oil
1 tbs runny honey
1 tsp Dijon mustard
1 lime, juiced
½ tsp chilli flakes
½ tsp sea salt flakes


Method
1. Start by putting a large non-stick saucepan over a medium to high heat. Once hot, toast the cashews for a few minutes keeping them moving in the pan until they’re golden. Put to one side.
2. Thinly slice the cabbage , dice the pepper, grate the carrot and chop the coriander. Add them to a large bowl along with the cooled cashews. Stir until combined well.
3. To make the dressing add the grated ginger and the crushed garlic to a small bowl.  Mix in the sesame oil, cider vinegar, honey, dijon mustard, lime juice, chilli flakes and salt.
4. Pour the dressing over the slaw, mix well and serve.

Cashew Rainbow Slaw
Cashew Rainbow Slaw
Minotaur (in case you don't know what one looks like... horrible!)
Minotaur (in case you don’t know what one looks like… horrible!)

If you’ve had a go at making any of my recipes, I’d love to hear from you. Follow me now @corrieheale and tag your recipe pictures using #corriesrabbitfood.


V– Vegetarian    Vn– Vegan    Gf – Gluten free.    Df – Dairy free.


HEAT COOKS THE BOOKS: Frances Quinn’s strawberry shortcake

Hello my foodie chums, sorry I’ve been a little quiet of late but I have an announcement to make… My fellow blogger and work colleague Anna and I have just been made THE NEW FOOD EDITORS OF HEAT MAGAZINE! Whoop whoop! Every week, we’ll be trying and testing recipes for your reading and cooking pleasure. Now, not all recipes will be vegetarian but rest assured that the ones that are, I will share with you dear readers on this very blog. Fortunately the first one we published was vegetarian so ENJOY!

851 REVS Food


Remember Frances Quinn who won the Bake Off in 2013? Well, she’s only written a book full of ingenious cake creations. Go, Frances! Admittedly, it may be for the more advanced baker, but undeterred, we donned our aprons and had a go at the easist recipe we could find. Now don’t forget, cakes can smell fear…


Strawberry Shortcake
Makes one 10cm cake
(serves 2–3)
Cake: 50g softened butter, 50g caster sugar,
1 egg, 1tsp vanilla extract, 50g self-raising flour,
1tsp warm water
To decorate: 50g strawberry jam, 50ml double cream, 1/2 tbsp icing sugar, few drops vanilla extract, 9 shortcake biscuits, 1 med & 2 small strawberries, 1tsp freeze-dried strawberry pieces


1. Heat the oven to 180°C/160°C fan/gas 4. Beat the butter and sugar together until pale and creamy. Lightly beat the egg with the vanilla extract. Gradually add the egg to the butter and sugar, beating well after each addition. Sift in the flour and fold in until just combined, then add the warm water. Scrape the mixture into the tin and level with a spatula.
2. Bake for 20–25 minutes. Leave to cool in the tin for ten mins before transferring to a rack to cool completely.
3. Slice the cake horizontally into two equal pieces.
4.Place the bottom piece on a cake board. Spread a few teaspoons of jam over the cut surface. Place the other cake layer on top. Put the cream in a bowl with the icing sugar and vanilla extract, and whip until it holds medium peaks. Spoon the cream on top of the cake and smooth with a palette knife.
5. Spread jam over the back of each biscuit to act as “glue” and press the biscuits around the side of the cake. Leave a few millimetres between each one to make it easier to cut the cake into even slices.
6. Decorate the top of the cake with the three strawberries, placing the larger one in the centre and the smaller two alongside, slightly off-centre. Scatter the freeze-dried strawberry pieces over the top.


Heat’s Verdict…
Not knowing what a shortcake was, we decided to triple the ingredient amounts. We also covered it in 450ml of double cream, which is nine times the amount specified. WE LIKE CREAM, OK? We didn’t manage to get a good rise, either, most likely because we didn’t beat the mixture enough,so cutting our flat shortcake lengthways was challenging. But,once assembled, it looked great and tasted even better.

HEAT COOKS THE BOOKS: Frances Quinn's Strawberry Shortcake
HEAT COOKS THE BOOKS: Frances Quinn’s Strawberry Shortcake

If you fancy trying this or any other of Frances’s recipes, then why not treat yourself to her book Quinntessential Baking by Frances Quinn.


Also, if  you have a taste for the good, the bad and the unmissable, check out the brand spanking new heat magazine.

Smoky tomato & chickpea soup

IMG_5602


I couldn’t be bothered to leave the house yesterday, so decided to invent a soup out of the bits I already had in the fridge. This is what happened…

“Oh, I only have half an onion… Why do I have so many cans of butter beans? I don’t even like butter beans!… Oh wait, I have chick peas, yes! I swear I had some cumin?! No? REALLY?! Shit!… Oh wait, smoked paprika, that could be interesting… Maybe with some sweet potato?… No wait, they’re Isabelle’s… Half a bag of spinach could work though with some tinned tomatoes maybe? Yes, a smoky tomato chickpea broth… Hope I have some cheese… YES! Right, sorted, lets do it…


Smoky tomato & chickpea soup
Serves 2 / Hands on time 15 mins / Total time 35 mins / V Vn Gf* Df 
1 tsp rapeseed oil
½ an onion, finely chopped
2 garlic cloves, peeled and finely chopped
1 tbs tomato purée
1 can chopped tomatoes
1 can chick peas, drained and rinsed
½ tsp smoked paprika
500ml vegetable stock*, I use Knorr
100g spinach
Handful grated vegetarian cheese to serve (optional)
Extra virgin olive oil to serve


Method
1. In a medium sized saucepan, sweat the onions and garlic together in the oil over a medium heat. Put the lid on and allow to sweat for 10 mins.
2. Add the tomato puree, smoked paprika and cook for a further 2 mins before adding the tinned tomatoes and seasoning well with salt and pepper. Give it at good stir, add the stock and bring to the boil before reducing down and simmering for 15 mins
3. Add the drained chickpeas with the spinach and cook for a further 5 mins.
4. Serve topped with a good drizzle of extra virgin olive oil and sprinkling of cheese (optional).

IMG_5601


If you’ve had a go at making any of my recipes, I’d love to hear from you. Follow me now @corrieheale and tag your recipe pictures using #corriesrabbitfood.


V– Vegetarian    Vn– Vegans forgo the cheese    Df– Make dairy free by leaving out the cheese
Gf– I use Knorr vegetable stock pots because they are gluten free but other stock pots/cubes may not be. Always check the label.
❄ Suitable for home freezing once cooled. Consume within 3 months.


Big brunch bruschetta

1


When I was sixteen, I was sacked from McDonald’s. It was a rather unceremonious sacking, but remarkably, landed me my next job making coffee in a local coffee shop. I say ‘coffee shop’ but it was more of an American Diner serving real American milkshakes and Reese’s Pieces cheesecakes. It was the most exciting thing to have happened to Letchworth Garden City, like ever. Admittedly that wasn’t hard – Letchworth was, and still is where people go to die. Anyway, that’s why Caffeine was such a breath of fresh air in that stale, powdery old town. The council got rid of Caffeine eventually of course (bastards) but I still miss it, even after all these years.

Anyway, we used to make this gorgeous bruschetta which, to be fair, wasn’t anything like any Italian bruschetta I’d ever had. It’s the US version, so naturally it’s three times the size and covered in cheese, but it’s SO GOOD! This wasn’t just my favourite, it was my dad’s too. He used to come in and order it alongside a small cappuccino that he would nurse for at least 2 hours. Good times… Feel a bit sad now. Enjoy!


Big brunch bruschetta 
Serves 2 / hands on time 20 mins / total time 30 min / V 
250g mixed ripe tomatoes
1 garlic clove, peeled
Handful of fresh basil
1 ripe avocado, sliced
1 ball vegetarian mozzarella
2 thick slices of bread (I recommend, sourdough)
1-2 tbs balsamic vinegar
Extra virgin olive oil


Method
1. Preheat your oven to 220°C/200°C fan/425°F/gas mark 7.
2. Start by halving the tomatoes and scooping  out the seeds (if using cherry tomatoes there is no need to scoop out the seeds). Slice into strips (again, not if you’re using cherry tomatoes) and put in a bowl along with a good crack of pepper and salt. Add a handful of chopped basil along with 1-2 tbs of balsamic vinegar (if using good quality balsamic vinegar, use just 1 tbs as it is stronger than regular supermarket balsamic). Drizzle with extra virgin olive oil and put to one side.
3. Lightly toast the bread in a toaster before rubbing the surface of each slice with a raw, peeled garlic clove. Top with sliced avocado and thinly sliced mozzarella. Season with salt and pepper, place on a baking tray before cooking in the oven for 10 minutes.
4. Once the cheese has melted, finish the slices under the grill to allow the cheese to go nice and brown (optional). Slide onto plates and top with the balsamic tomatoes. Serve with an extra dash of balsamic vinegar and a drizzle of extra virgin olive oil.

1


If you’ve had a go at making any of my recipes, I’d love to hear from you. Follow me now @corrieheale and tag your recipe pictures using #corriesrabbitfood.


V– Vegetarian


Homemade Hobnobs

5


Shall we have some more treats? Yes, I think we should. I only have a wedding in two weeks that I need to lose at least four stone for but that should be fine. Worst comes to the worst, I can always chop my leg off, a leg surely must weigh about 4 stone. Maybe I shouldn’t have made biscuits after all but it’s too late for that – I’ve already eaten five.
I actually learnt to make these oaty biscuits at school but haven’t made them for about ten years, I stumbled across the recipe the other day. I managed to make them out of ingredients I found in the back of my cupboard. This has literally never happened to me before and probably never will again, I never have everything I need to make anything in this life.
Anyway, I love these biscuits because they’re short and buttery but not too sweet. If you have a sweet tooth though, feel free to dip them in melted chocolate for a more indulgent biscuit… Kind of wish I’d done that now. Enjoy!


Homemade Hobnobs (oat biscuits)
Makes 12-14 biscuits / Hands on time 20 mins / Total time 30 mins / V
You’ll need:
Baking paper, rolling pin, biscuit cutter or anything else use can use (I use a mug)
100g softened unsalted butter
100g demerara sugar
50g plain flour
160g rolled oats
½ tsp bicarbonate of soda
2 egg yolks
Pinch of sea salt flakes


Method
1. Preheat an oven to 180°C/160°C fan/ 350°F/gas mark 4. Line 2 baking trays with baking paper and put to one side.
2. Cream the butter and sugar together and beat in the egg yolks. Add all the dry ingredients and mix well.
3. Turn the mixture out onto a large piece of baking paper. Dust a rolling pin with flour and roll out the mixture to around half a centimetre. Cut the biscuits out with your chosen cutter and place on a lined baking tray. Once you’ve cut out all the biscuits, gather up the mixture and roll out again and cut out more biscuits. Sprinkle each biscuit with a pinch of Demerara sugar and bake in the oven for 10-12 mins.
4. Cool for 5 mins on the trays before transferring the biscuits to a cooling rack. Enjoy with a nice cup of tea.


5


If you’ve had a go at making any of my recipes, I’d love to hear from you. Follow me now @corrieheale and tag your recipe pictures using #corriesrabbitfood.


V– Vegetarian  – The biscuits are suitable for home freezing. Wrap individually in clingfilm and freeze for up to 3 months. Defrost fully before consuming.

Jamie’s chocolate nutty bites

1


Sorry I’ve been a little neglectful food chums, I’ve been on holiday… Okay so I haven’t been on holiday but I’ve been extremely busy sunning myself in pub beer gardens with my boyfriend. Yes I now have a boyfriend, and yes he is real, and yes he is called Jamie, and yes he plays the harmonica. Now enough with your incessant questions!

Anyway, now the weather’s decided to be a bum-hole, I thought I’d cheer us all up with something lovely and chocolatey – like these chocolate bites Jamie made me a few weeks ago. I loved them so much, I decided to try and pass them off as my own at my friend Rosie’s baby shower. Good job I did, as without them I would have turned up completely empty handed. I know this sounds stupid but I didn’t know you were supposed to bring gifts to a baby shower. I’ve seen enough American TV to know better but thankfully I was able to hide behind the chocolate until I could redeem myself with a trip to Kath Kidson the following week. Phew!


Jamie’s chocolate nutty bites
Makes 1 slab / Hands on time 20 mins/ Total time 20 mins + 2 hours to chill / V Gf
You’ll need: Electric Hand whisk, 18-20cm round flan or cake tin
300g Green & Black’s Organic 70% Dark Chocolate 
3 egg whites
3 tbs runny honey
200g ground almonds
50g hazelnuts
100g walnuts
200g icing sugar


Method
1. Line a flan or cake tin with cling film. Melt the dark chocolate in a large heatproof bowl over a pan of simmering water.
2. In medium bowl, separate the whites and discard the yolks and whisk with an electric whisk for 2 mins – you just want to break them up rather than whisk them to a peak. Add the honey and whisk once more to incorporate.
3. Fold in the ground almonds with a large metal spoon and mix to a paste. Fold in the nuts,  stir in the icing sugar before very gently folding in the melted chocolate.
4. Pour the mixture into the tin, fold the cling film over the mixture and press everything down until smooth. Refrigerate for a minimum of 2 hrs.
5. Remove the clingfilm and slice into bite sized chunks. Sprinkle with icing sugar and serve with a cup of tea. 
1


If you’ve had a go at making any of my recipes, I’d love to hear from you. Follow me now @corrieheale and tag your recipe pictures using #corriesrabbitfood.


V– Vegetarian    GfGreen & Black’s Organic 70% dark chocolate is gluten free but some other brands may not be. Always check the label.


Mum’s warm rice salad

1


Since when did I become poor and obese? Okay so maybe I’m not obese but my body has sneakily put on 5lbs behind my back, RUDE! So, as I can’t afford to buy nice new fat clothes, my only option is to go on a diet… Sigh. It’s not like I sit around all day squirting cream into my mouth but I have perhaps been overindulging a tad more than usual. Unfortunately, this means that we shan’t be dining on butternut squash gnocchi with brown butter this week my little blogging chums. Instead, we have a low fat, poor man’s menu starting with my mum’s rice salad…

… Oh stop crying, it’s for your own good!


Mum’s warm rice salad
Serves 6 / Hands on time 25 mins / Total on time 25 mins / V Vn Df
1 tsp rapeseed oil
1 cup of brown basmati rice
100g toasted cashews
1 small red onion, peeled and diced
4 sticks of celery, chopped
1 red pepper, de-seeded and diced
12 cherry tomatoes, halved
3 handfuls baby spinach
1 lemon, juice and zest
1 tbs extra virgin olive oil
4 tbs soy sauce
1 avocado, peeled and chopped


Method
1. Put one cup of rice in a saucepan and follow the packet instructions.
2. Place a large non-stick saucepan over a medium to high heat. Once hot, toast the cashews for a few minutes keeping them moving in the pan until they’re golden. Pour into a bowl, put to one side and add 1 tsp of oil into the pan. Over a medium heat fry the chopped onions for 10 mins until soft, stirring occasionally.
3. Meanwhile, chop the celery, red pepper and half the cherry tomatoes, put to one side. In a small bowl, make the dressing by combing the zest and juice of the lemon along with the extra virgin olive oil and the soy sauce.
4. Once the rice is cooked, allow to cool for a few minutes, use this time to peel and chop the avocado. Transfer the warm rice to a large bowl along with the onions. Add the raw vegetables and including the spinach and pour over the dressing. Mix and serve immediately.

1


If you’ve had a go at making any of my recipes, I’d love to hear from you. Follow me now @corrieheale and tag your recipe pictures using #corriesrabbitfood.


V– Vegetarian    Vn– Vegan    Df– Dairy free.


Green minestrone

Green Minestrone

new


Poor and fat week is coming to a close my follower chums but fear not, here’s one more jolly slimming and jolly cheap recipe to send you on your way… I would write more but I’m tired and can’t be bothered.


Green minestrone
Serves 6 / Hands on time 30 mins / Total time 40 mins / V Vn 
1 tsp rapeseed oil
1 medium white onion, finely chopped
2 medium carrots, peeled and chopped
3 celery sticks, finely chopped
8 leaves of savoy cabbage or 2 handfuls or kale, roughly chopped
1 leek, roughly chopped
¼ tsp salt
1.5 litres vegetable stock, I use 2 Knorr stock pots
75g orzo pasta or bashed pasta
30g fresh basil
2 garlic cloves, roughly chopped
Vegetarian Italian hard cheese or Parmesan* grated to serve (optional)
Drizzle of extra virgin olive oil to serve
Bread to serve (optional)


Method
1. In a large, saucepan of heavy bottomed pot, sweat the chopped onion, leek, carrot, celery and 1/4 tsp of salt in the oil along with a dash of water over a medium heat for 20 minutes until soft.
2. Add the stock, season with pepper and bring to the boil. Once boiling turn the heat down and simmer for 15 mins. Add the pasta and continue to cook for 10 mins.
3. Meanwhile, in a mini blender or food processor, blitz the fresh basil, chopped garlic and 8 tablespoons of the vegetable soup water together until you have a watery green liquid. Add this to the soup and give it a good stir. Finally add the cabbage or kale and cook for a further 5 minutes.
4. Ladle into bowls, sprinkle with cheese (optional) and finish with a drizzle of extra virgin olive oil. Serve with bread and butter.

Green Minestrone
Green Minestrone

If you’ve had a go at making any of my recipes, I’d love to hear from you. Follow me now @corrieheale and tag your recipe pictures using #corriesrabbitfood.


 V– Vegetarian     Vn – Vegans forgo the cheese
* Parmesan (Parmigiano Reggiani) is always made using animal rennet, therefore it is not vegetarian. Substitute for Italian hard cheese if applicable.
 The soup is suitable for home freezing once cooled. Consume within 3 months.